Since I love puzzles, I was delighted to see Lost Lands 9 has more of those challenging twists and turns, much like Lost Lands 8, to work through. We have a full guide to help you complete it below!
Lost Lands 9 Full Walkthrough Guide – Chapter 1 Part 1
The Lost Lands 9 is a unique story about a boy, Folly, who goes on an epic adventure, experimenting with a crystal creation and uncovering an ancient dungeon that could lead to the treasure.
This game is very long and filled with puzzles, so I have split it into multiple parts to help you work through it. We will add the pages to the following few parts right here, so check back soon.
Keep reading below to start working through Chapter 1, Part 1, all the way up to Folly’s sudden discovery!
Village
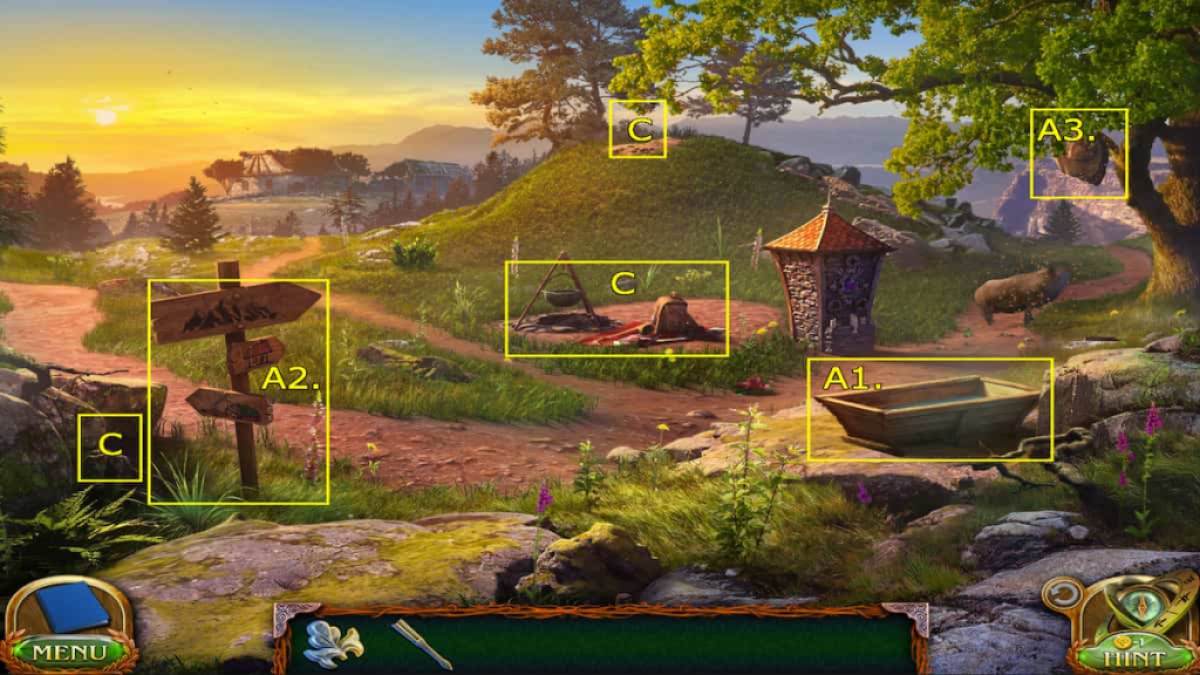
After a brief intro, you’ll start in the school yard where Folly wants to check out his shelter rather than go to school. Follow these steps to pick up all the items and use them as necessary to progress:
- A1. Water trough – Iron Flower
- A2. Sign post – Screwdriver Shaft and Stick
- A3. Bee hive
- (Collectible) Campsite – Manuscript Page 1/8
- (Collectible) Rocks behind Sign Post – Book 1/7
- (Morphing Object) Hill 1/45
Use the Stick in your Inventory to toss to the bee hive hanging in the tree on the right side of the screen, and this will distract the bees from the hive toward the hog, making the hog run away with them and giving you a free path onward. Click on the pathway to the right to continue to the canyon.
Canyon
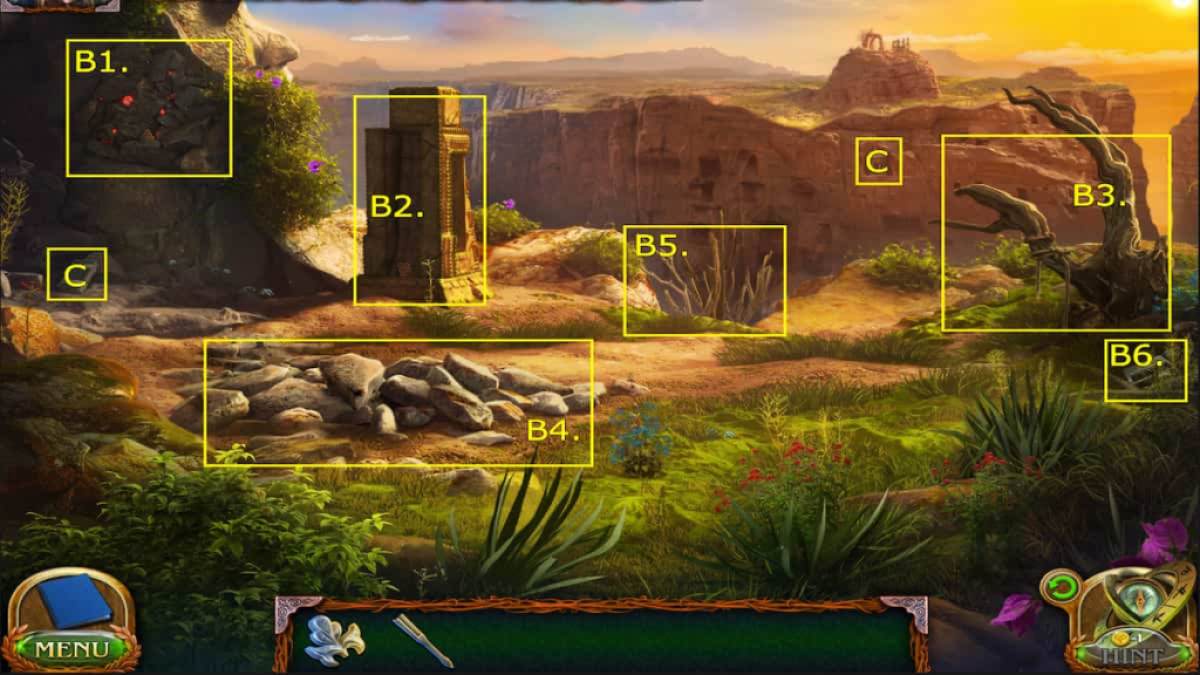
Folly continues down the path toward his shelter, but he’ll need to get his grappling equipment to descend down the canyons. Here’s where to find the pieces to the honeycomb chest and retrieve his equipment:
- B1. Cliffside vein – Wooden Honeycomb
- B2. Pillar – Wooden Honeycomb
- B3. Tree with broken rope – Wooden Honeycomb
- B4. Pile of rocks
- B5. Sticks – tear the sticks out of the way
- B6. Below the tree with broken rope – Ascender
- (Collectible) Cliffside – Book 2/7
- (Morphing Object) Ruins 2/45
Pressing on the Sticks on the cliff’s edge will break them off and automatically set them on the ground. Click on the pile of rocks and uncover a chest. This chest is where you’ll insert the missing Honeycomb pieces. Select the recovered pieces from your inventory and then press on the chest to automatically slot them.
How to unlock the Honeycomb chest
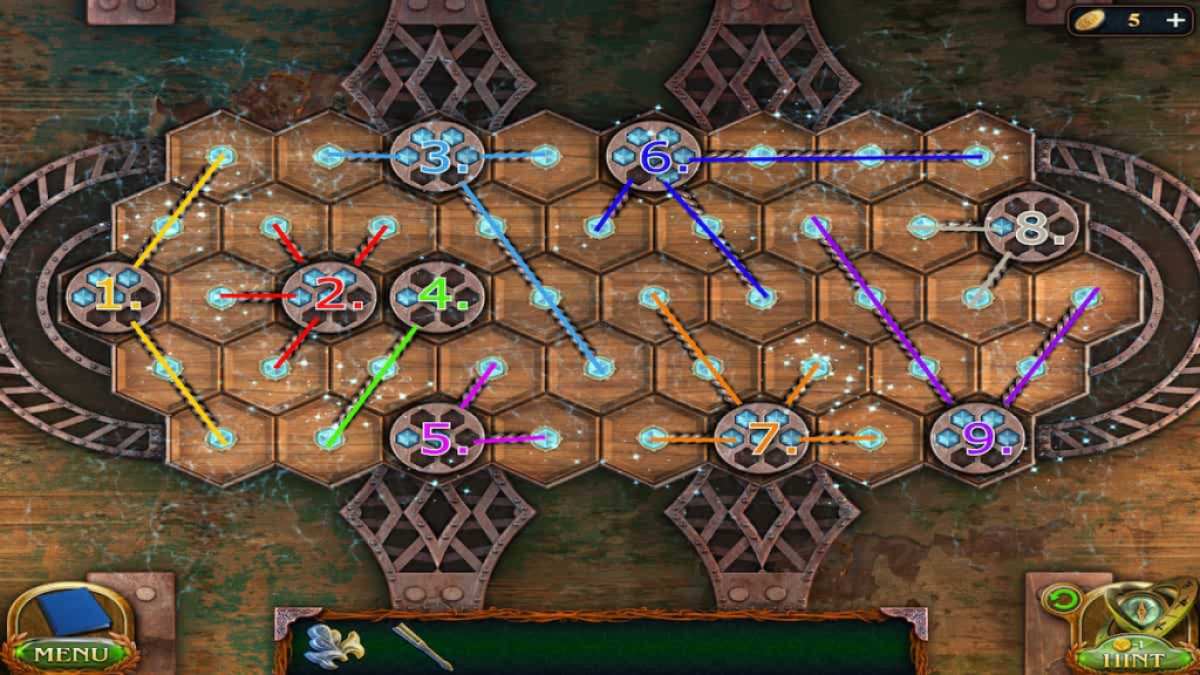
To fully unlock the chest, you’ll need to fill all the holes in the top using the little diamond chains within each lock. The number of diamonds shown in each lock equals the number of holes they can fill. Click on a lock to show available spaces you can place a diamond in, then click any of those holes to place a diamond. If the holes are in a row, you can click on the farthest one, and the chain will cross over all of them, slotting a diamond into each.
You must maneuver them around until a diamond is in each slot. (Keep in mind that there are random chest puzzles here, and yours might not be the same as mine.) You can use the picture above to help you place them like I did.
Once you open the chest, you can grab the Roll of rope and the Shelter Key. Then, select the tree with the broken rope on the right side and use the roll of rope to replace it. Now, you can select the rope, attach the Ascender to it, and propel down to the next area.
Shelter Entrance
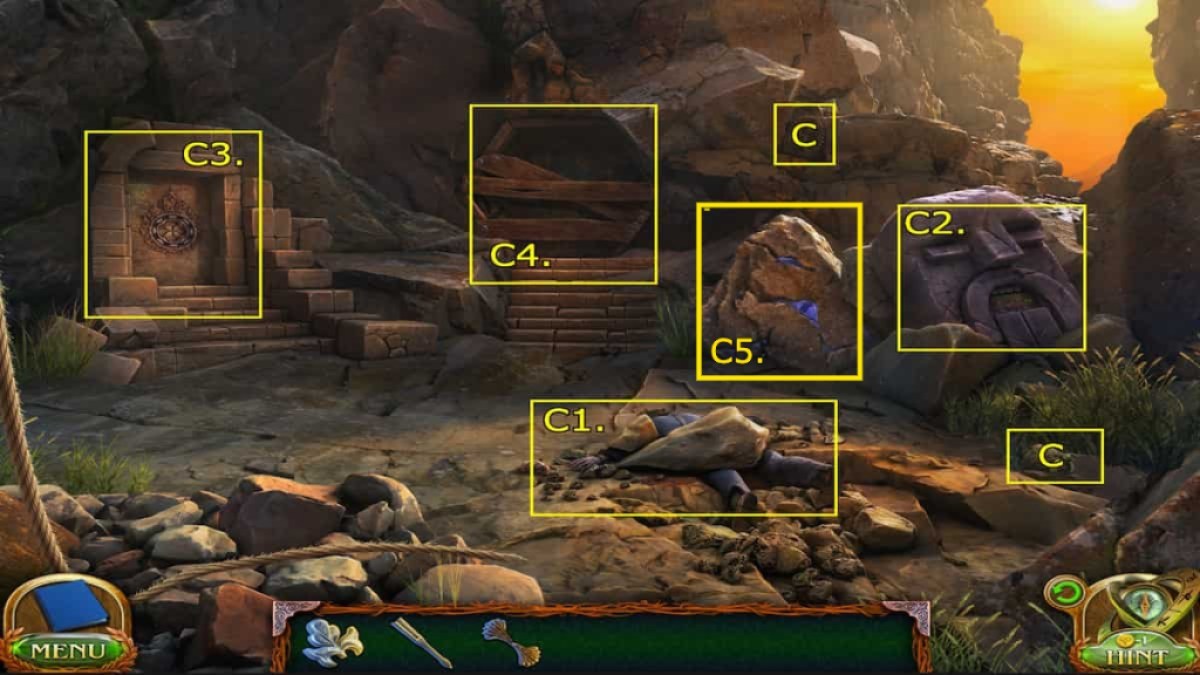
You’ve reached the entrance to the shelter below the canyons, but Folly’s missing the key to enter. Investigate this Fallen Traveler and figure out how to retrieve your key:
- C1. Fallen body – Traveler’s Key
- C2. Statue double-headed snake puzzle
- C3. Shelter door
- C4. Planks covering a drawing
- C5. Blue gem vein
- (Collectible) Rocks above the double-headed snake puzzle – Gear 1/8
- (Morphings Objects) In the grass below double-headed snake puzzle – 3/45
Once you retrieve the key from the body, look around at the surrounding area, make a note of the Shelter door and planks (which you can interact with later), and then start working on the double-headed snake puzzle.
How to solve the snake puzzle
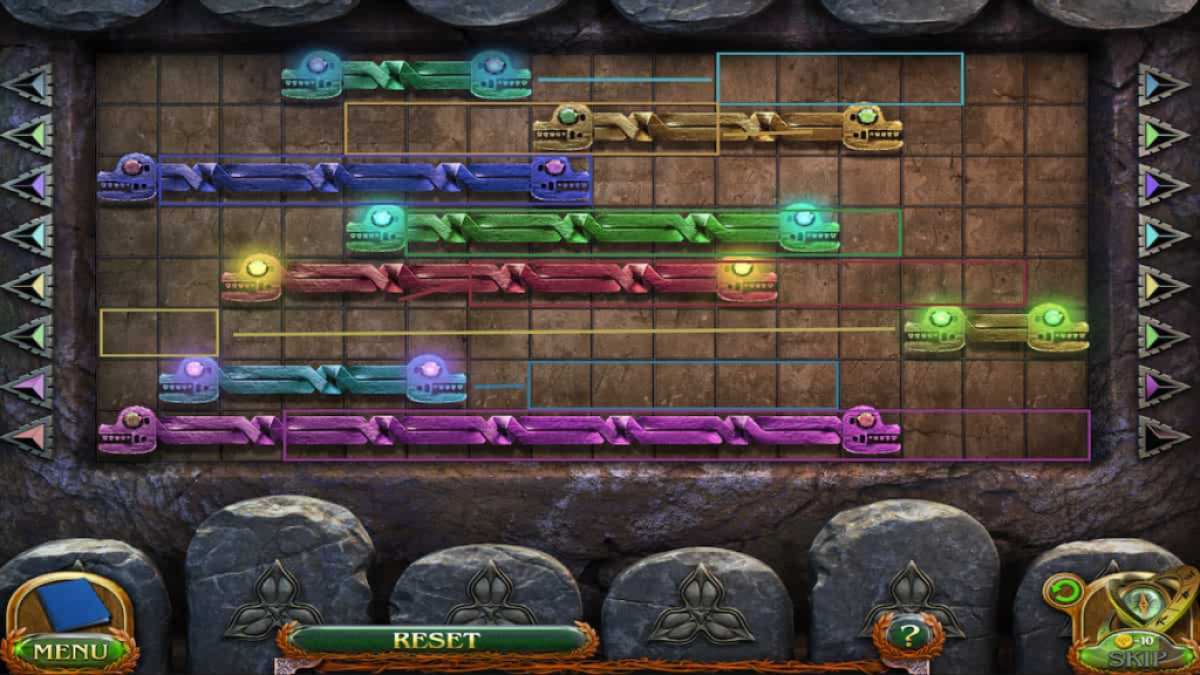
Just like the honeycomb chest, the double-headed snake puzzle will also be random for each person. The goal of this puzzle is to move the snakes left and right until each snake head is in its own column. If the head is not lined up with any other head, the eye will glow to let you know you have it right. Check out the picture of my puzzle ahead to see how to place them correctly.
Once you complete the puzzle, you can retrieve a note explaining the key to the shelter has now been moved, and you can collect the Screwdriver Handle. Click on the Screwdriver Handle in your inventory and combine it with the Screwdriver Shaft to create a functional Screwdriver. Now, press the green back arrow on the bottom right of the screen to return to the Village (starting area). Once there, press on the left pathway to move to the Schoolyard.
Schoolyard
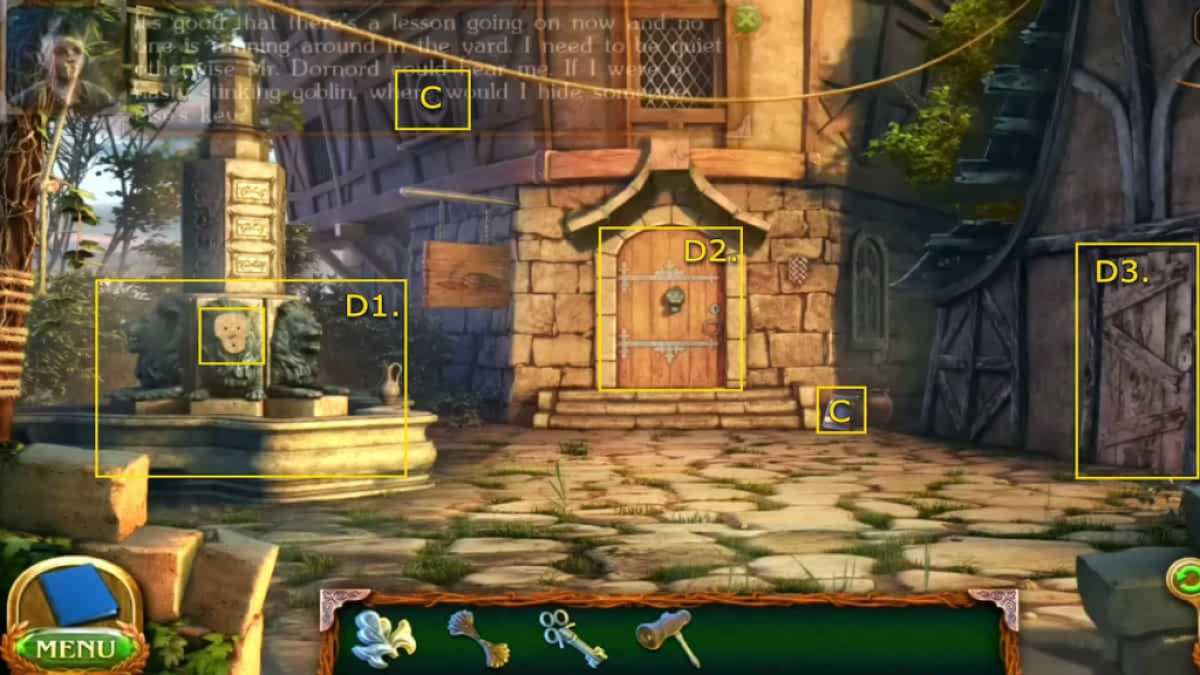
With the new information we just got from the letter in the double-headed snake puzzle and with the Traveler’s Key, we can head to the School Yard, where the Shelter Key could be hidden. Here’s what to do:
- D1. Lion fountain – Iron Flower
- D2. School door – Lion Mask
- D3. Barn door
- (Collectible) To the right of the school door – Book 3/7
- (Morphings Objects) School window 4/45
To get the Lion Mask off the school door, you’ll need to use your Screwdriver to pry it off. Select the Screwdriver from your Inventory, then click on the Lion Mask. Then, you can head to the lion fountain and put the mask on the statue. This will open up some pipes behind it, but the professor will first catch you. The Professor will give you the Barn Key and instruct you to fix the fountain. Use the Key to enter the barn.
School Barn
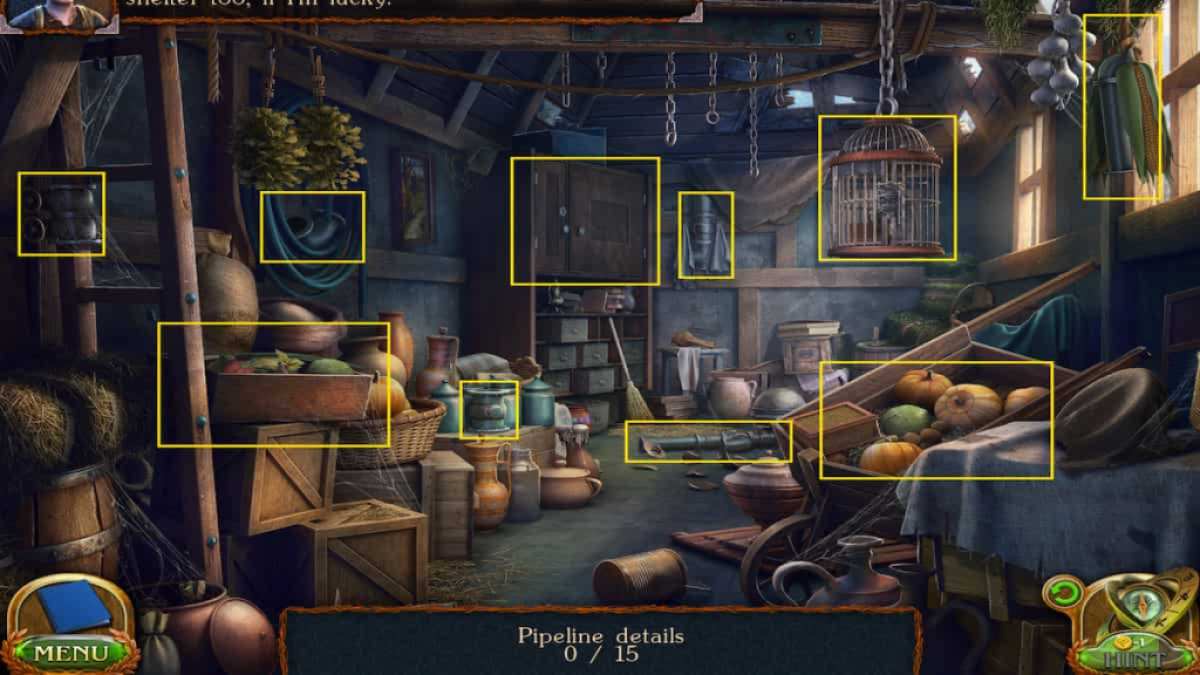
In the barn, you’ll need to find all the pipeline details hidden in the mess. There are 15 total, and here’s where to get all of them:
- Pipeline detail 1 – On the ladder on the left side of the screen
- Pipeline detail 2 – On the floor toward the back of the barn
- Pipeline detail 3 – On the hose hanging on the left wall
- Pipeline details 4 & 5 – Vegetable crates on the left side of the barn
- Pipeline details 6, 7, & 8 – In the locked cupboard in the left corner (The first one is on the shelf, and the second must be unlocked from the safe. Find the key in the lower right book stack, open the cabinet with the key, grab pipe in the lower shelf of the cabinet, and grab the crank from within. Now you can open the safe and grab the last pipe piece)
- Pipeline detail 9 – Hanging on the back wall slightly beneath cloth
- Pipeline details 10 & 11 – On hanging birdcage (First one is behind on blue cloth, second is inside the cage beneath the book )
- Pipeline detail 12 & 13 – Vegetable crate on the right side of the barn ( One directly to the right of the crate and the second inside the pumpkin at the top )
- Pipeline detail 14 – Hanging with the ear of corn on the window on the right side of the barn
- Pipeline detail 15 – On crate with pitchers on the left side of the barn
With all the pipeline details, you will return to the Schoolyard and can interact with the lion fountain. Select the pipelines you collected from the barn in your Inventory and then place them in the statue. This will automatically repair it. To retrieve the Shelter Key at the top of the fountain, you’ll need to complete the pipe puzzle.
How to solve the pipe puzzles
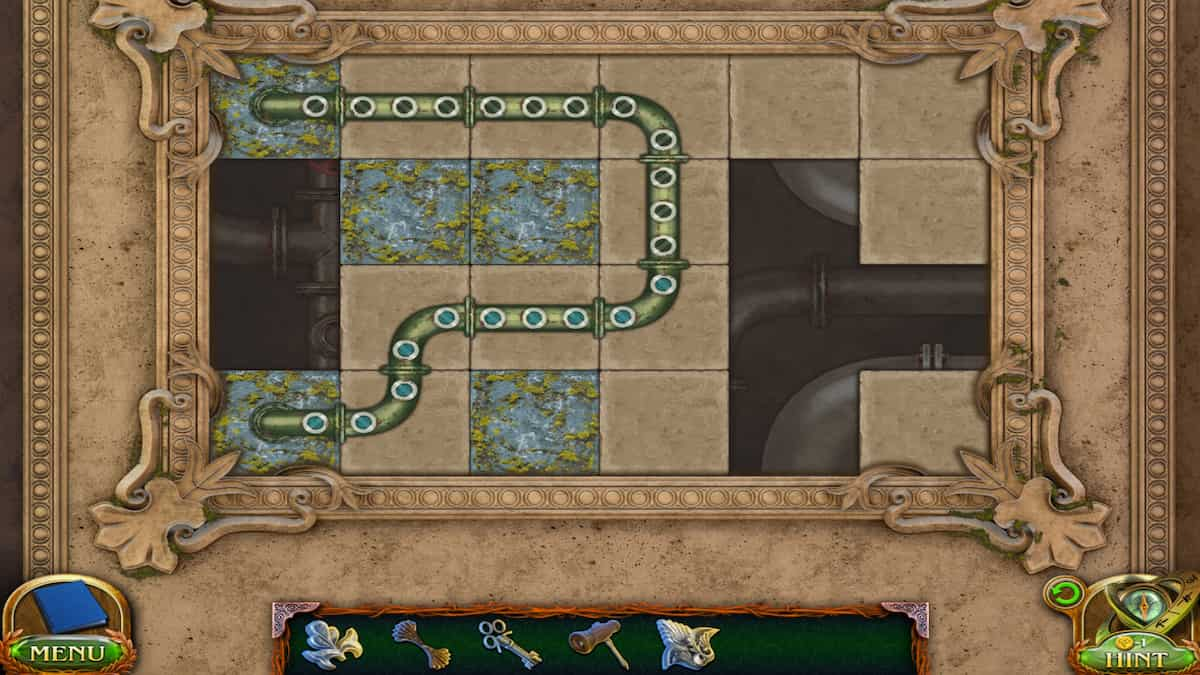
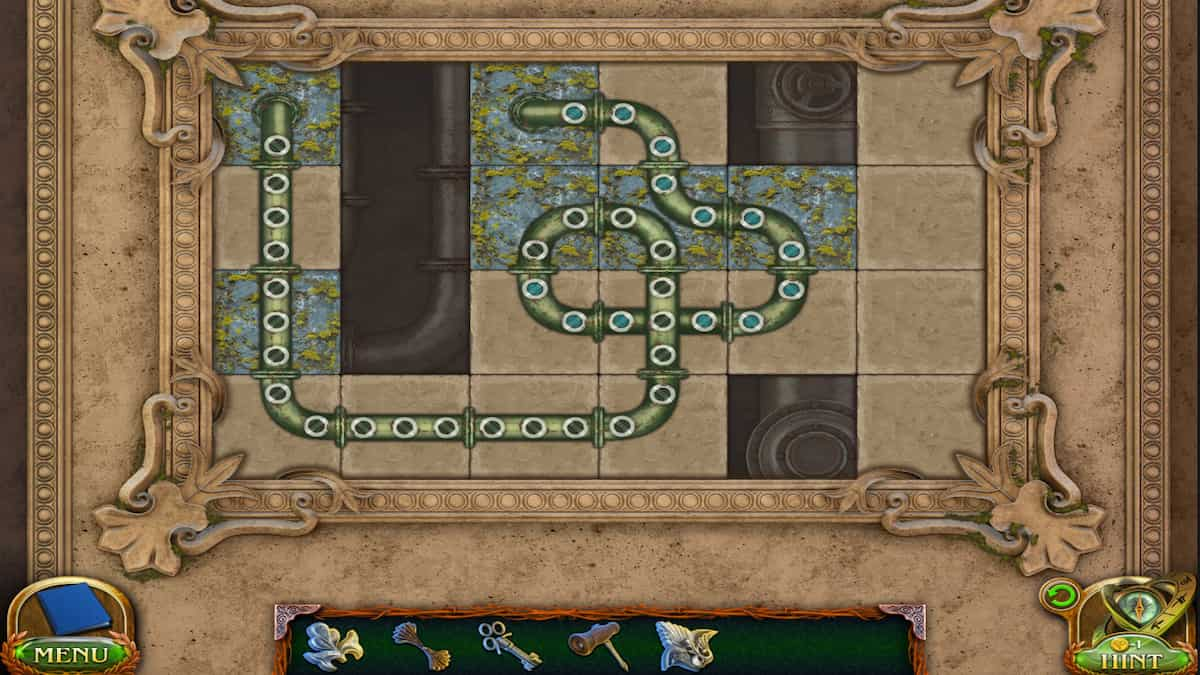
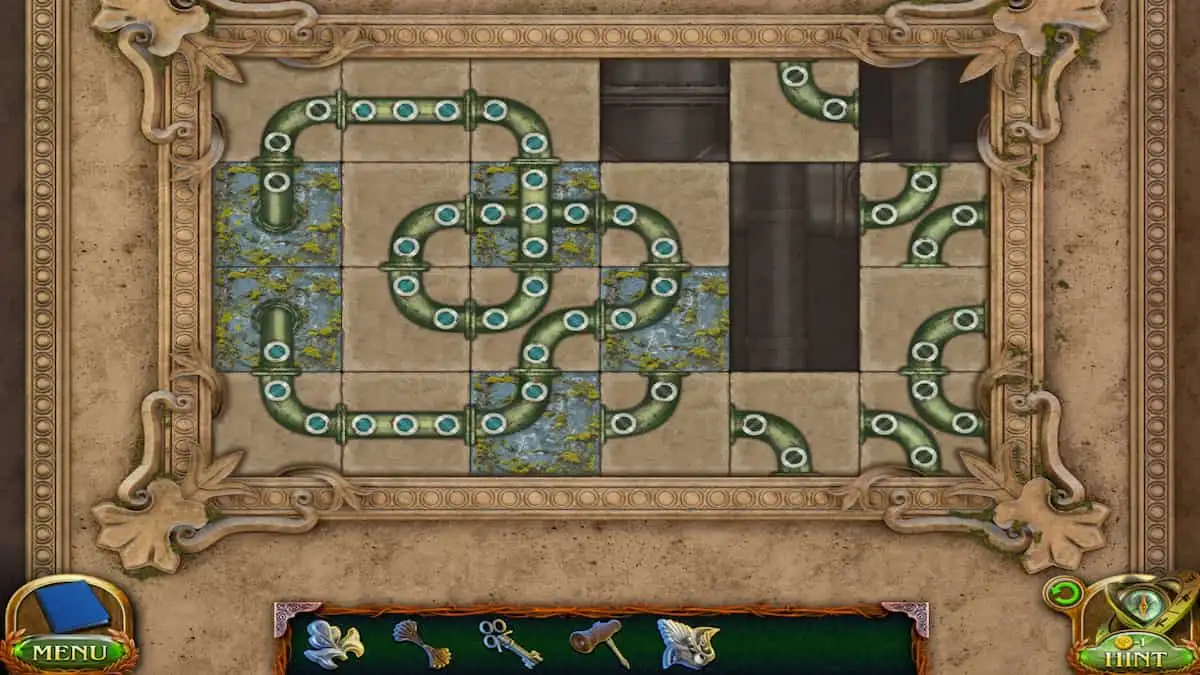
There are three total pipe puzzles on the statue, and they are just like regular sliding tile puzzles. Your goal is to connect all the fixed pipes together using your sliding pipes. Fixed pipes are the ones that you can’t slide on the mossy stone tiles. You’ll need to slide pieces around, moving them out of the way occasionally so you can slide the right pieces in. The puzzles will get more complicated as you go through them. Take a look at my three solved puzzles above!
Once you fix the fountain pipes, the Shelter Key will fall off the top of the fountain into the drain. Interact with the drain and use the Screwdriver to collect it from the drain. Once you collect it, you will automatically be returned to the Village, and you can continue back through the Canyon and to the Shelter Entrance.
Now, at the Shelter Entrance, interact with the door on the left side of the screen and use the two Shelter Keys to open it. Use the bronze key first and then the silver key in order to enter.
Shelter
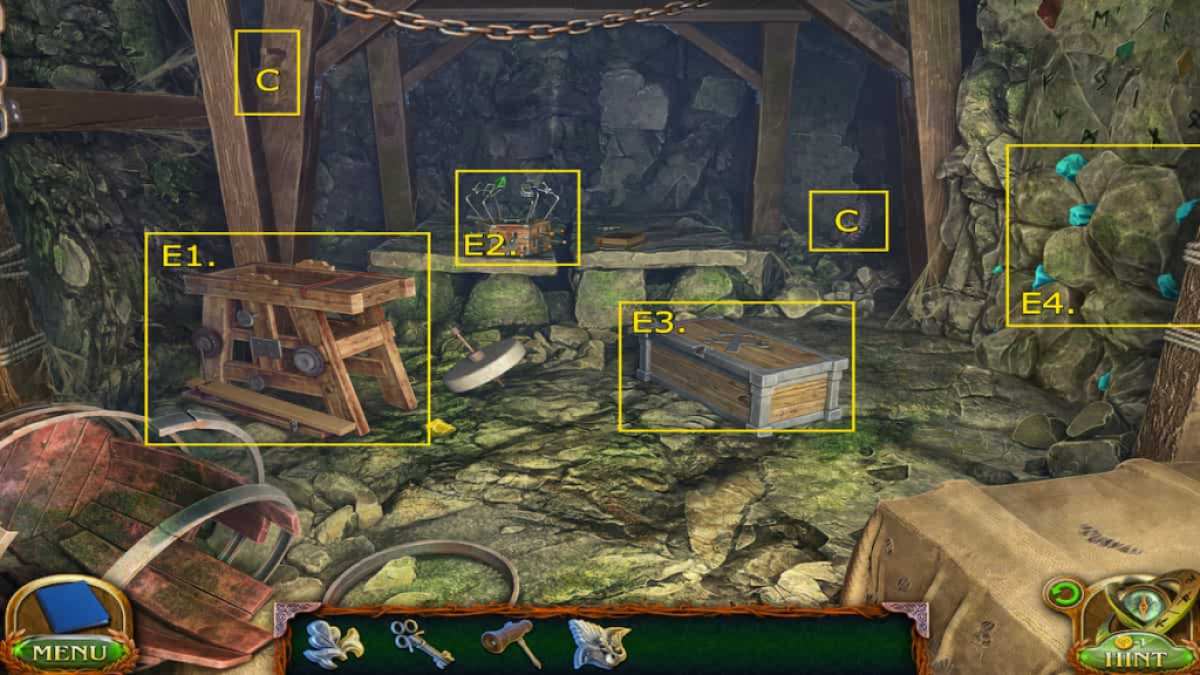
Now that we finally made it to the Shelter, Folly can begin his fun experiments, but we’ll need to gather up all the ingredients and fix up his equipment.
- E1. Grindstone
- E2. Gemstone Clamps – Toolset Key and Iron Flower
- E3. Toolset Chest – Gear Transmitter and Hammer
- E4. Turquoise gem vein
- (Collectible) In the back right corner – Gear 2/8
- (Collectible) In the Toolset Chest – Manuscript Page 2/8
- (Morphing Objects) Mirror and lantern hanging on the post on the left side of the screen 5/45
First, interact with the Grindstone and place the stone back on the bench. Then, grab the red elastic band and place it in the right spot on the gears on the side of the bench. Then, look at the Gemstone Clamps on the makeshift desk to find your Toolset Chest key. You can use it to unlock the chest and collect the Gear Transmitter. Return to the Grindstone and place the Transmitter on the bench.
How to solve the Gear Transmitter puzzle
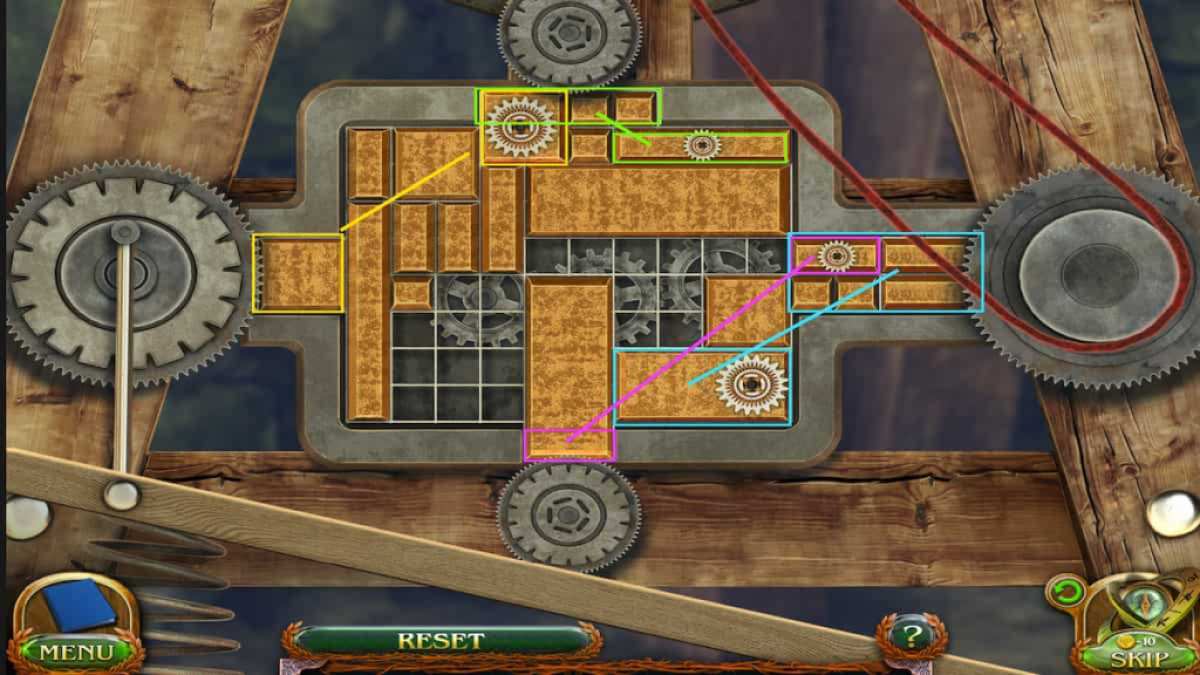
The Gear Transmitter is another sliding puzzle, just like the pipes, but a bit easier. Your goal is to get all the tiles with gears on them lined up with the gears on the Transmitter. To do this, you must move all the tiles around and find which gear tiles fit into the slots against the main gears. You’re going to want the following tiles in these spots (use the picture above to help you visualize):
- Long skinny gear tile – Top
- Rectangle gear tile – Right
- Square gear tile – Left
- Short skinny gear tile – Bottom
Once you have gears placed in the right spots, the Grindstone will begin to work, but you’re still missing one last item. You need something to grease it up. We’re going to need to head back to the Village to get something. Press the green back arrow to backtrack to the Village.
Village (Campsite)
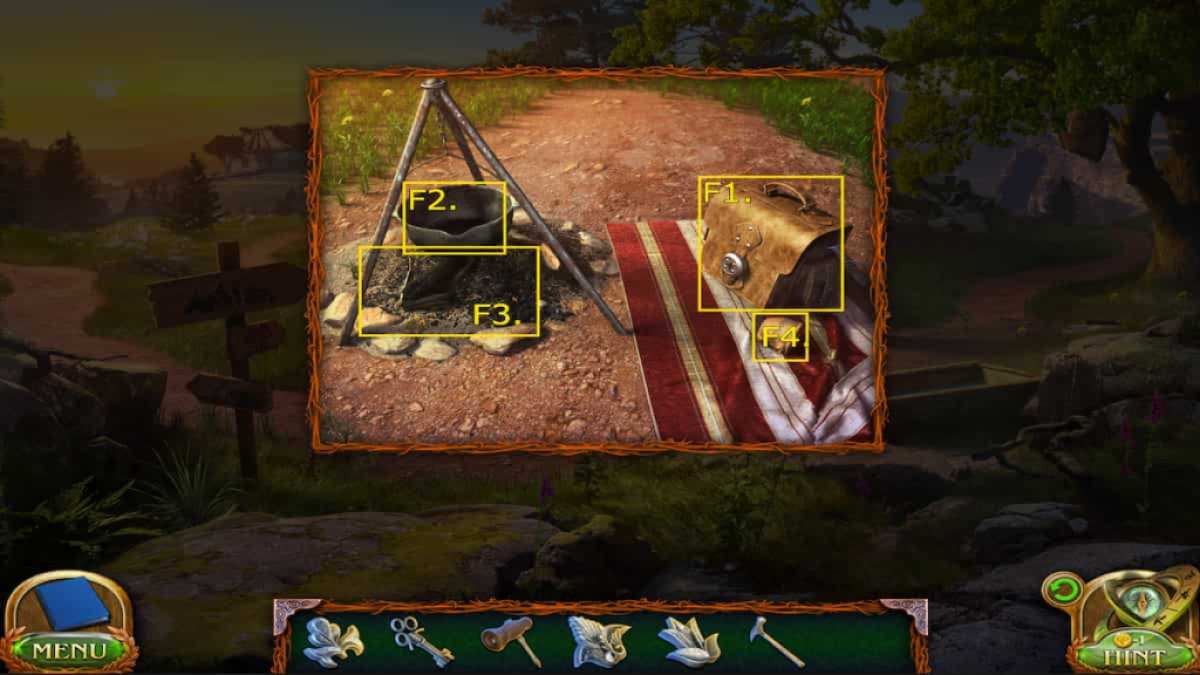
- F1. Locked Satchel – Flint and Meat
- F2. Cauldron pot
- F3. Fire pit
- F4. Empty Cup
At the Village, interact with the campsite, like we did at the start. However, this time, we can use the Traveler’s Key to open up the locked satchel. You will find a piece of flint and meat. The meat is perfect for creating a bit of grease.
How to start the fire and make grease
Press on the meat to add it to the pot. Now, you’re going to need to start up a fire by gathering some Brushwood. Thankfully, we know where we can find some. You can just head back to the canyon by pressing on the pathway to the right and then clicking on the brushwood pile we removed from the cliff’s edge earlier to collect some. Then, return to the campsite and add the brushwood to the fire pit. Once you have it set up, take your Flint from your Inventory and click on the brushwood to try to light it. Unfortunately, we can’t seem to get the fire going yet; you need a catalyst.
Head back to the Canyon on the right path and climb down the ropes to the Shelter Entrance. On the Fallen Traveler’s body, grab the flask of alcohol. With the flask of alcohol, we can return to the campsite again, apply the alcohol to the brushwood, and try our Flint again. Now, the fire will start and cook our meat, creating fatty grease. Grab the Empty Cup from beside the satchel and click on the pot with it to pour the grease in. Make sure you take your cup of fat.
Shelter (Experiment)
Now, you can head back to the Shelter and apply your cup of fat to the Grindstone to grease the gears. With the Grindstone working correctly, we can use it to cut down some gemstones and add them to our gem clamps. Our gem collection is missing, so here’s where to find all the Gem Nuggets.
Where to find all Gem Nuggets
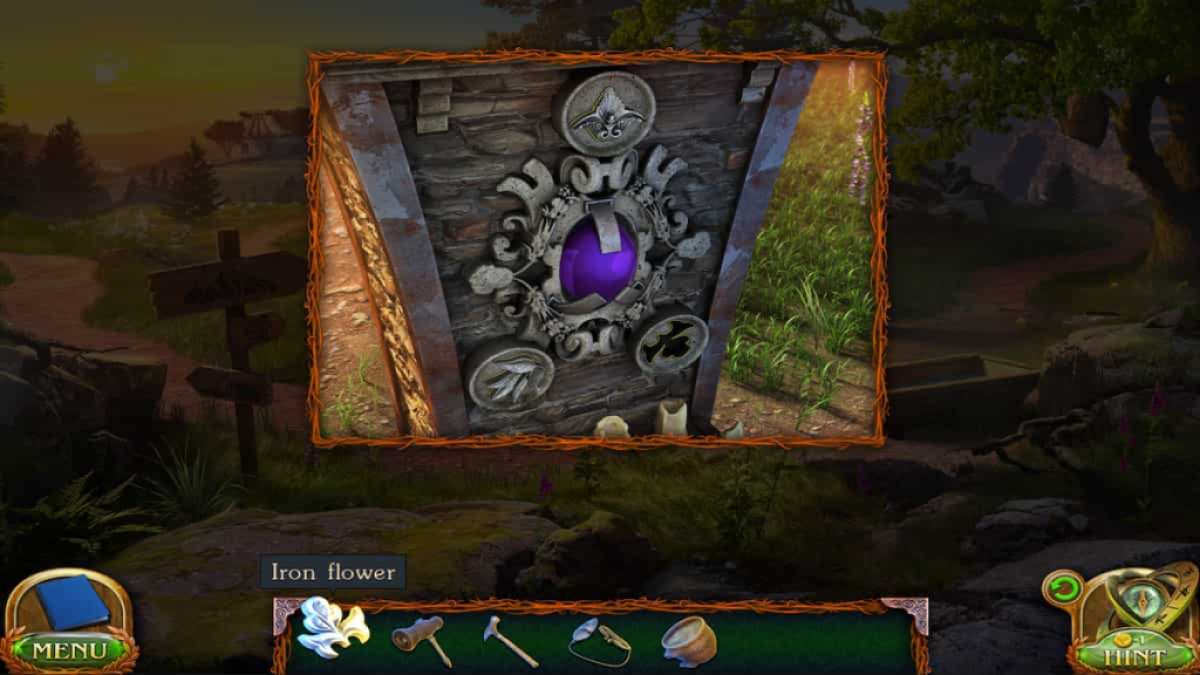
Interact with the little shrine next to the campsite in the Village. You now have three Iron Flowers you can place into it. Select them from your Inventory and click on the empty slots to insert them. Once you do, you can grab the Gem Nugget (1/4) from the center.
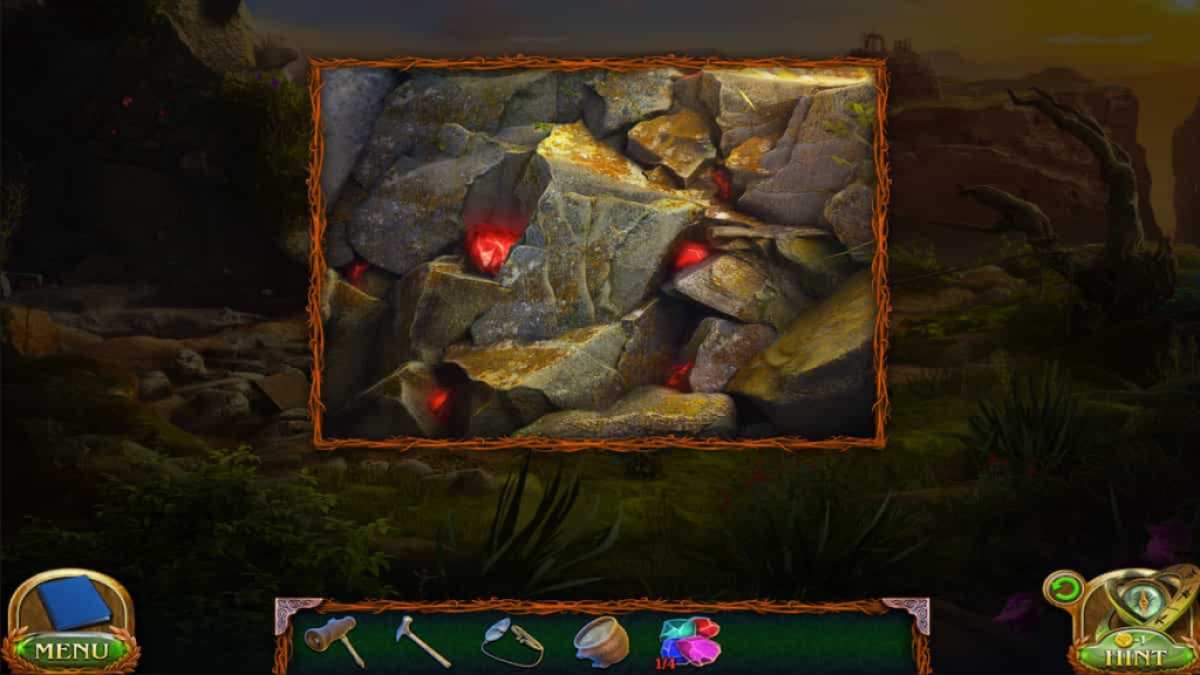
Head back to the canyon and interact with the red vein on the cliffside. Use your Hammer to break away a cluster of it and gain Gem Nugget (2/4).
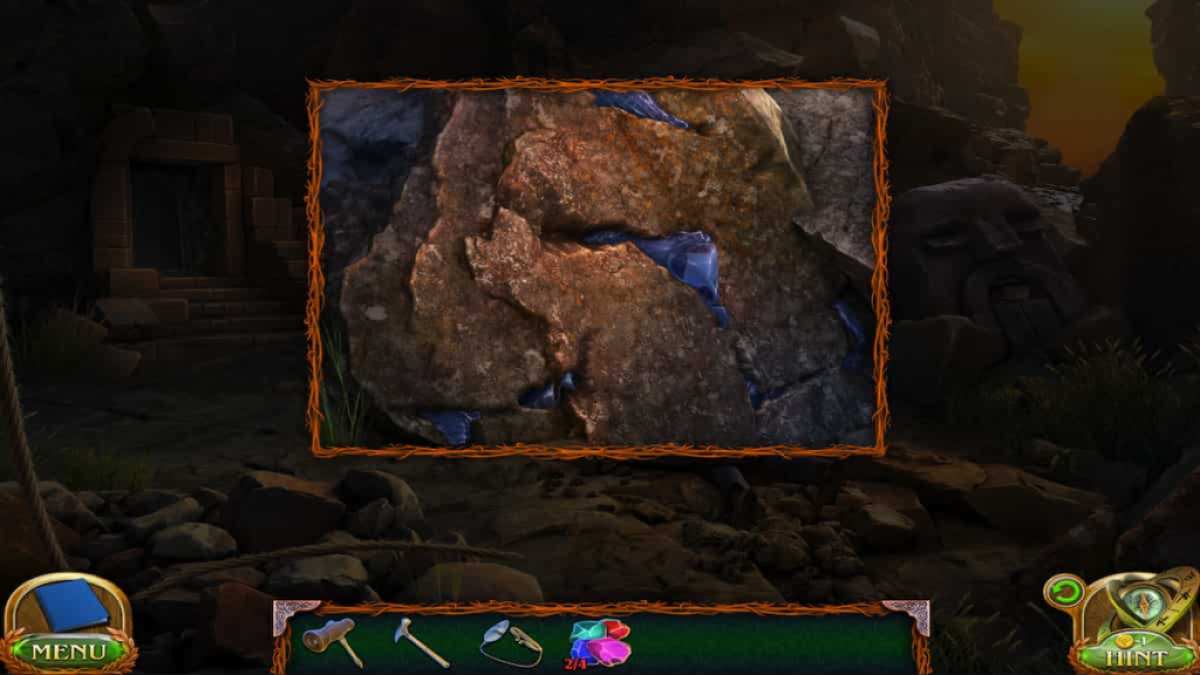
At the Shelter Entrance, interact with the blue vein on the rocks behind the Fallen Traveler. Use your Hammer to break away a piece of it and acquire Gem Nugget (3/4).
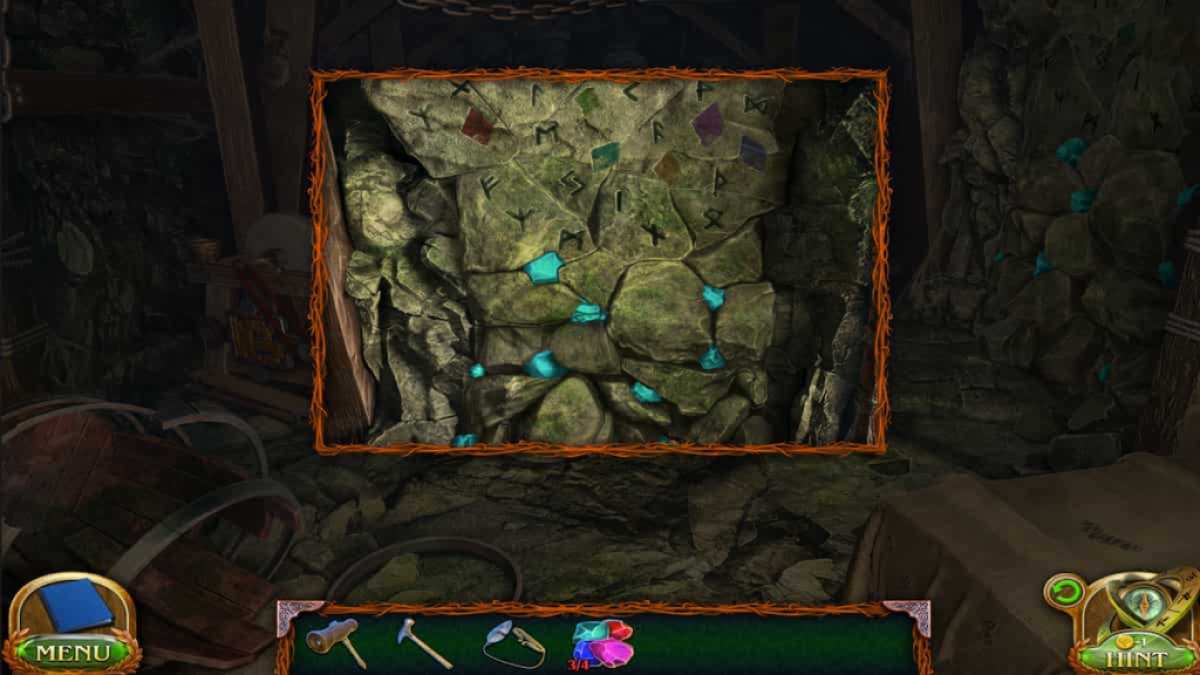
In the Shelter, interact with the light blue crystal clusters on the right wall. Use your Hammer to break some free and collect your last Gem Nugget (4/4).
Once you find all the Gem Nuggets, return to the Grindstone. Select the Gem Nuggets from your Inventory and place them with the yellow gem on the ground. Click on the Grindstone to start it up, and then select gems and then the Grindstone to turn them into Crystals.
With the Crystals, go back to the clamps and place them inside. This will initiate a short cutscene and then reveal a crack in the ancient inscriptions.
This is where we end part 1! Continue with part 2 when we continue through the secret entrance and investigate the mysteries hidden within.
Looking for more puzzle game walkthroughs? Check out Haunted Hunt Walkthrough – Adventure Escape Mysteries or Lost Lands 6 Walkthrough – Mistakes of the Past!
