After seeing Maaron’s POV in Chapter 2, we are moving on to the final chapter of Lost Lands 9 where all secrets and the mysterious Entity will be revealed. Here’s the full guide for part 1 of Chapter 3!
Lost Lands 9 Full Walkthrough Guide – Chapter 3 Part 1
Maaron was tasked with helping out a Druid Settlement that was attacked by some ‘beast,’ however, fate had allowed him to arrive at perfect timing to Trilly Valley and save Folly from the same strange Entity. In this chapter, we will finally get some answers and put a stop to the Entity’s terror.
I’ve split the full Lost Lands 9 walkthrough into several parts since the chapters are so long. This way they are easier to work through at different intervals. Check out the list of previous and following parts below and keep an eye out for more added!
Keep reading below to start working through Chapter 3!
Mine Shaft
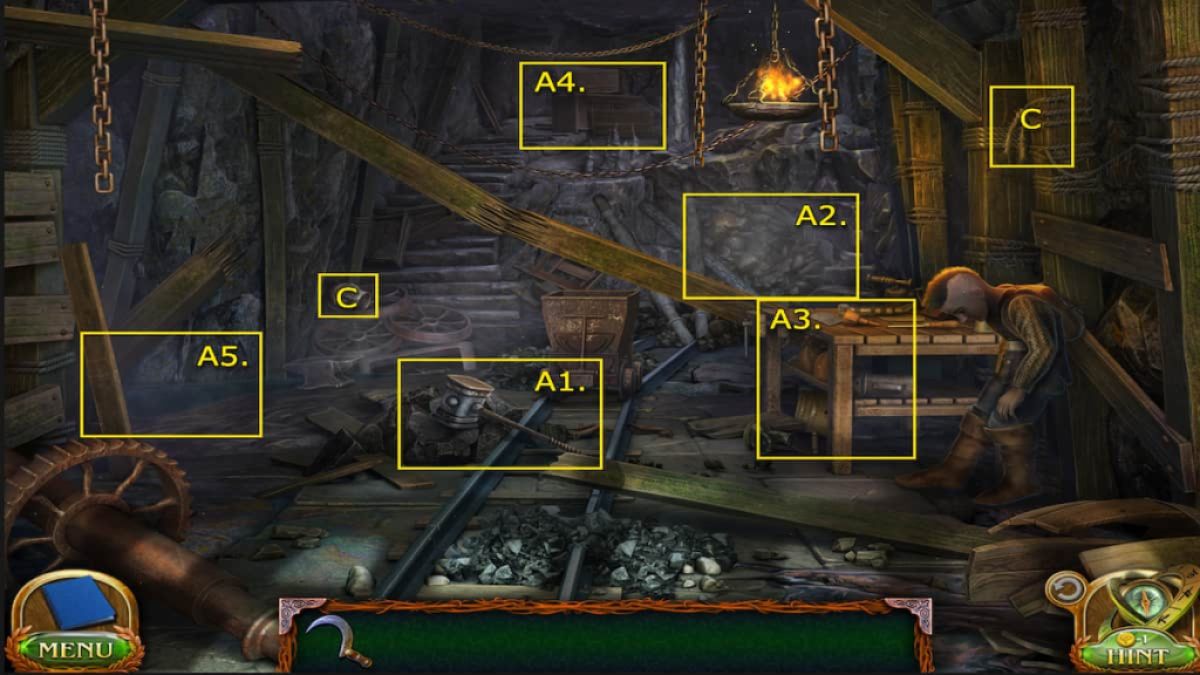
We begin the story in the mine shaft, where Folly and Maaron took shelter against the Entity but found themselves trapped after gate slammed shut behind them. We’ll need to find a way out.
- A1. Folnur’s hammer
- A2. Rubble
- A3. Mine bench – Mug, Keg of gunpowder
- A4. Crates – Cord
- A5. Spring Water
- (Collectible) On the wheel at the bottom of the stairs – Suit of armor 1/8
- (Morphing Objects) Rope tied on the post above Folly 31/45
First, pick up Folnur’s hammer in the middle of the area on the ground. He’s too weak to carry it himself anyways. Then, check out the Rubble on the far side of the mine, past the mine cart. This might be a way we can get out, but we’re going to need to clear it out. Look at the Mine bench next to Folly and move the objects on the bottom shelf until you can retrieve the Mug. Then, collect the moved objects to get a Keg of gunpowder.
You can use your Mug to scoop up some Spring water and give it to Folly. Be sure to interact with him first before giving him the Mug of water. This will initiate a short cutscene between Folly and Maaron. Folly will tell you to find explosives to clear the rubble. Thankfully, we already have the Keg of gunpowder. Approach the Rubble, place the gunpowder and then the Cord inside of it. Now you can conjure some fire to light it.
How to light the Keg of gunpowder
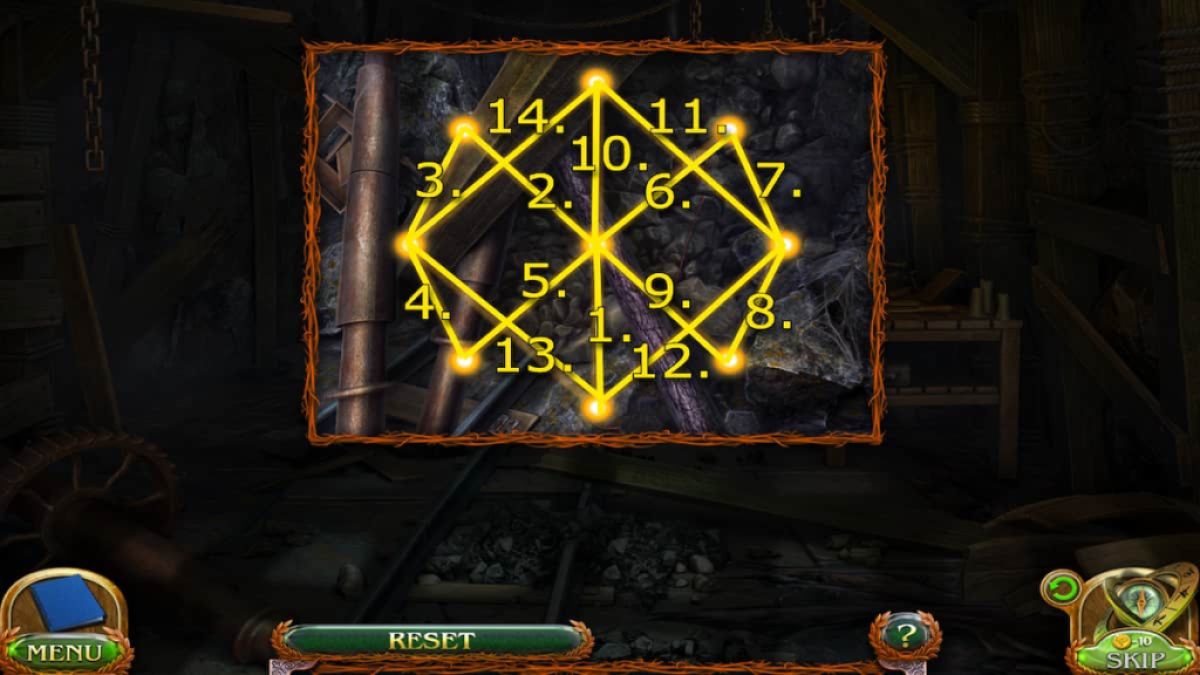
This is another puzzle where you’ll need to draw a beam across the pattern in one continuous line. This means you’re going to need to start on side and work your way all the way around without crossing or backtracking any lines. Take a look at the image above to help you complete it.
Once you complete the pattern, the keg will light, and the explosion will clear the path through. You will come to a spot where the tracks are damaged. Use Folnur’s hammer to move them back into place. Now, you’ll have to navigate your way out using the mine cart.
How to escape the mine in the mine cart
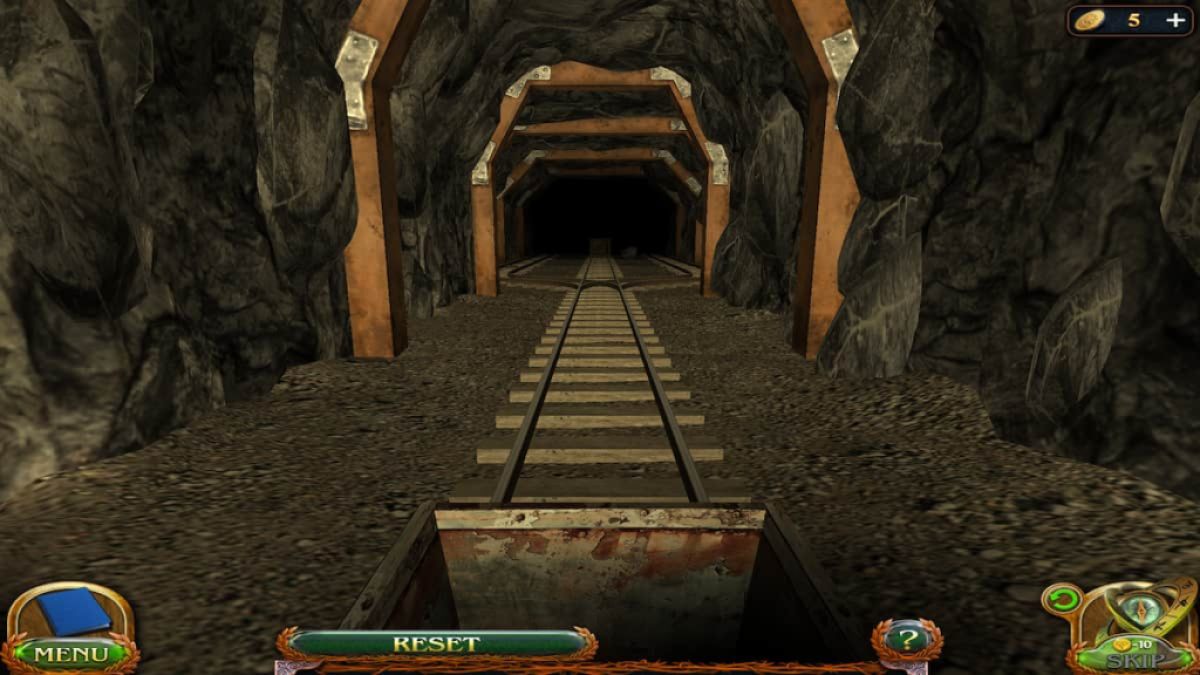
To escape the mine shaft, you’ll need to find your way through using the mine cart. Once you start, the mine cart will continue moving forward non-stop, and you must use the arrows to change direction. The goal is avoid all the obstacles and make it out. Here’s what directions you’ll need to move:
- Right
- Straight
- Left
- Straight
- Left
- Left
- Straight
- Right
- Left
- Left
- Right
- Right
Once you make that last right, you’ll see the light in the distance indicating you’ve made it to the outside.
Castle
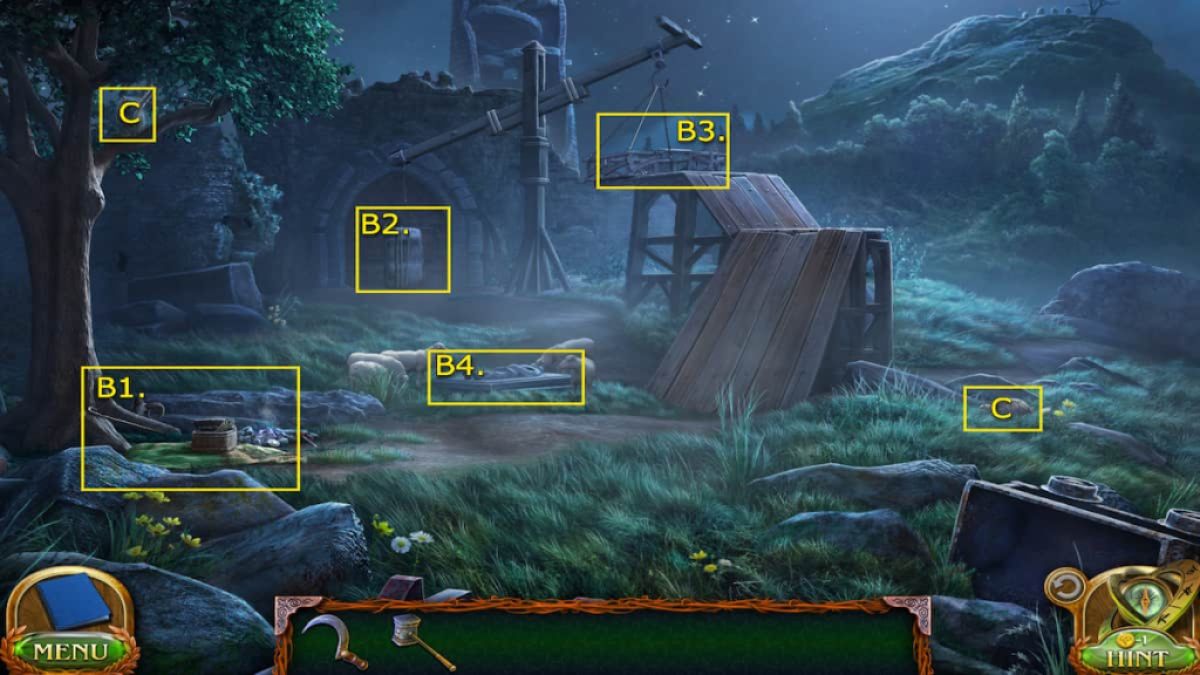
- B1. Campsite – Broken flag, Castle gate detail 1, Sausage
- B2. Castle gate
- B3. Counterweight platform – Piece of the puzzle 1
- B4. Knight grave – Castle gate detail 4 (Herd sheep first)
- (Collectible) On the path beside the ramps on the right – Wood animal 1/8
- (Morphing Objects) Bird/owl on the tree on the left side 32/45
We can potentially reach the portal to take us back to the Academy, but the gate is blocked. We’ll need to find a way to open the castle gate, by loading the sheep into the counterweight platform and lifting the rock out of the way. Investigate the campsite nearby to retrieve several useful items: broken flag, castle gate detail, and sausage. Check out the platform to open the gate and pick up the puzzle piece. Now, continue up the hill toward the forest to find the lost sheep.
Castle Woods
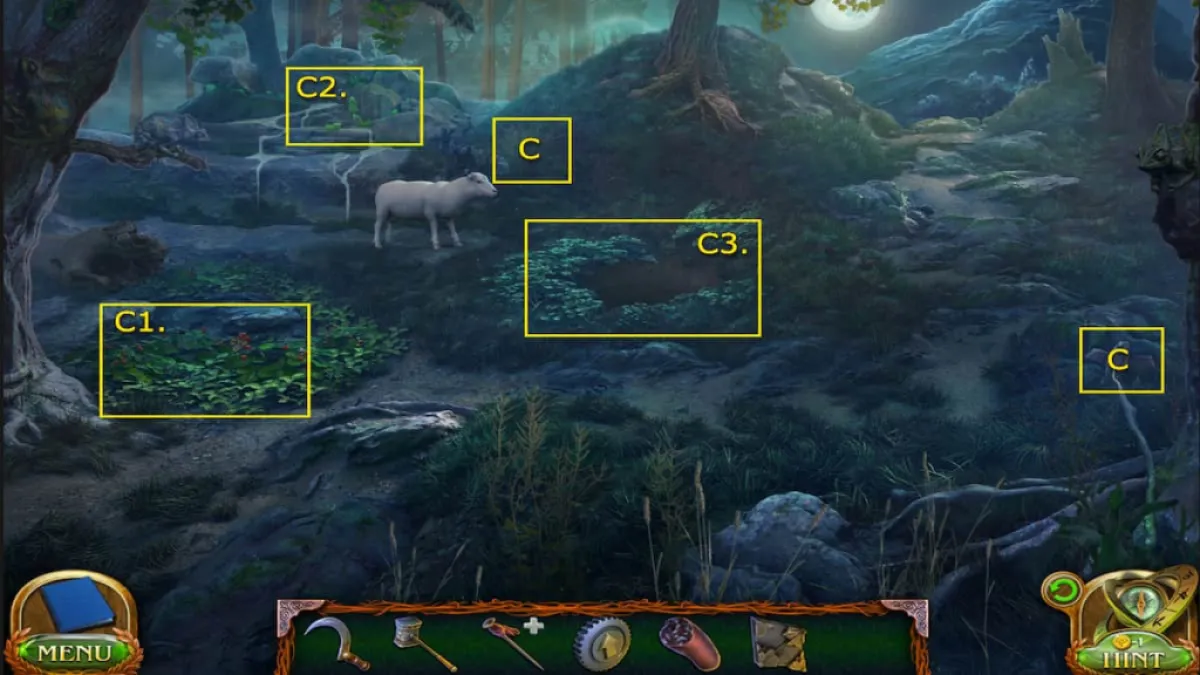
- C1. Strawberry plants – Piece of the puzzle 2
- C2. Spring Water
- C3. Ditch
- (Collectible) On the rock directly to the right – Wooden animal 2/7
- (Morphing Objects) Grass right above the sheep 33/45
We found one of the missing sheep, but we can’t herd it back just yet. Check out the strawberry plants and collect the second piece of the puzzle. The sheep dog is stuck in the ditch and we must find a way to help him out.
How to save the dog from the ditch
Head back to the Portal Tower and grab the Shepherd’s staff from the Campsite. Then, use it to scoop up the dog from the ditch. The dog is safe but it’s a bit shy. Use the Sausage to lure it toward us and then we can collect another Castle gate detail 3 from its harness. Now continue up the hill to the next area.
Castle Hill
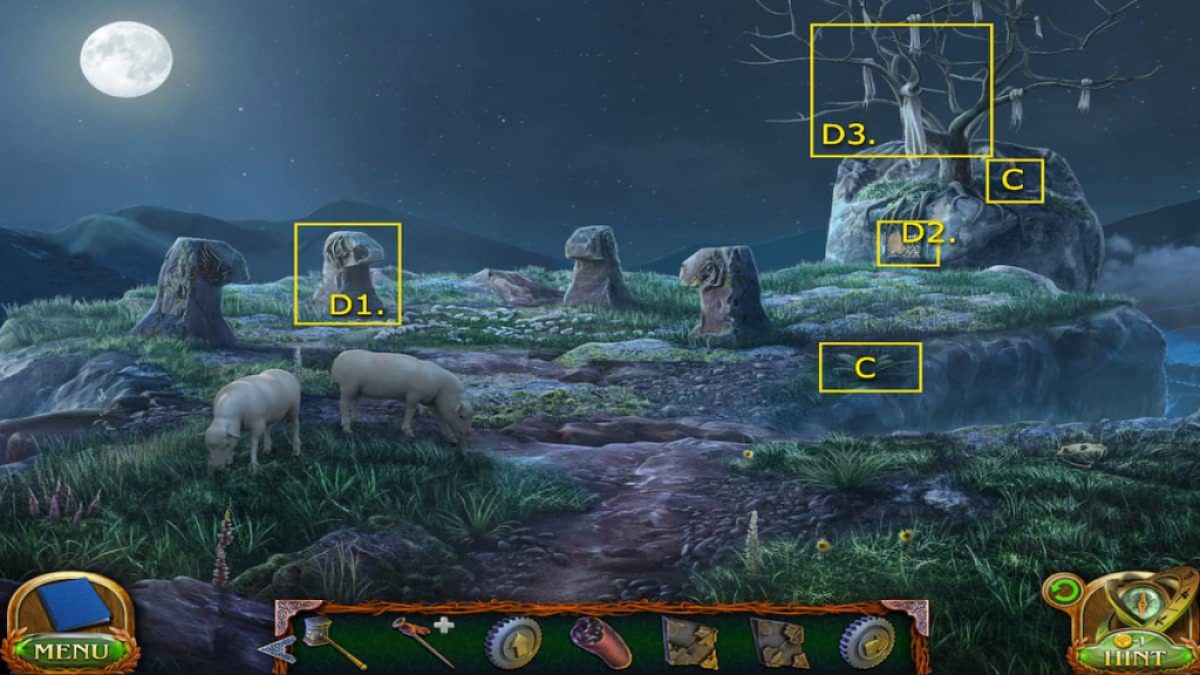
- D1. Wolf ritual stone – Castle gate detail 2
- D2. Puzzle board – Manuscript page 7/8
- D3. Tree with cloths
- (Collectible) Beside the tree – Suit of armor 2/8
- (Morphing Objects) Stump at the edge of the cliff on the right side 34/45
On the hill we’ve located two more of the missing sheep. Investigate the puzzle board underneath the tree and place the two pieces of the puzzle we’ve collected into the slots. Now we can work on solving this put together puzzle.
How to solve the patterned tree puzzle
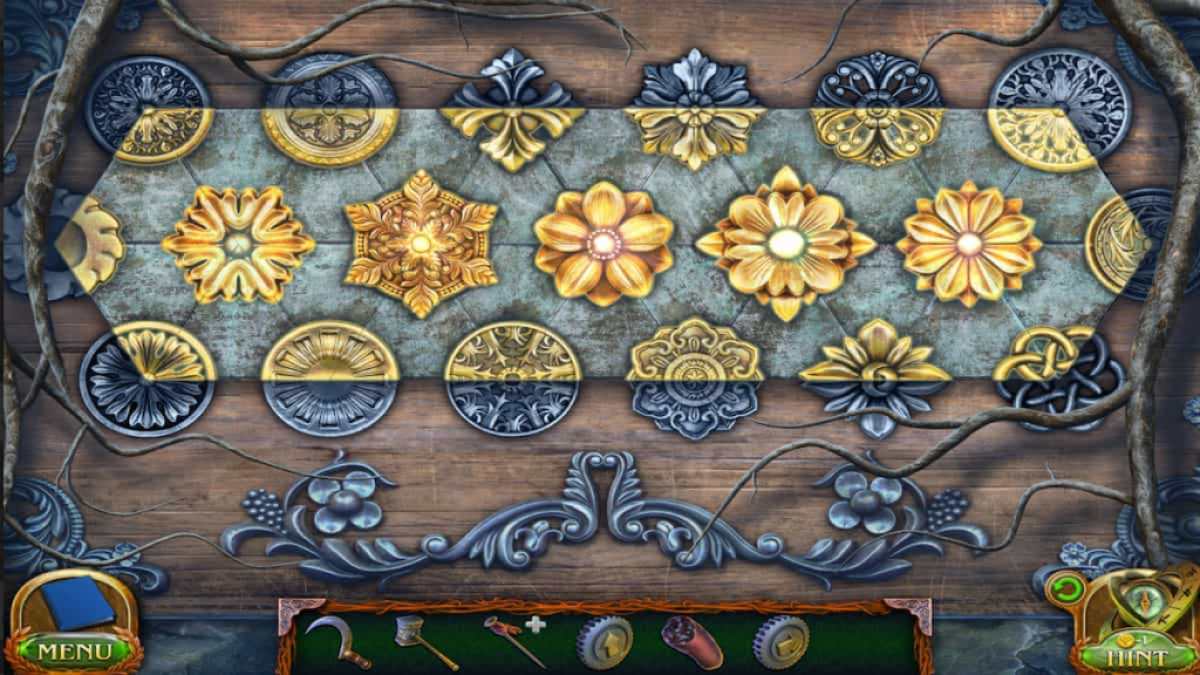
In this puzzle, our goal is restore the pattern by rotating the pieces. This is fairly simple; you just need to click on the piece to rotate it. Check the edges of the puzzle to see if you have it in the right spot. If the edges match the grey pattern then it’s correct. Check the image above to help you recreate it.
When the puzzle is completed, the tree will lower, allowing you to get closer and grab a new piece of fabric that is hanging in the branches. Use the Sickle to cut it loose. Before we can place it on the flagpole, we’ll need to dye it red.
How to dye the fabric red
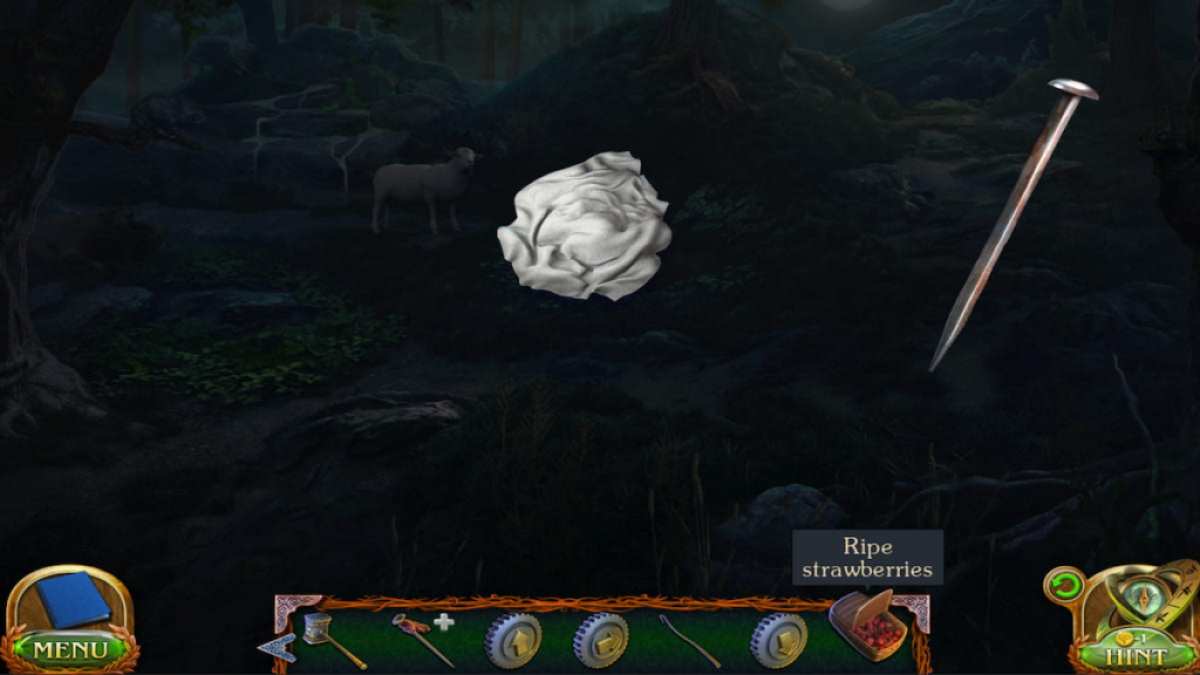
Head back to the Campsite and grab the Empty basket where we found the sausage. We can use the basket to collect the strawberries from the woods area. Now interact with the flagpole and fabric and use the Ripe strawberries on the fabric. We’ll shake the fabric up in the basket real good and then have a red piece of fabric to replace on the flagpole. Now we can begin herding the lost sheep back.
How to herd the sheep
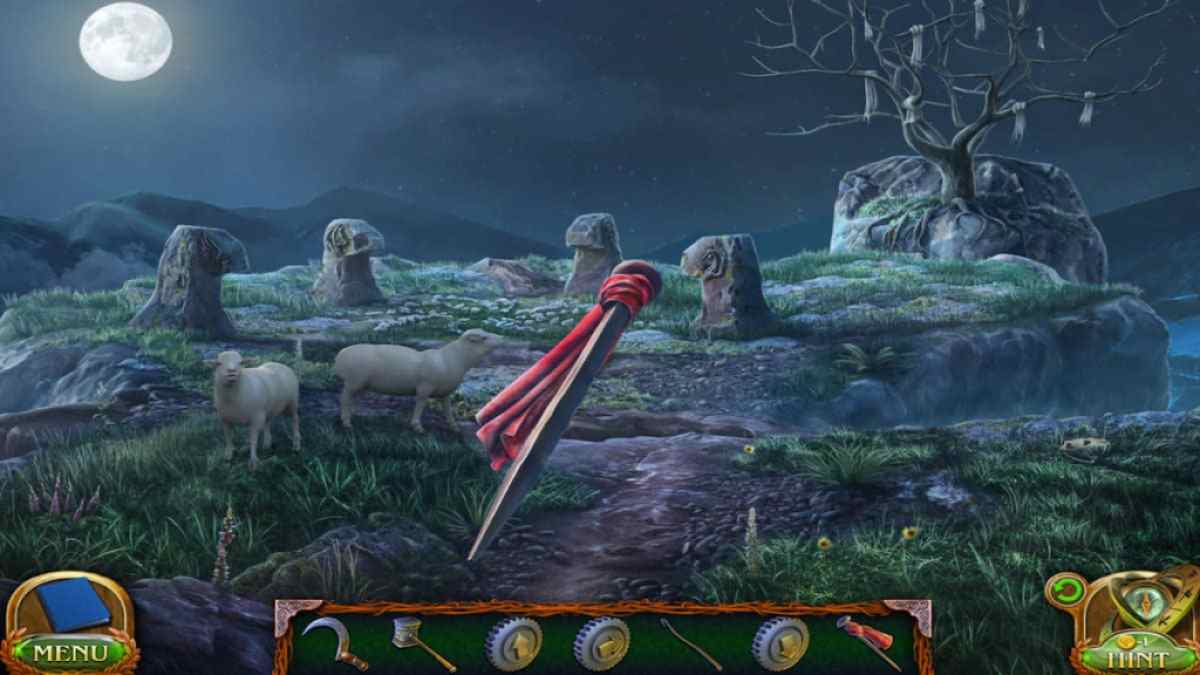
Start on the hill and select the red flag from your Inventory to wave it in the air. Repeat this again in the woods to herd the solo sheep. Then, back at the Portal Tower, head up to the Counterweight platform and drop the red flag inside and use Folnur’s hammer to stake it into the beam.
All the sheep will move up to the platform, minus one. Investigate the last sheep and you’ll notice its leg is caught in the grave. Use the Shepherd’s staff to wedge the cover off and allow it to join the other sheep. With all the sheep in the weight platform ( and a butterfly) the Castle gate will be cleared. Ensure you grab the Castle gate detail 4 from the knight grave and then continue toward the castle.
How to open the castle gate
To open the gate, you’ll need to place all the Castle gate detail pieces we’ve collected along the way. These are all the locations where they’re hidden:
- Campsite
- The wolf ritual stone on the hill
- On the dog’s harness
- In the knight grave
Once you place all of them in gate, you can begin solving the puzzle to unlock it.
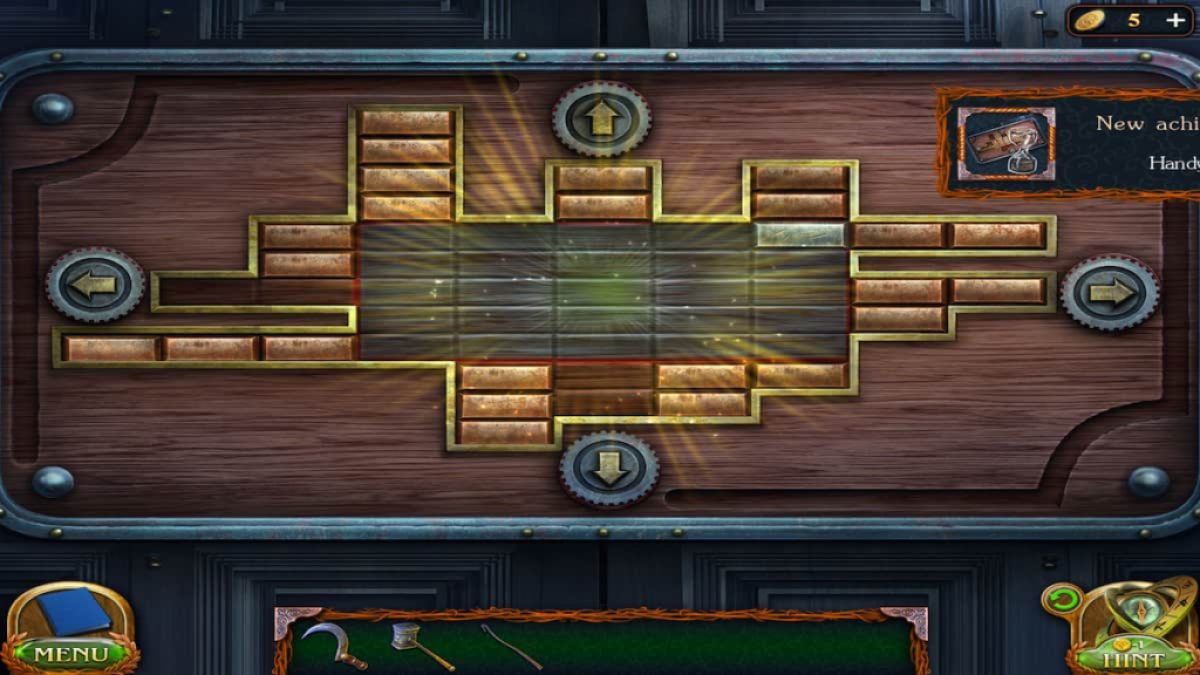
The goal of this puzzle is to clear the center rectangle by pushing the copper bars out of the using the metal bar. Use the arrows to move the pieces up, down, right, and left. You can only move the metal bar against copper bars, meaning you’ll need to plan your moves wisely. Here’s how:
- Right x2
- Up x2
- Left x1
- Down x3
- Right x1
- Down x1
- Left x2
- Up x3
- Left x1
- Down x3
- Left x1
- Up x4
- Right x4
All of the center rectangle should be uncovered and you can now you can continue through the open gate.
Castle Ruins
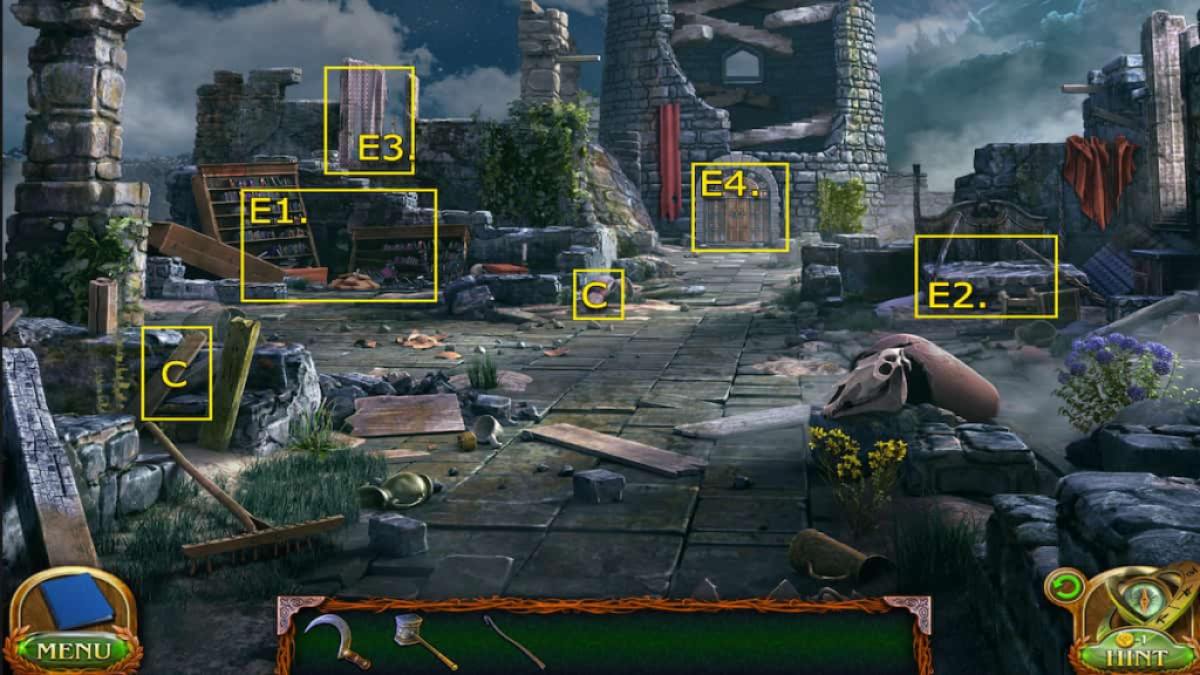
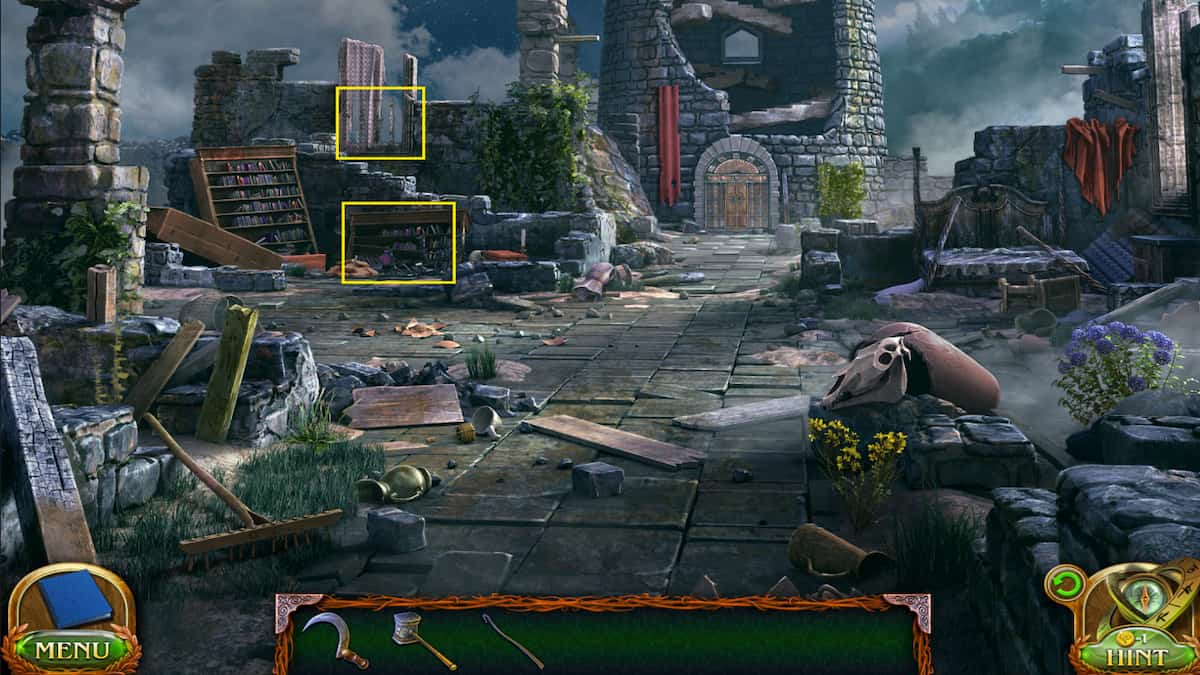
- E1. Bookcase – Glass prism
- E2. Bed – Embroidery hoop
E3. Window with curtain – Glass prism 2 - E4. Tower gate
- (Collectible) On the right side of the wall near the bookcases – Suit of armor 3/8
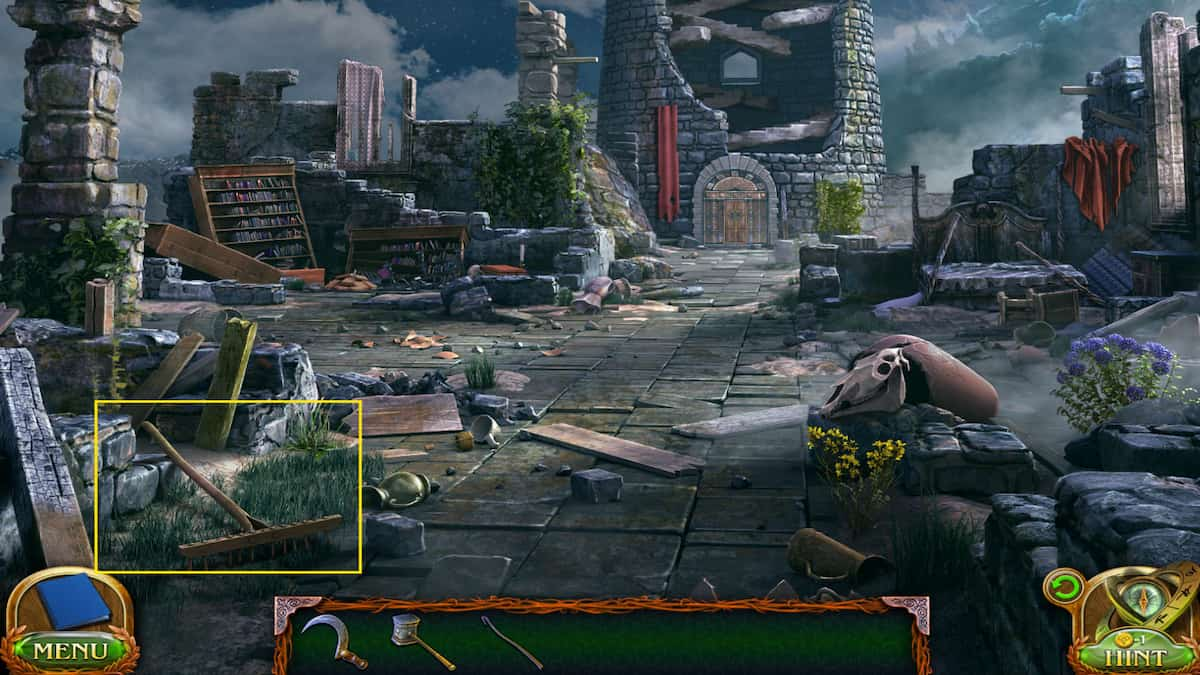
- (Morphing Objects) Wood plank on the left side behind the rake 35/45
First, check out the bookcases to grab the Glass prism. Then, on the bed across from it, you can collect the Embroidery hoop. Now you can continue to the tower gate where you’ll complete a puzzle using the Embroidery hoop.
How to solve the tower gate embroidery puzzle
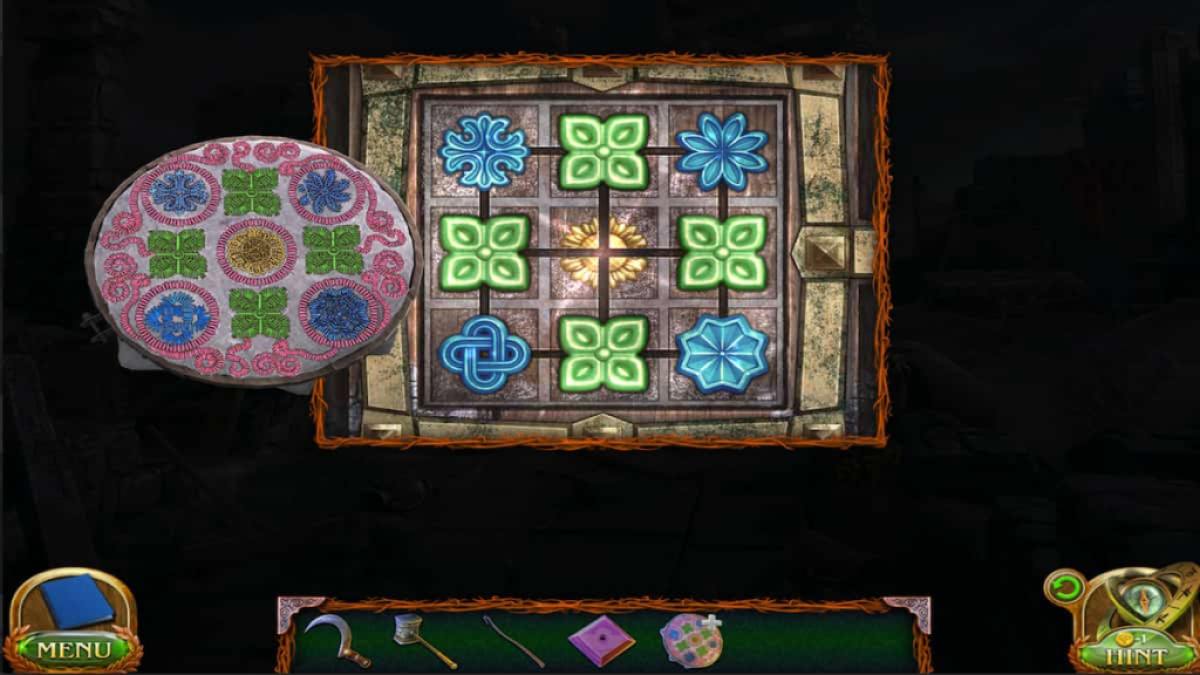
The goal of this puzzle is to replicate the embroidery by sliding the pattern pieces around until they are in the correct positions. This works just like the other sliding puzzles we’ve done in the past. You’ll need to slide the pieces around, getting them out of the way as necessary, until they are all in the right spots as shown in the image above.
Once you have replicated the embroidery, the gate will open and you can continue forward toward the portal.
We’ve made it to the portal but unfortunately we won’t be able to explore this area until we get rid of the fly swarms.
How to clear the fly swarms
To clear out the swarm of flies at the Tower portal, we’ll need to collect a few different objects. Remember all the chameleons in the wooded area? They can help us get rid of all those pesky flies, but we’ll also need to get rid of the bird skeletons. Here’s what we’ll need to do:
- Grab the Rake from the Castle ruins and use it to sweep away the bones.
- Select a chameleon in the Woods (you will be prompted that you need something to carry them in)
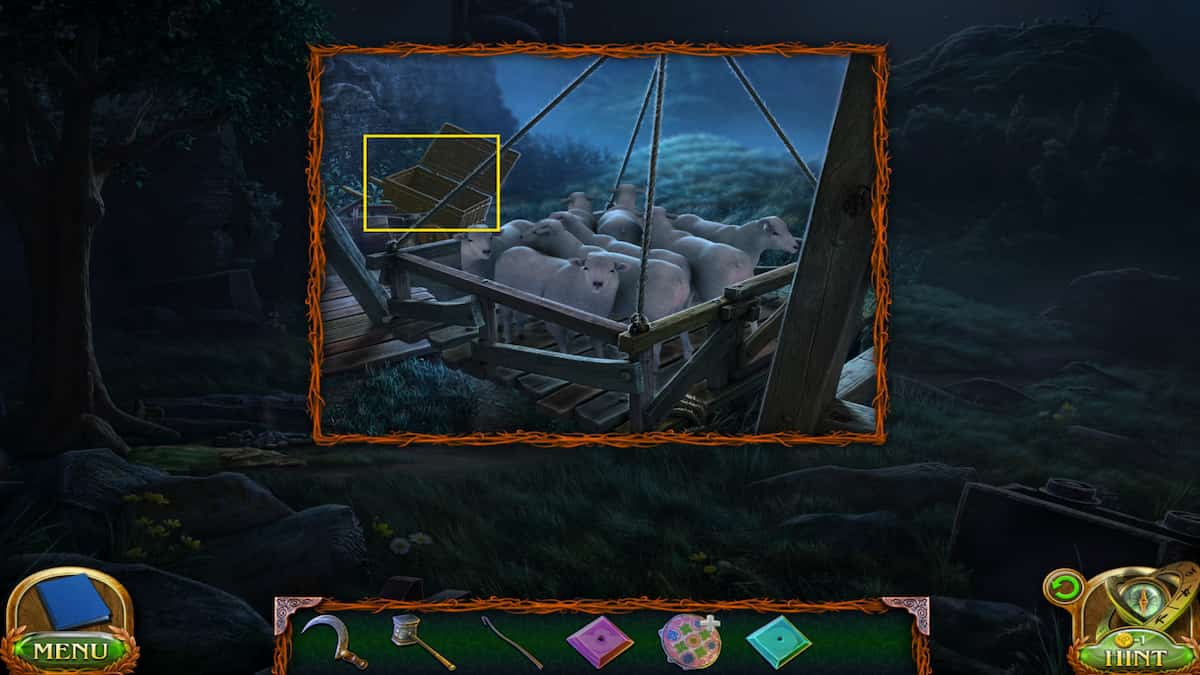
- Head to the castle gate and investigate the sheep on the platform. Behind them will be a Cart on wheels that you can grab.
- Select your embroidery in your Inventory and take out the fabric.
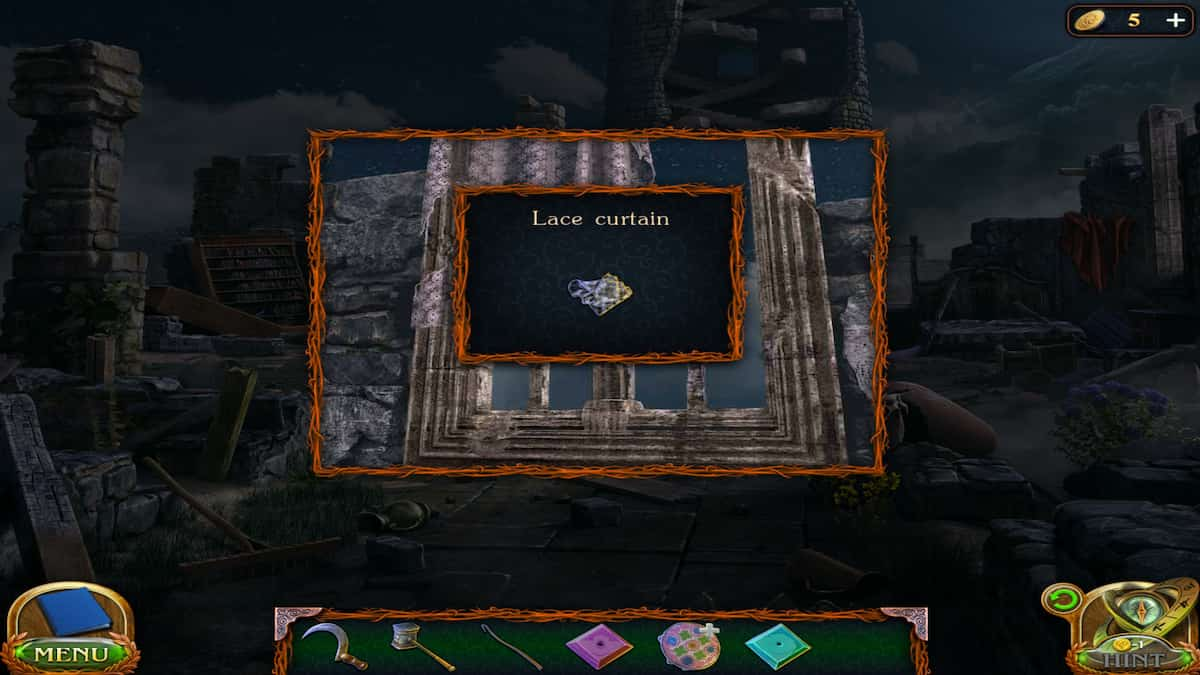
- Collect lace material from the window with a curtain in the Castle ruins with your Sickle.
- Place the lace material into your embroidery hoop, then use your Sickle to cut off the excess fabric.
- Then place the Shepherd’s staff into the hoop, tied with the extra fabric to make a Net.
- Now head back to the Woods, place the cart down, and then use the Net to collect the chameleons.
Where to find all the chameleons
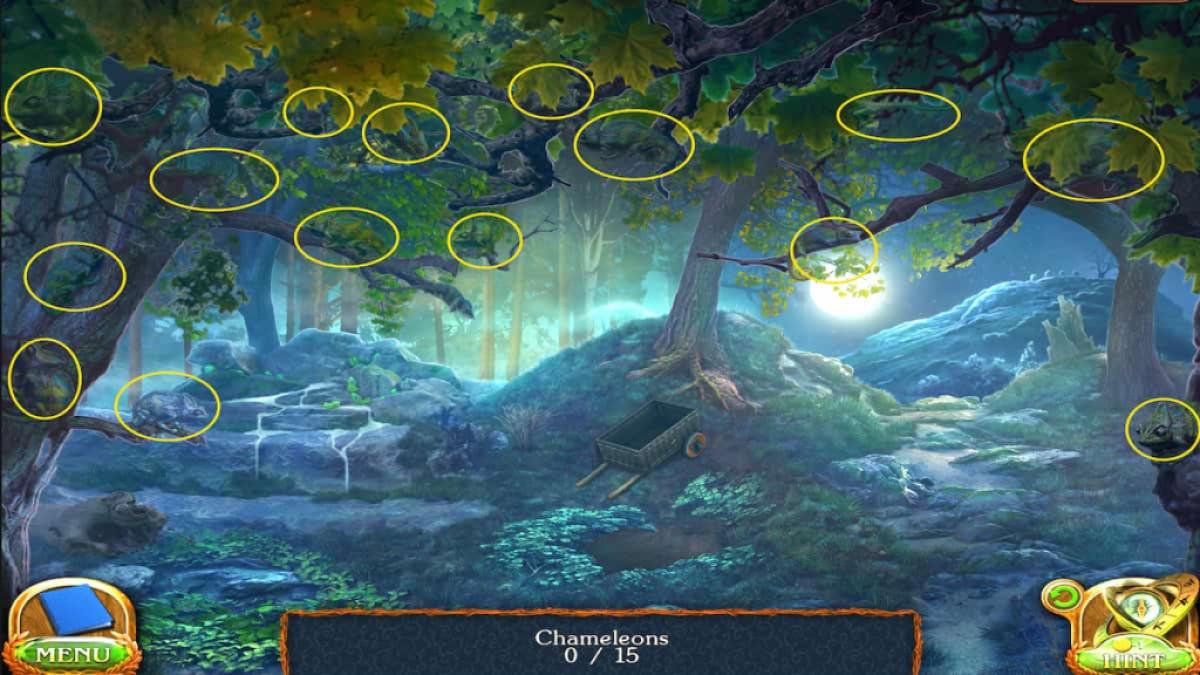
You’ll need to find all 15 chameleons in the woods. This is difficult to do since they blend in perfectly to the dark surrounding, but use the image above to help you find each one.
Once you get all 15, collect your box on wheels and head back to the tower. You can place them down to clear up the fly swarms.
Castle Tower Portal
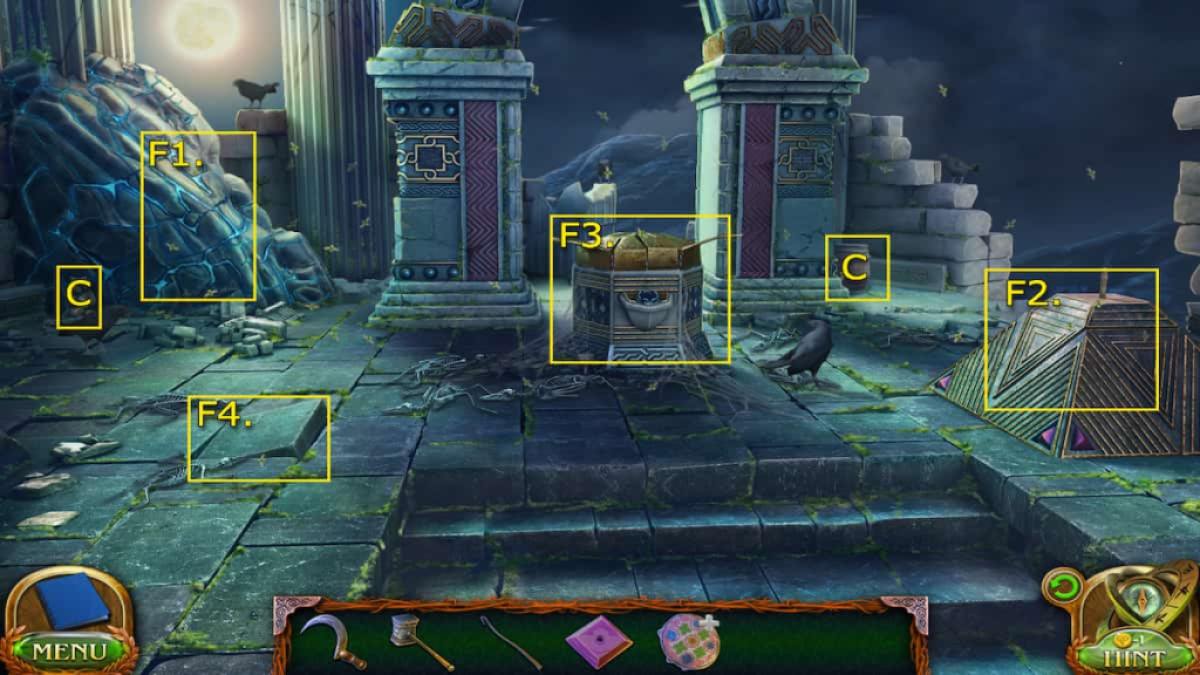
- F1. Stone deposit
- F2. Pyramid
- F3. Portal pedestal
- F4. Loose stone
- (Collectible) Against the stone vein – Wooden animal 3/7
- (Morphing Objects) Barrel/pot on the right side of the portal 36/45
Now that the flies are gone we can explore this area a bit more. There are a few different objects we can explore here but we’ll need some more items to use on them. First, investigate the pyramid on the right side. This is where our Glass prisms come into play, but we’ll need to collect them all to finish the piece.
Where to get all the Glass Prisms
To finish the pyramid we’ll need to collect all the glass prisms. Luckily, the last piece is right near the pyramid. We’ve found the other two along the way, but in case you’ve missed them, here’s where to find them all:
- Glass prism 1 – In the bookcase of the Castle ruins
- Glass prism 2 – In the window with the curtain in the Castle ruins
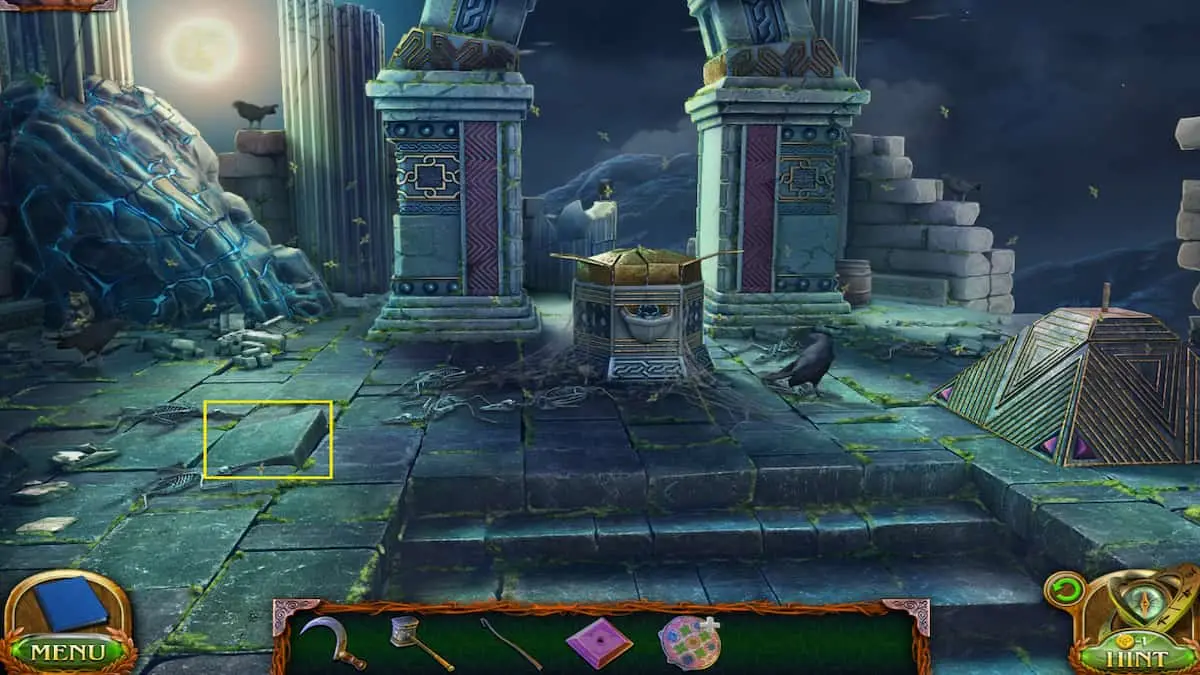
- Glass prism 3 – Under the loose stone near the portal
With all of them, you can place them on the pyramid which will then open a compartment with the portal runestone. Now we can work on opening the portal!
How to open the castle tower portal
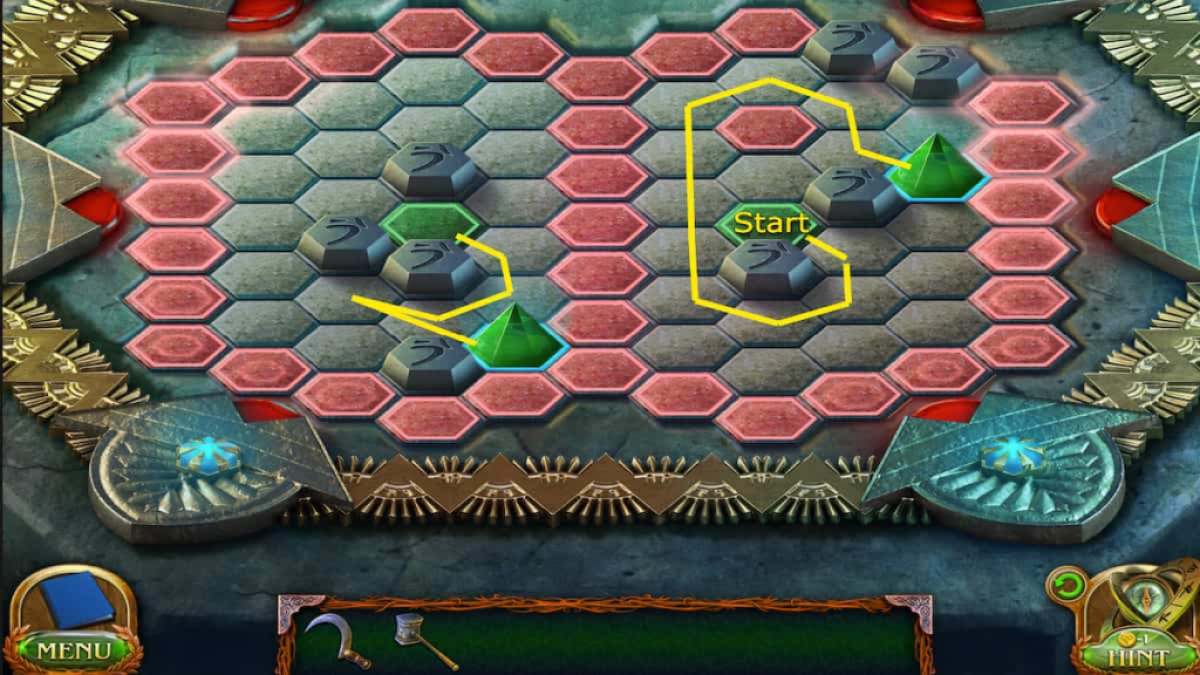
The goal of this puzzle is to land the green pyramids on the blue cells simultaneously. They will always move in the same direction unless blocked by something. However, they cannot step on any red cells, or the puzzle will reset. You’ll have to find the right path to get them to land simultaneously. Use the image above to help get there.
Once both pieces land on the blue cell together, the portal will open up and you can enter through to the Academy.
Academy Backyard
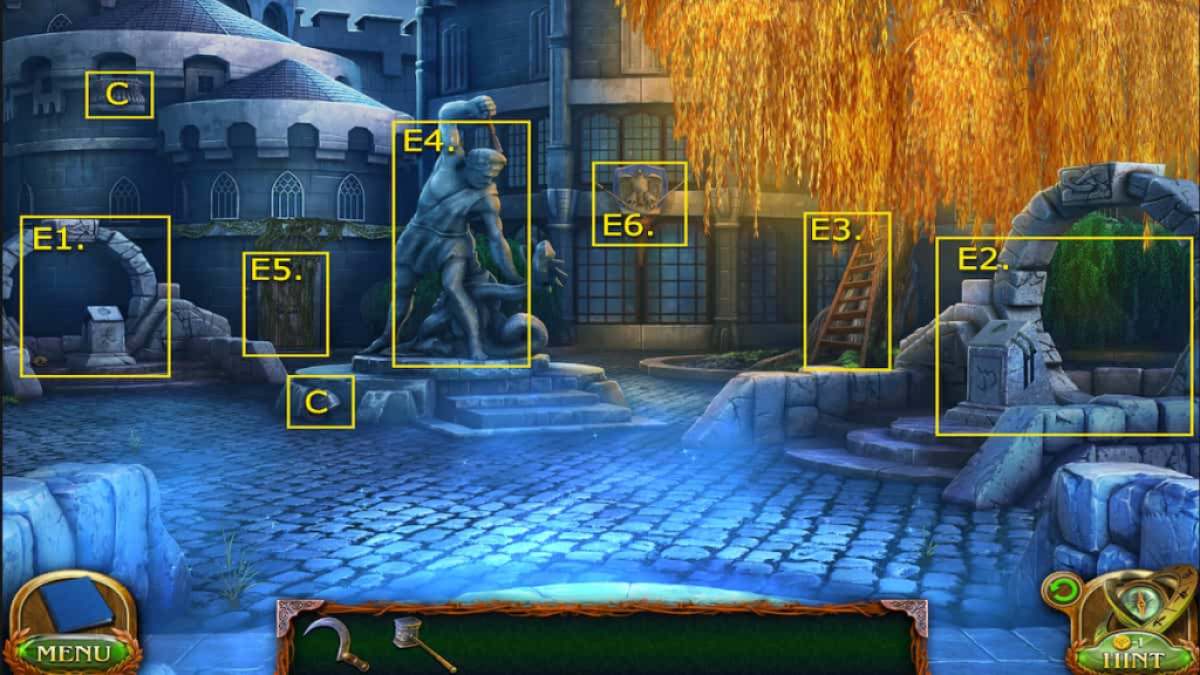
- E1. Portal pedestal 1
- E2. Portal pedestal 2
- E3. Ladder in tree
- E4. Statue – Chisel
- E5. Academy Office backdoor
- E6. Coat of arms – Spears
- (Collectible) Near the statue at the center of the yard – Suit of armor 3/8
- (Morphing Objects) Balcony on the exterior wall behind the portal on the left side 37/45
Here in the backyard of the Academy, there is a locked door to the Academy Office. However, Maaron could be in trouble for being on the grounds at night. They will have to find a different way through. There is a secret passageway under the yard statue, but we must find a way to open it.
Grab the Chisel from the statue’s hand and use it on the ladder and Folnur’s Hammer to pry it loose. Then, move the ladder over to the Coat of Arms and collect the Spears. Put the Spears in the statue’s hand by combining the two together, and the passageway will open.
Academy Library (Return)
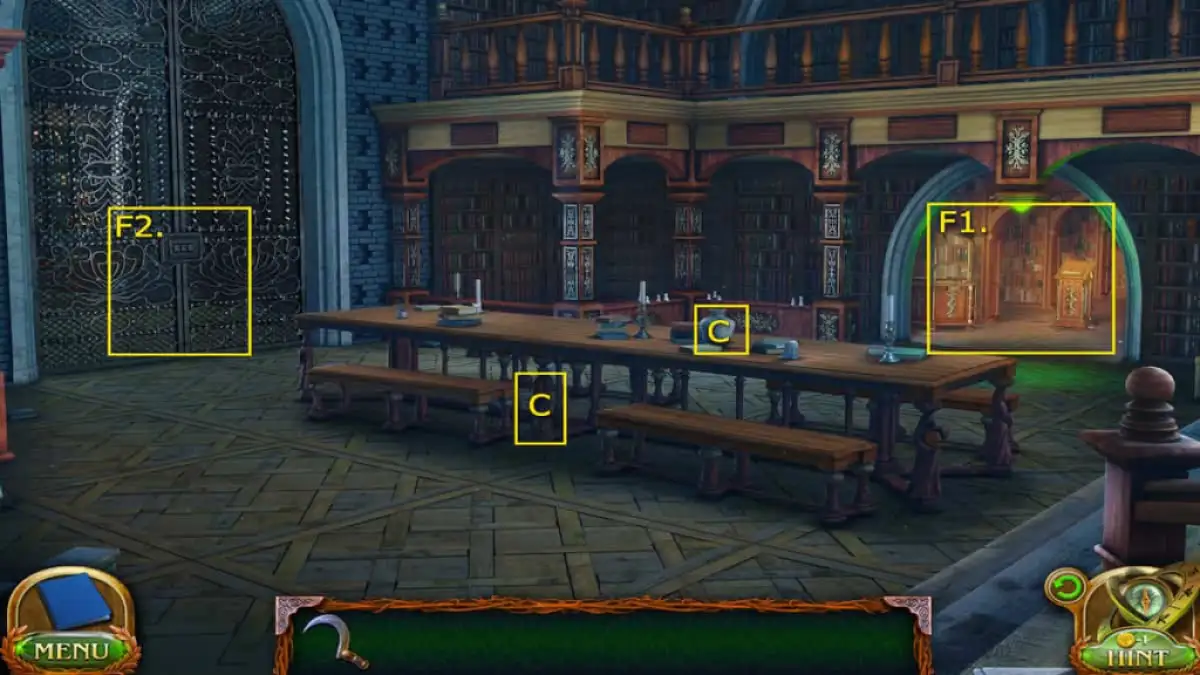
- F1. Library book sections
- F2. Library Archive
- (Collectible) On the table leg – Wooden animal 4/7
- (Morphing Objects) Pitcher/vase on the table 38/45
We’re looking for another book, so we’ll want to head straight through to the book sections again, after grabbing our collectibles to track down the book we need.
Where to find the Spirits and deities book
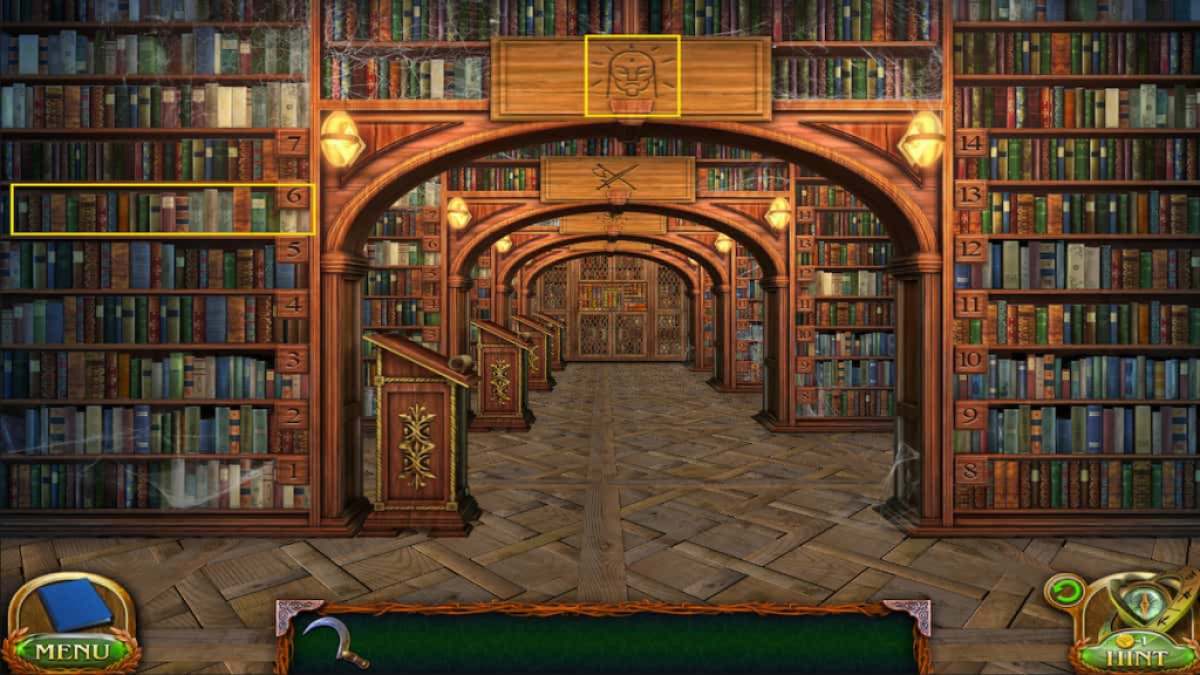
Just like how we tracked down the book before, we can use the scroll at the entrance of the book sections to see what zone has the books we need. The Spirits and Deities collection is located in the third row, matching the symbol of the masked face on the scroll as well. Then, looking at the scroll in this area will show us the Formless creatures in section 6.
After the brief cutscene, Folly and Maaron will now need to open yet another portal to take them to the Canyons, where we’ll be heading back to Folly’s lair. We’ll need to inspect the map in the Office to help us figure out which portal to open, but the keys to the backdoor are in the Archive, so head through the Library Archive gate.
Library Archive (Return)
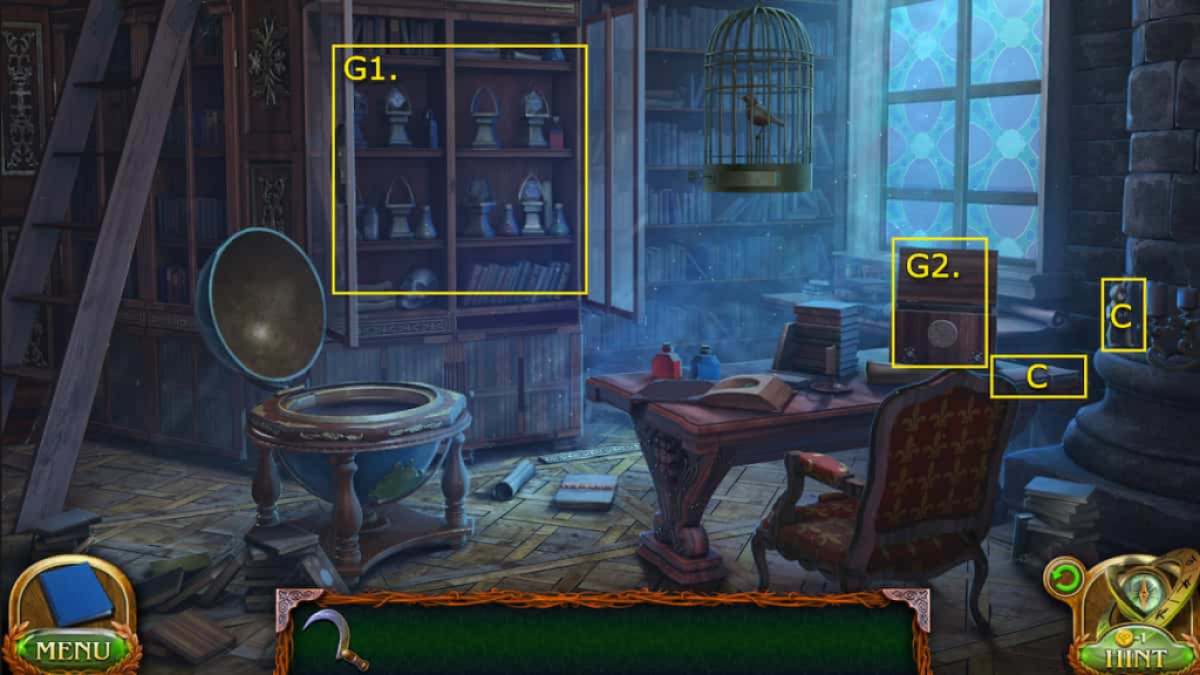
- G1. Rune stone cabinet
- G2. Open box – Spotting glass
- (Collectible) On the pillar directly to the right – Wooden animal 5/7
- (Morphing Objects) Letter on the right corner of the desk – 39/45
You can look for the key in a few different spots, but only a few spots will be essential to your mission. Interact with the open box on the desk, and you’ll find the Spotting glass. We can enchant it to help us get inside the locked office door, but we’ll need to find another book.
Where to find the potions book
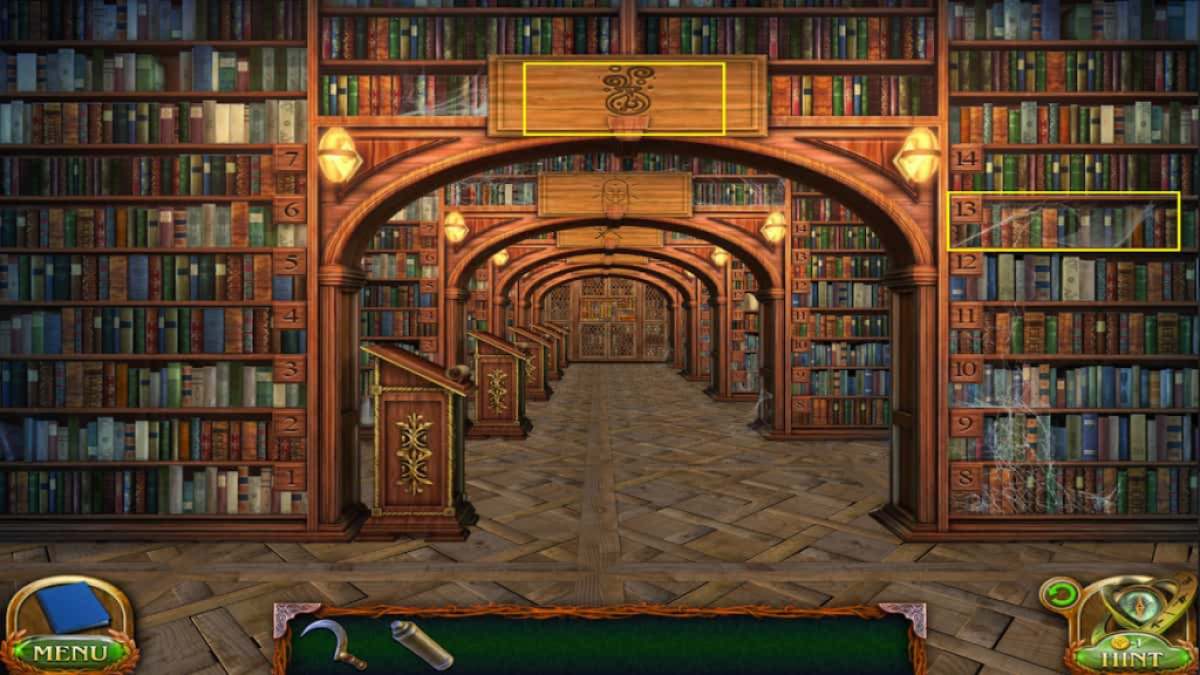
Once again, we will return to the library book section, check the scroll at the front pulpit, and see that Alchemy is row 2 with a fitting symbol of a potion beside it. In row 2, we can check the scroll here to see the Booster potions in section 13. We can grab the Book of Potions to help us create the enchantments we need. We can create the potions at Maaron’s hideout at the end of the library sections corridor.
How to solve Maaron’s hideout library door puzzle
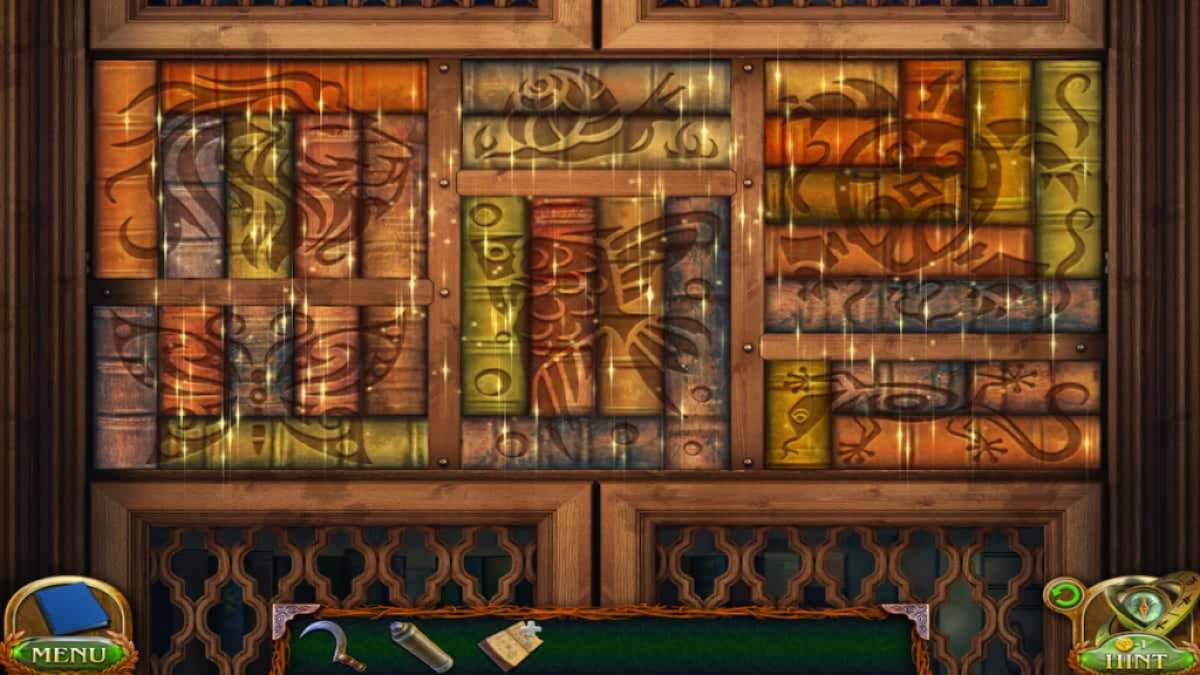
To solve this puzzle, we must recreate the patterns across all the books. Colors don’t matter, but we can only move books to the same size and rotation spots. Use the image above to help you find all the right spots for each pattern piece. Then, head on through to Maaron’s hideout.
Maaron’s Hideout
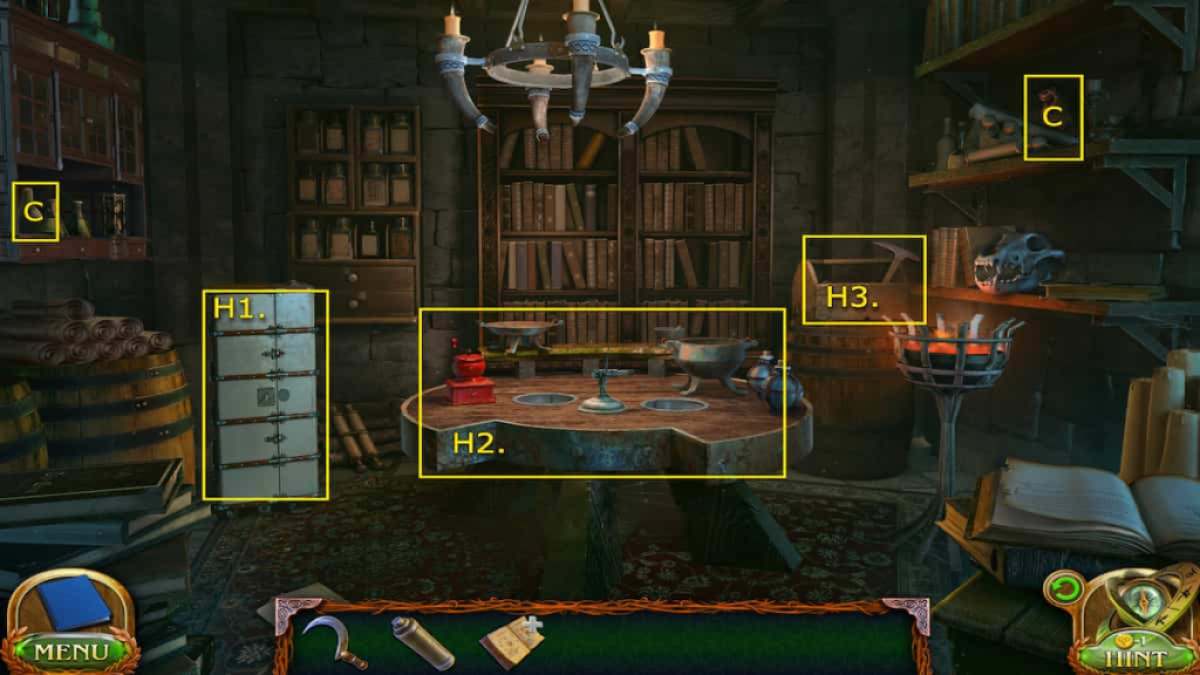
- H1. Chest cabinet
- H2. Potion table – Empty bottles
- H3. Tool crate – Mini pickaxe and Cabinet key
- (Collectible) On the shelf on the top right side – Wooden animal 6/7
- (Morphing Objects) Potion in the cabinet on the top left side 40/45
Before we can start making potions, we’ll need to gather some tools that will help us gather the ingredients we need. Check out the potion table in the center to grab the empty bottles there. Then, look in the little tool crate behind it and grab the mini pickaxe and Cabinet key. Use the key to unlock the Chest cabinet; it will have some of the ingredients we need for the potions. Now we can start collecting them.
How to brew the enchantment potions
Where to get all the potion ingredients
We can use the Book of Potions to help us find all the ingredients we need for both potions. These ingredients will be spread around many of the locations we were in before. Take a look at the image above and the list below to help locate them. You can put the found ingredients on the book to check items off the list.
Cat’s Intuition potion
- Spring water – At the Castle Woods, where we saved the dog (Use the Empty Bottles)
- Ice leopard’s whiskers – In the chest cabinet drawer
- Five-leaf cover – At the Castle Woods
- Veconium crystals – At the Castle Woods, same spot where you get Spring water (Use Mini pickaxe)
Elephant’s Memory potion
- Spring water – At the Castle Woods (Collected at the same time as the other Spring water)
- Fossilized mammoth’s brain – In the chest cabinet cubby
- Sunny willow leaves – In the Academy Backyard tree (Move the ladder back to grab the leaves)
- Paleritic coal – At the Castle Tower Portal in the blue vein (Use the Mini pickaxe)
Once you have all those items and place them in your Potions book to check them off, they will turn into the Set of ingredients in your Inventory. Now, you can take those to the Potion table in Maaron’s Hideout.
How to light the crystal flames on the Potions table
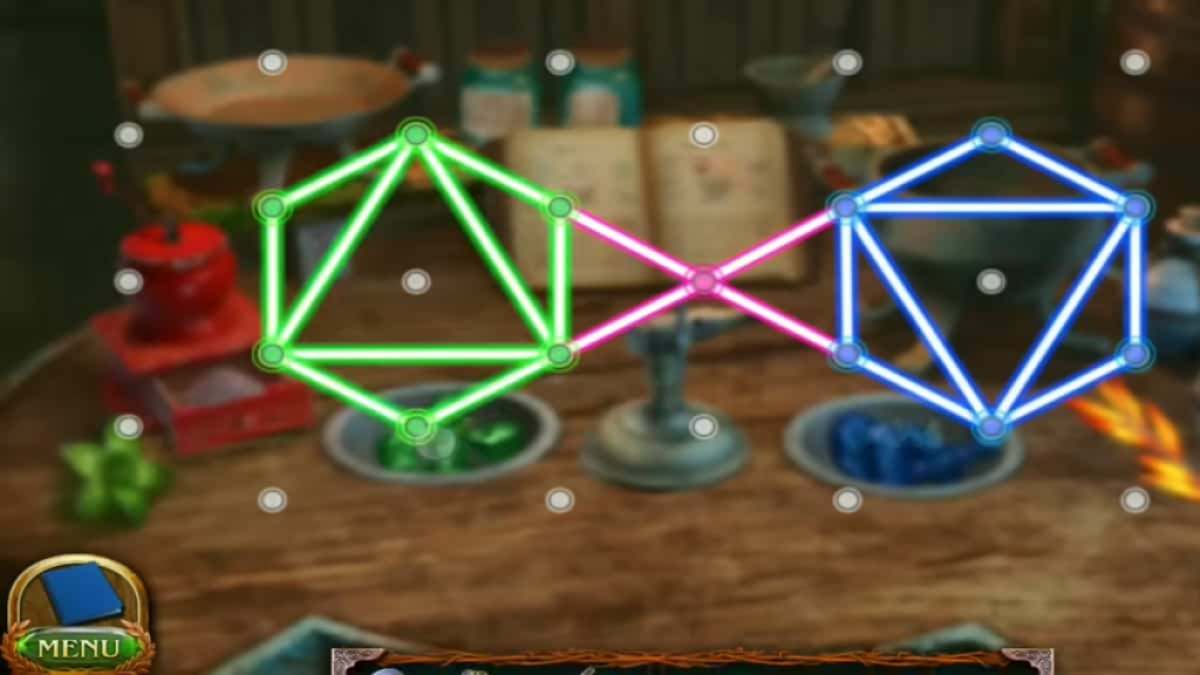
After placing the Set of ingredients on the Potion table, you can begin working on your potions. The first step will be lighting a fire. You’ll need to restore the pattern in the three colored lights by moving them around the dots provided. If you look closely at the background, you will see the correct pattern shown. The goal is to line up all the lines to match it. They can’t cross over each other. Check the image above for reference. When the flames are lit, you can begin creating the potions.
How to make Cat’s Intuition potion
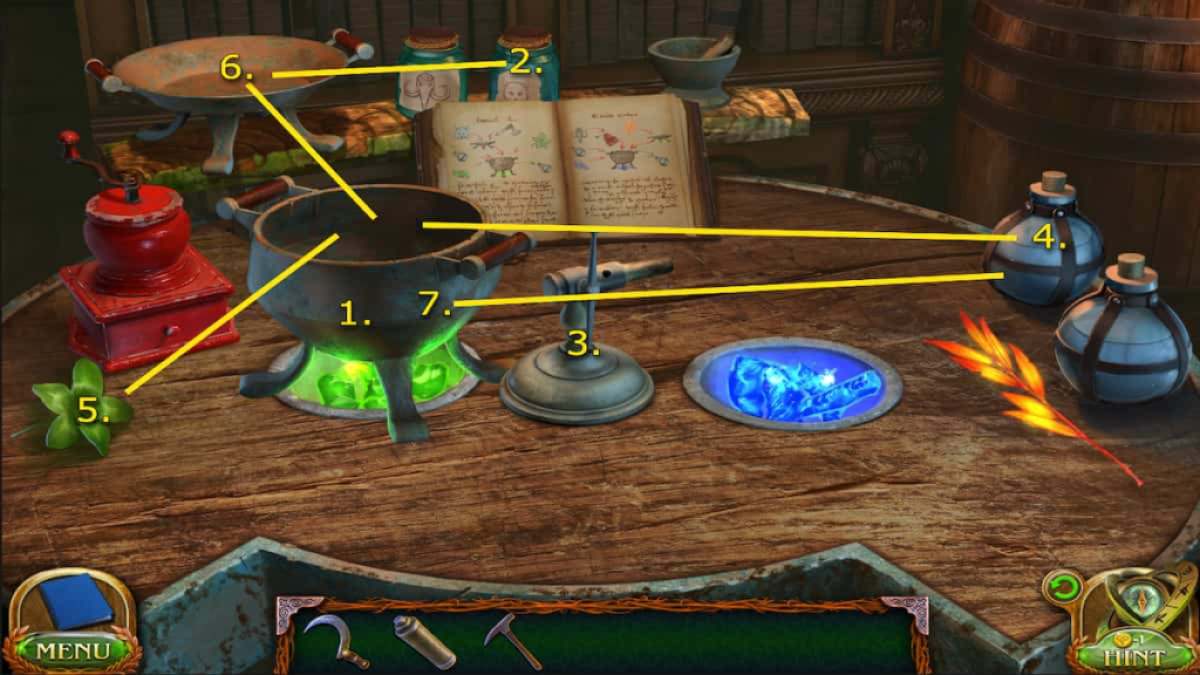
This potion is shown on the left page of the Potion’s book, which you can check for guidance at any time. Here’s how to make it, step-by-step:
- 1. Place the Cauldron on the green flame
- 2. Add the Ice leopard’s whiskers to the Plate
- 3. Use the Flame torch on the whiskers plate
- 4. Add Spring water to the Cauldron
- 5. Add Five-leaf clover to the Cauldron
- 6. Add the burnt whiskers to the Cauldron
- 7. Pour the Cauldron’s contents into the empty bottle
How to make the Elephant’s Memory potion
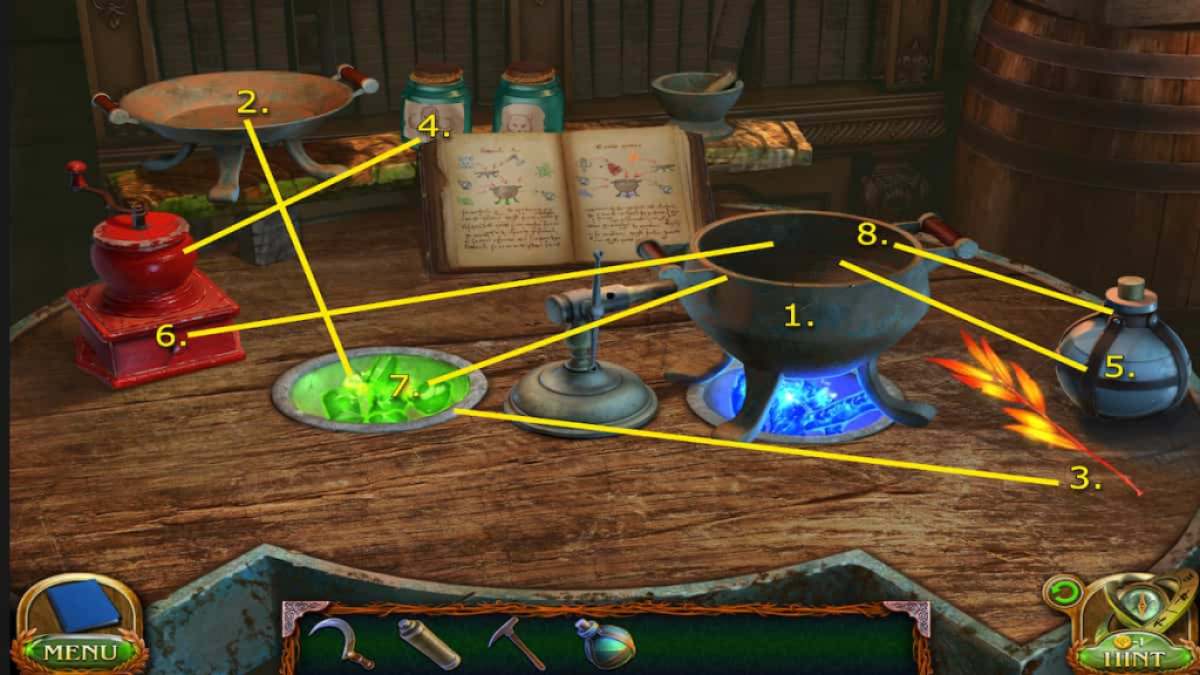
This potion is shown on the right page of the Potion’s book and will use up the rest of the ingredients we haven’t yet used. Here are the step-by-step instructions:
- 1. Place the Cauldron on the blue flame
- 2. Place the Plate on the green flame
- 3. Place the Sunny willow leaves onto the Plate
- 4. Add the Fossilized mammoth’s brain into the Grinder
- 5. Pour Spring water into the Cauldron
- 6. Add Fossilized mammoth brain dust to the Cauldron
- 7. Add burnt Sunny willow leaves to the Cauldron
- 8. Pour the Cauldron’s contents into the empty bottle
Now that we have both potions made, we can head back to the Office door in the Academy Backyard. Once interacting with the lock symbols on the door, use the Elephant’s Memory potion to memorize all the symbols. Then, head back to the Library Archive.
Where to find all the Office door keys
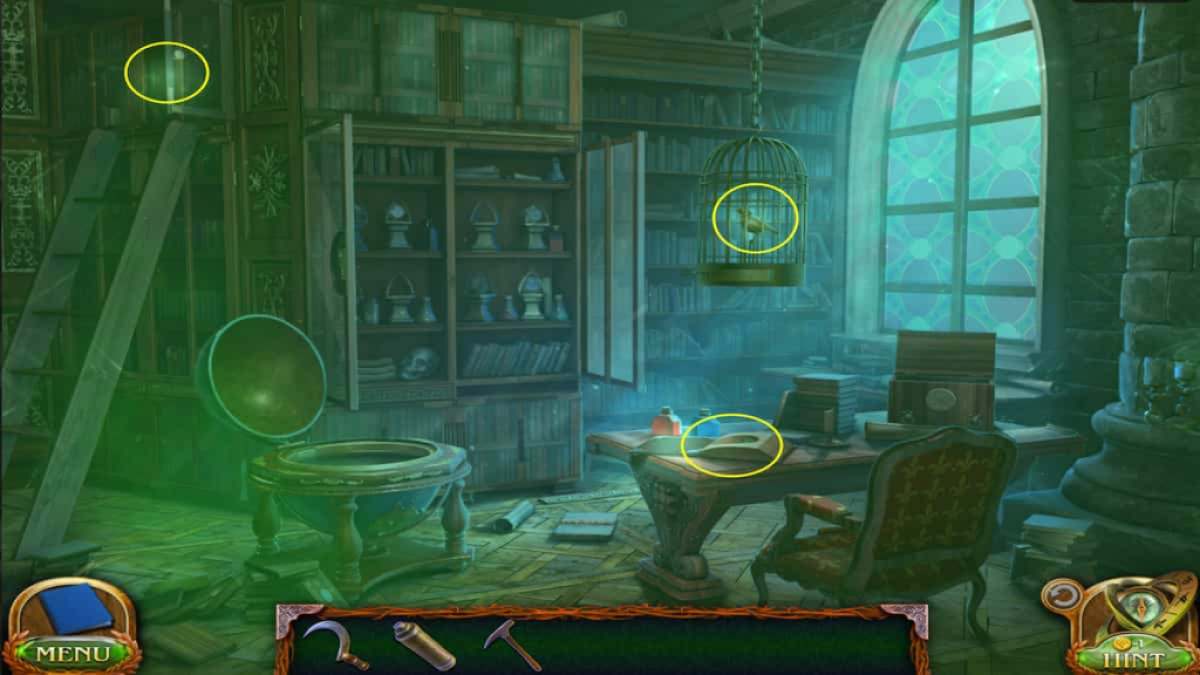
In the Library Archive, use the Cat’s Intuition potion to start looking for all the keys you need. They will all light up on the screen after taking the potion (as shown in the image above.) Each one will require a bit more to obtain, though.
How to get the book office key
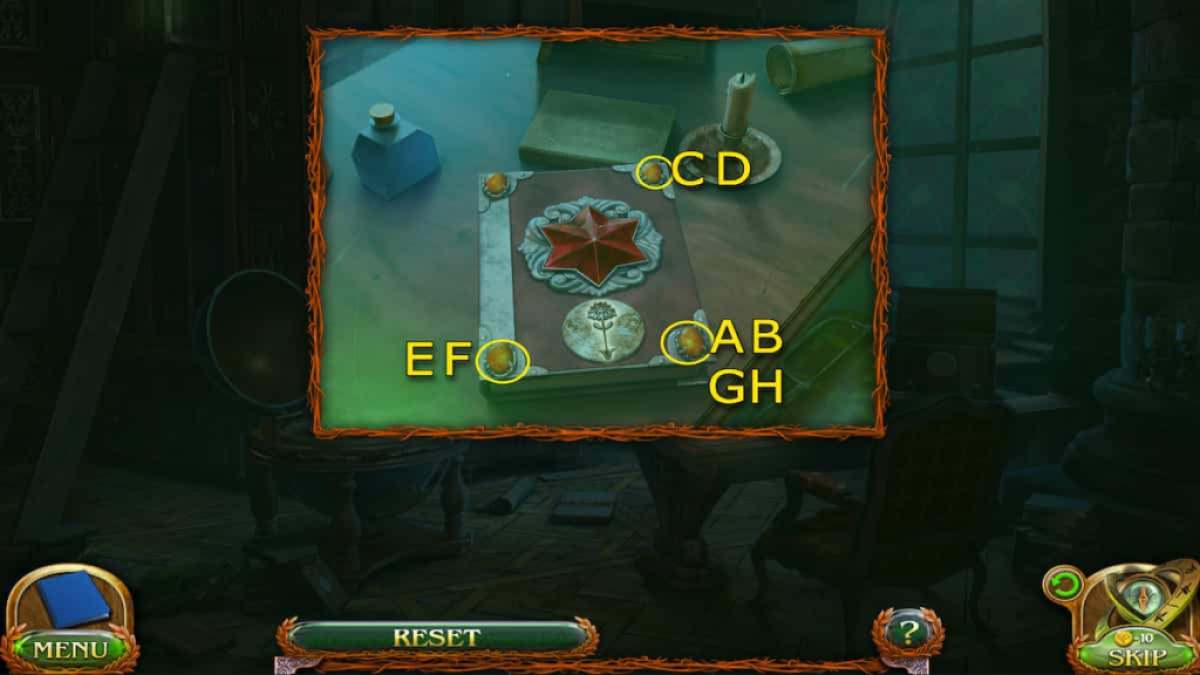
Just like the puzzle we completed in the book before, we will have to do it again to get the key. Watch the order the lights flash and then repeat it. Check the image above for help (remember it could be different for you since it’s random).
How to get the bird cage office key
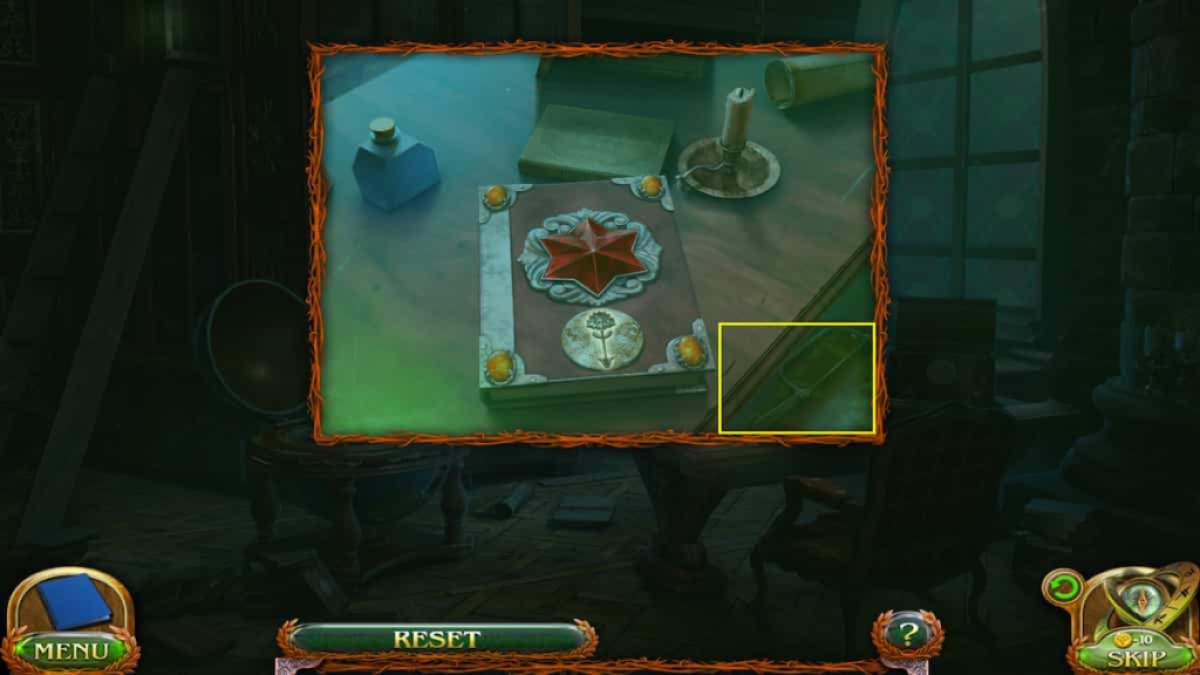
To get the bird key, which happens to be the bird statue’s head, you’ll need a way to get through the bars. You can just head back to the book where you got the first key and grab the Fretsaw located on the bottom right of the desk. Use the saw to cut through the bars and grab the second key.
How to get the cabinet office key
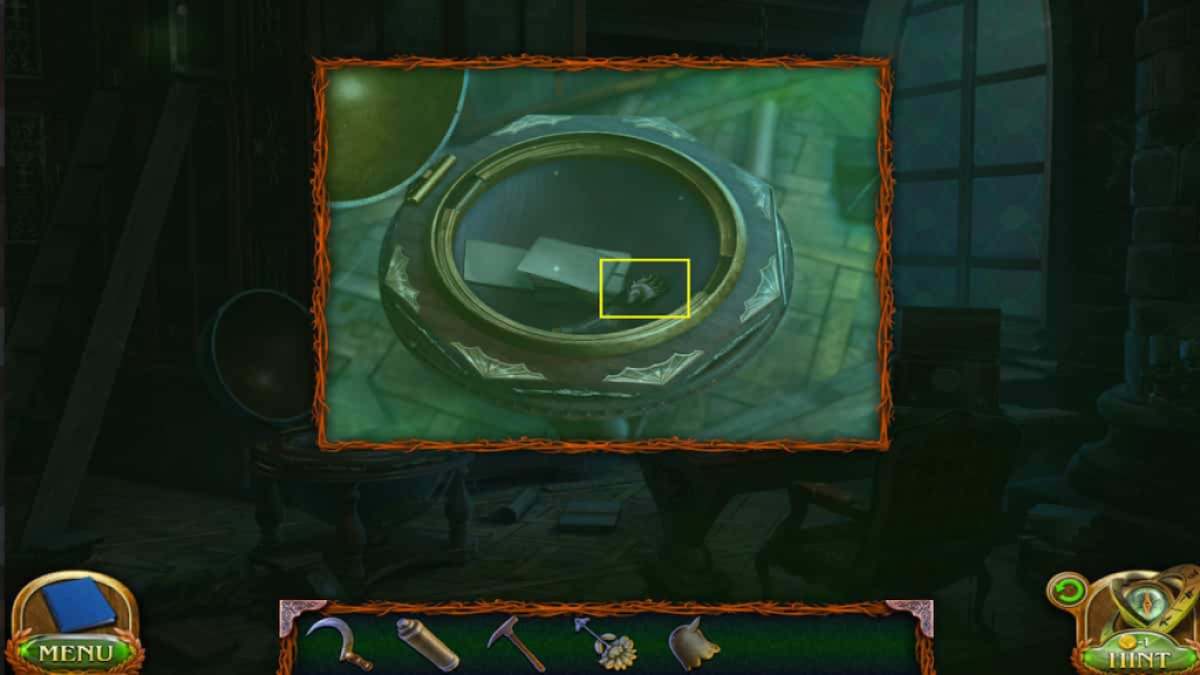
The last key is located in a box in the top cabinet. To open the box, we’ll need to fix the broken figurine on the lid. The figurine is a horse, so we’ll need a horse head. Check in the open globe, and you’ll find the missing piece. Return to the box and place it on the horse’s body, and it will open up.
How to unlock the Office back door
With all three keys, you can return to the Office door and use them in the correct slots to unlock the door. Bird key in the red slot, Spiral key in the yellow slot, and Flower key in the blue slot.
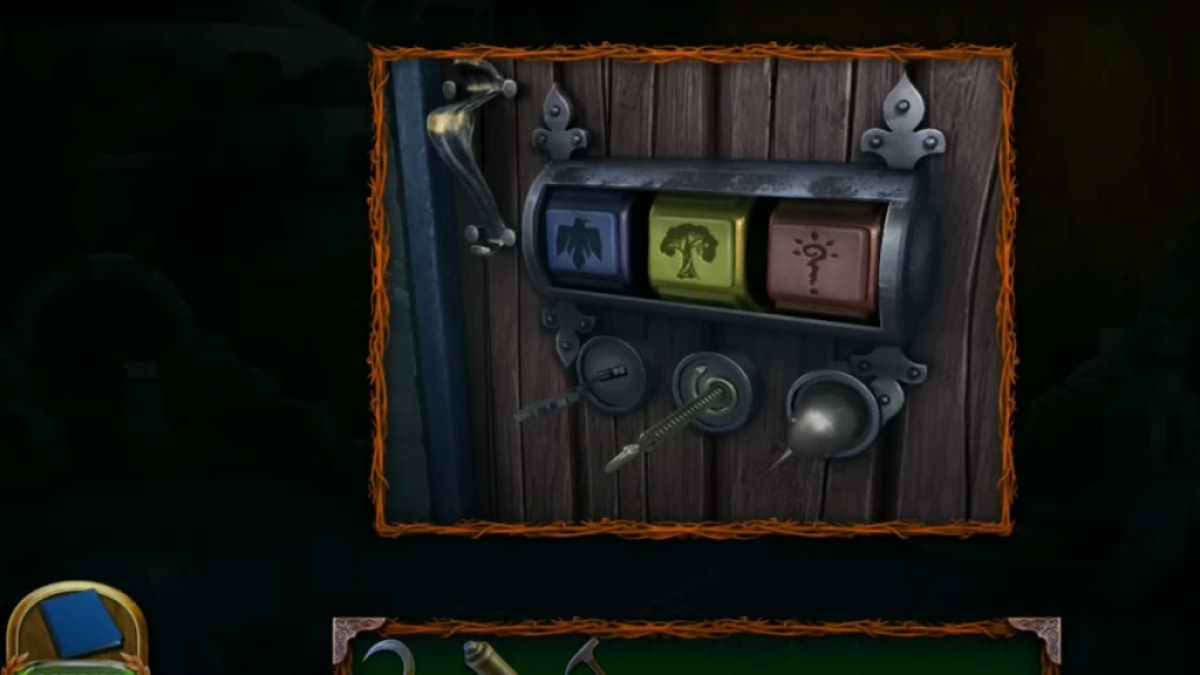
Now, you’ll need to solve the puzzle to get the door unlocked. We need to change the symbols to the correct icons; we saw a brief hint of this earlier. Click on the buttons to cycle through the symbols. Here’s what they need to be:
- Flower key: Bird
- Spiral key: Tree
- Bird key: Question mark
When you have the symbols in the right spots, the door will unlock and you can continue through to the utility room.
Where to find all the items in the Academy Utility Room
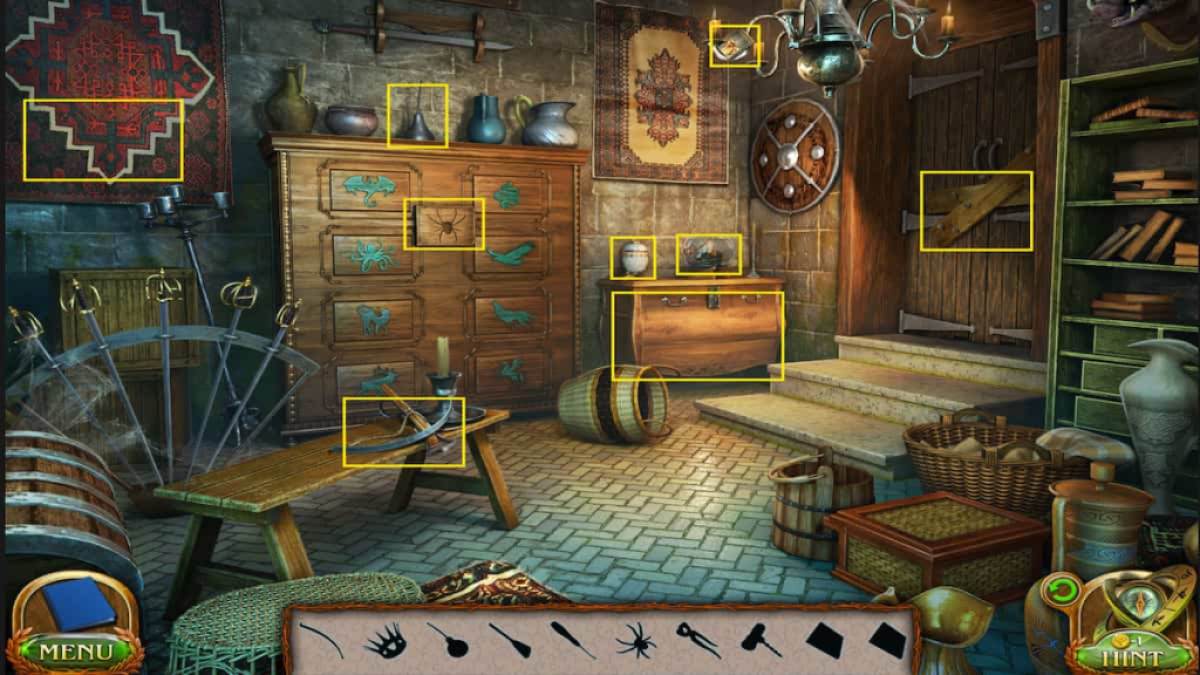
In the Utility Room, there will be several items you need to find to help you continue through to the Office. Some items require others to be obtained; here’s how to get them all:
- Crossbow limb – On the bench
- Oiler – On the animal cabinet
- Crown – In the loose brick behind the left tapestry (Use the Crossbow limb to wedge out the brick and then use Broom to dust off cobweb)
- Broom – In the chest cabinet near the door (Use the Oiler to open it)
- Picklock – In the ship bottle (Use the Corkscrew to open it)
- Spider figurine – In the loose brick behind the left tapestry (With Crown)
- Pincers – In the chest cabinet near the door (With the Broom)
- Corkscrew – In the animal cabinet (Place the two chips and complete the puzzle shown below)
- Chip 1 – On the candelabra (Use the sword to knock it down)
- Chip 2 – In the egg vase on the chest cabinet (Place the Crown on the top to open it)
How to solve the animal cabinet puzzle in the Utility Room
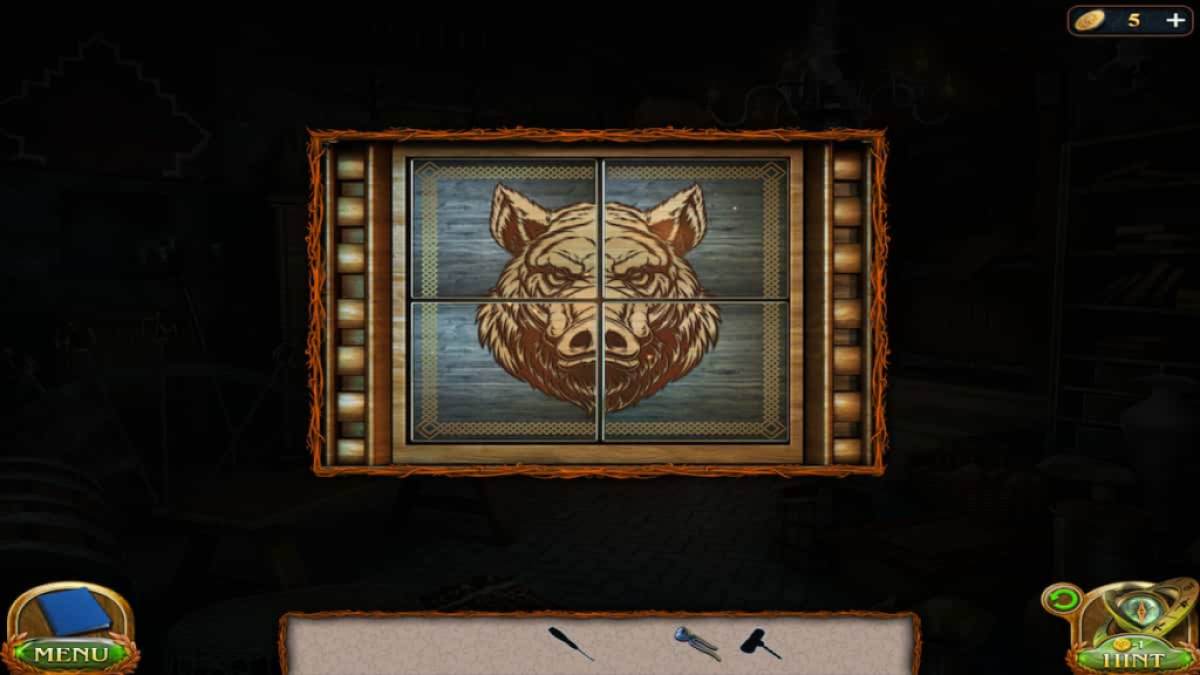
This is a simple puzzle that requires swapping out the pieces until they’re in the right spots to restore the pattern. It’s a hog’s face, so it should be pretty quick to figure out where they need to go. Use the image above for reference.
Once you find all the items you need and use them accordingly, you should be left with the Pincers and the Picklock. Use the Pincers to pull the nails out of the boards covering the Office door, and then use the Picklock to unlock it.
Academy Office (Return)
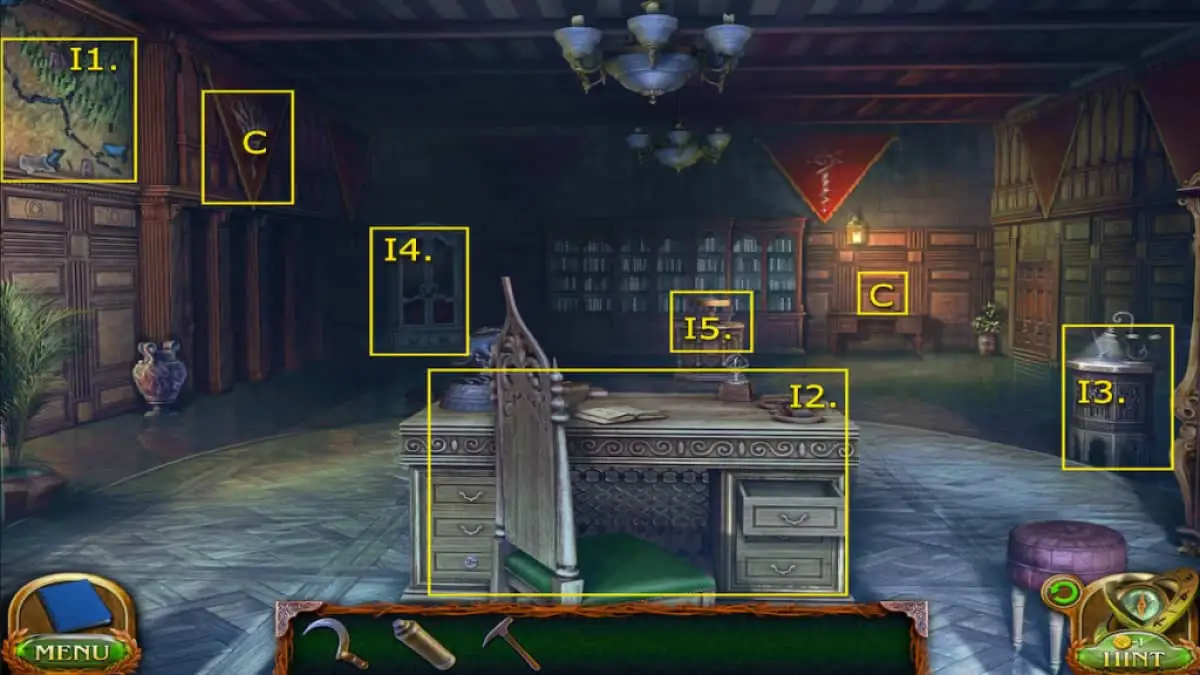
- I1. Map
- I2. Desk – Pattern element x2
- I3. Filter lamp – Pattern element and Quill
- I4. Wardrobe – Rune hyperstone
- I5. Rotating lamp – Pattern element
- (Collectible) On the stand in the back right corner – Wooden animal 7/7
- (Morphing Objects) Banner on the top left side of the wall 41/45
Unfortunately, the map is faded on the symbol we need to get to the Canyon; we’ll have to find a way to fix it. There are several different items we can interact with in the office that will give us what we need.
First, check the Wardrobe in the back left corner. It’s too dark to see anything. Grab the Filter lamp on the table on the right side of the room. Use the lamp to light up the Wardrobe. It’s missing several pieces of the front leaves pattern, and we’ll need to find them.
Where to find all the Wardrobe leaf pattern elements
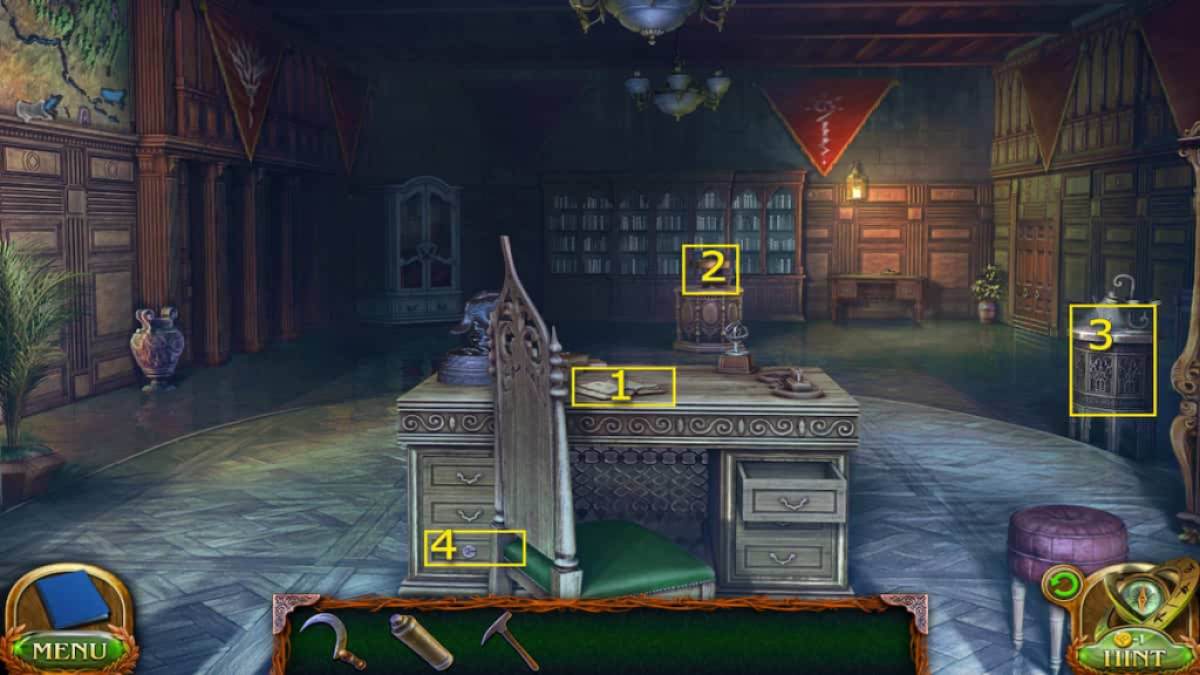
- Pattern element 1 – On the second page of the book on the desk
- Pattern element 2 – In the Rotating lamp on the far table (Use first pattern element piece to loosen it)
- Pattern element 3 – In the Filter lamp table (Use the second pattern element piece to open it)
- Pattern element 4 – In the locked desk drawer (Use the third pattern element piece to unlock it)
With all four, select Pattern element four from your Inventory and combine them all together. Then, place them in the Wardrobe.
How to solve the Wardrobe figurine puzzle
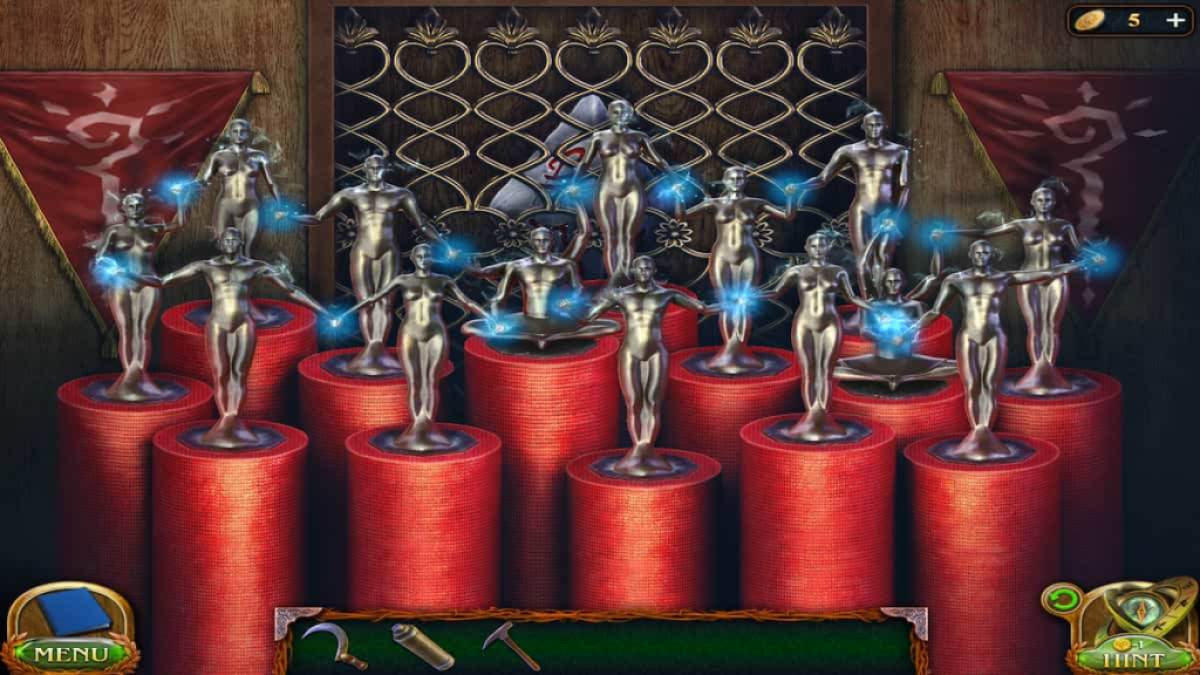
The goal of this puzzle is to rearrange all the figurines so that they all join hands. Press on a figurine and then on the spot where you want to move it to rearrange it. The hands will light up if they are joining correctly. Take a look at the image above for help. When they are in the correct spots, you can grab the hyperstone from behind them.
How to fix the faded map symbol
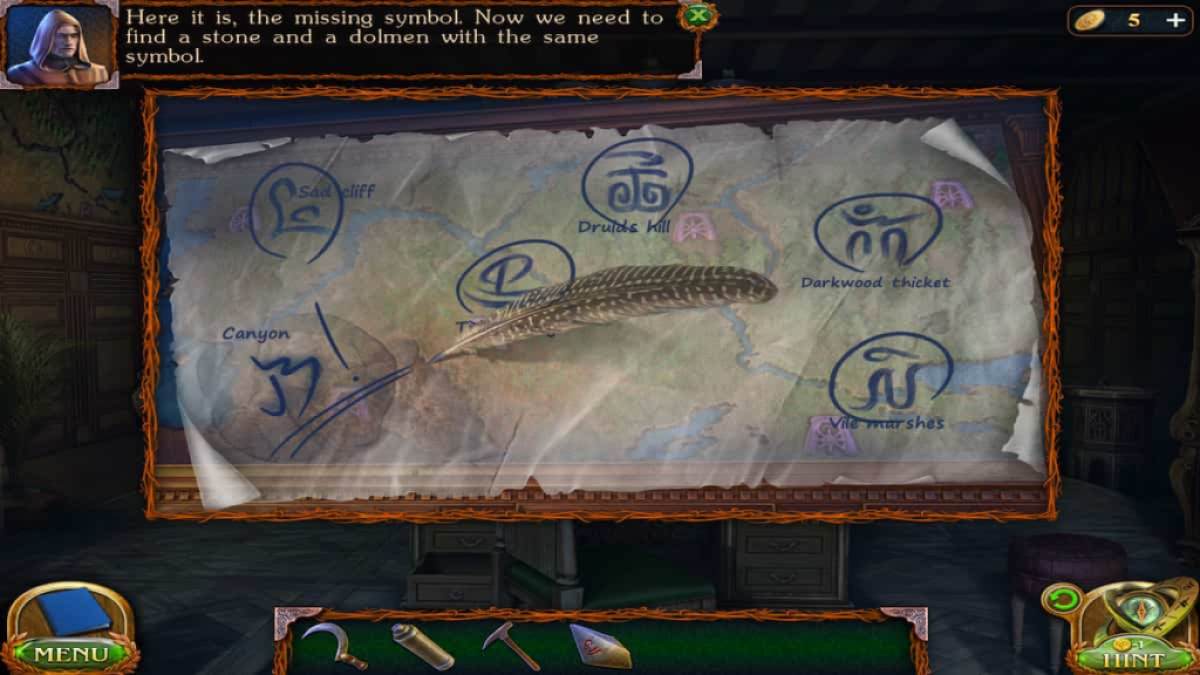
To fix the faded symbol, bring the Rune hyperstone to the map and place it on top of it. Then, grab the Quill from the Filter lamp table and place it with it. The goal of this quick little puzzle is to use the process of elimination to figure out which symbol is missing. Use the quill to mark the symbols you can currently see on the map that match the hyperstone. You can rotate the hyperstone by pressing on it and mark the symbols by pressing on them. Once all of them have been circled, find the one that still needs to be matched and then draw it on the faded symbol near the Canyons.
Now, we can head to the glass case in the Archives, retrieve the rune stone that matches the map, and use it to open the portal we need.
This is where we end part 1 of Chapter 3. Check back soon as we continue through the last part of the story!
Looking for more Lost Lands content? Check out our guides on Lost Lands 7 Redemption Walkthrough or Lost Lands 6 – Bonus Chapter Walkthrough & Solutions!
