Continuing with the Lost Lands 9 full Walkthrough, this part 2 of Chapter 1, where we will finish up Chapter 1 and delve into the mysterious hidden with the secret Dungeon Folly found.
Lost Lands 9 Full Walkthrough Guide – Chapter 1 Part 2
Folly’s invention has created a magical reaction and cracked the wall in his shelter, exposing some kind of puzzle within. This secret entrance will lead to brand new discoveries and puzzles to solve as we continue Chapter 1.
There are several more parts to Lost Lands 9 and I have split up into parts since it’s so long. You can continue the Walkthrough by navigating to each part listed here. We will update this section as we release them, so stay tuned.
Keep reading to work through the second half of Chapter 1!
Picking up where we left off, inspect the new crack in the inscriptions on the wall. You can use your Hammer to chip away the rocks and reveal a pattern puzzle.
How to open the secret entrance to the Dungeon
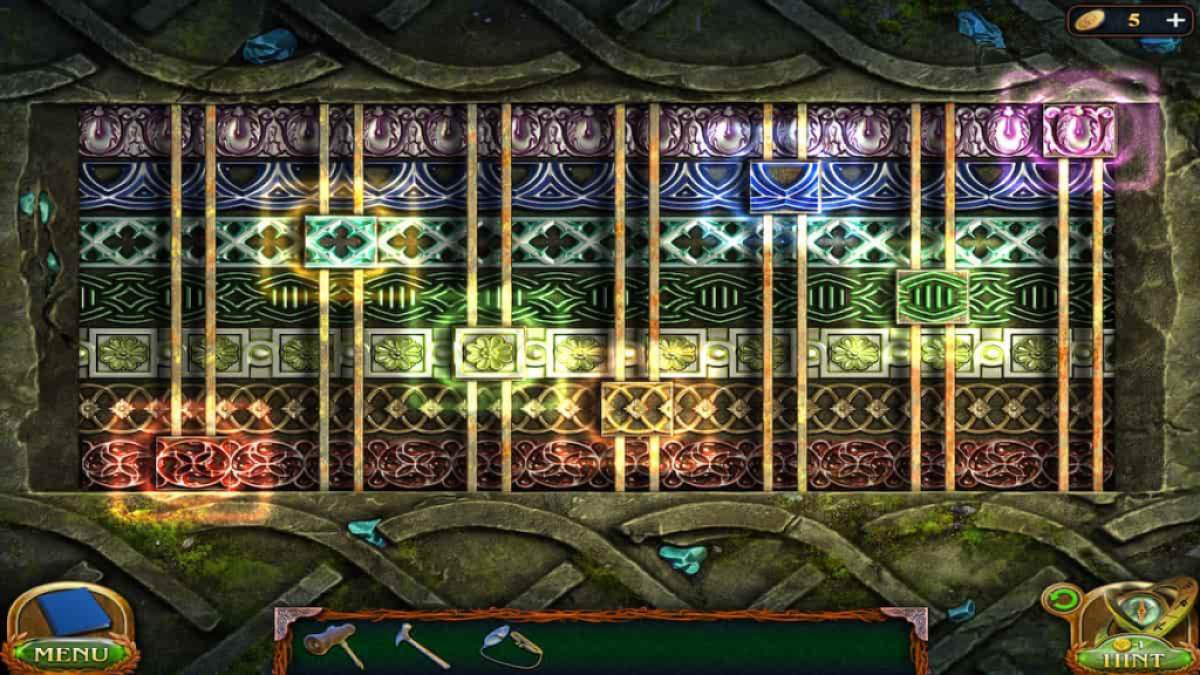
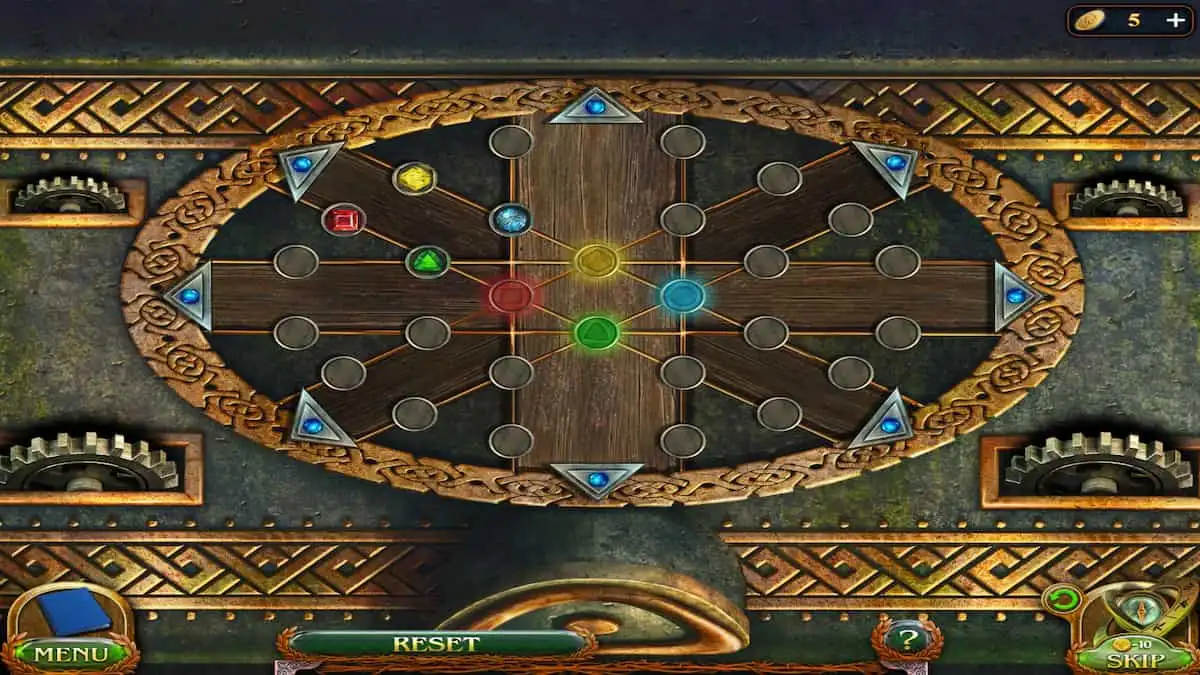
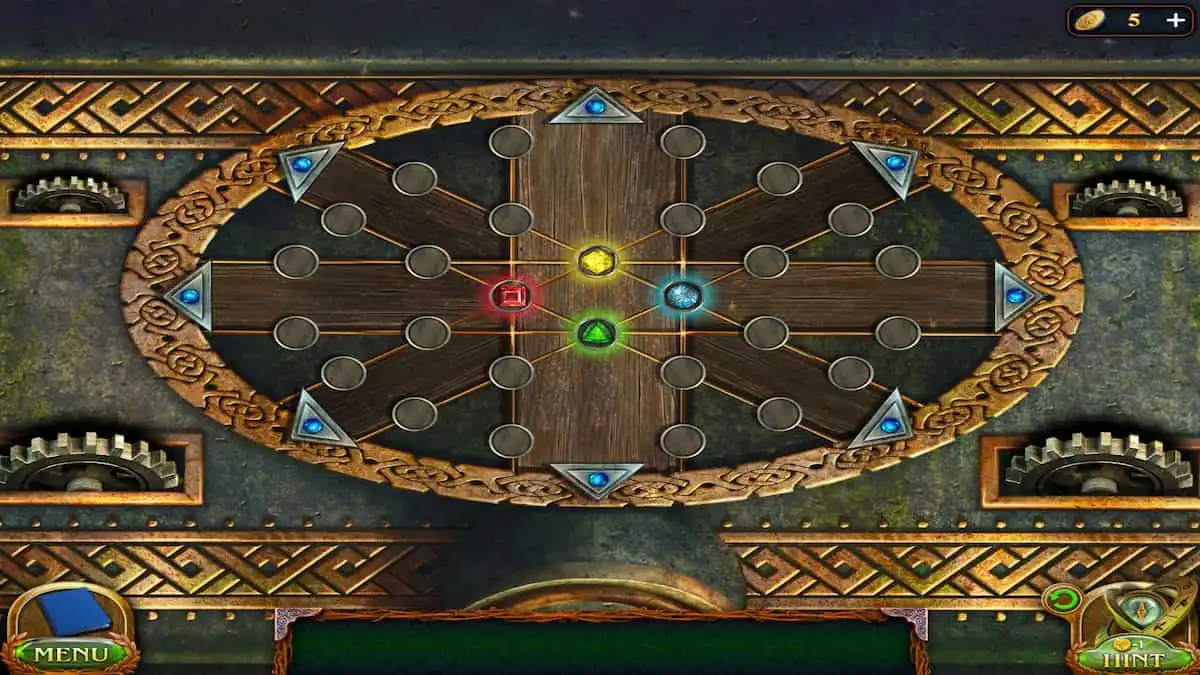
The goal of this puzzle is to get all the colored tile patterns in their matching color line. Some of the tiles are connected to other tiles, meaning when you move it up or down, other tiles will also move, occasionally in the opposite direction. There are a few different ways you can complete this puzzle, but here’s the order I moved them:
- Move red to green
- Move pink to green
- Move red back to green
- Move blue to blue
- Move turquoise to blue
- Move yellow to orange
- Move blue back to blue
- Move orange to orange
- Move turquoise to blue
- Move green to blue
- Move blue back to blue once more
- Then, move green to green
Once you complete the puzzle, the secret entrance will open up and allow you to enter.
Dungeon
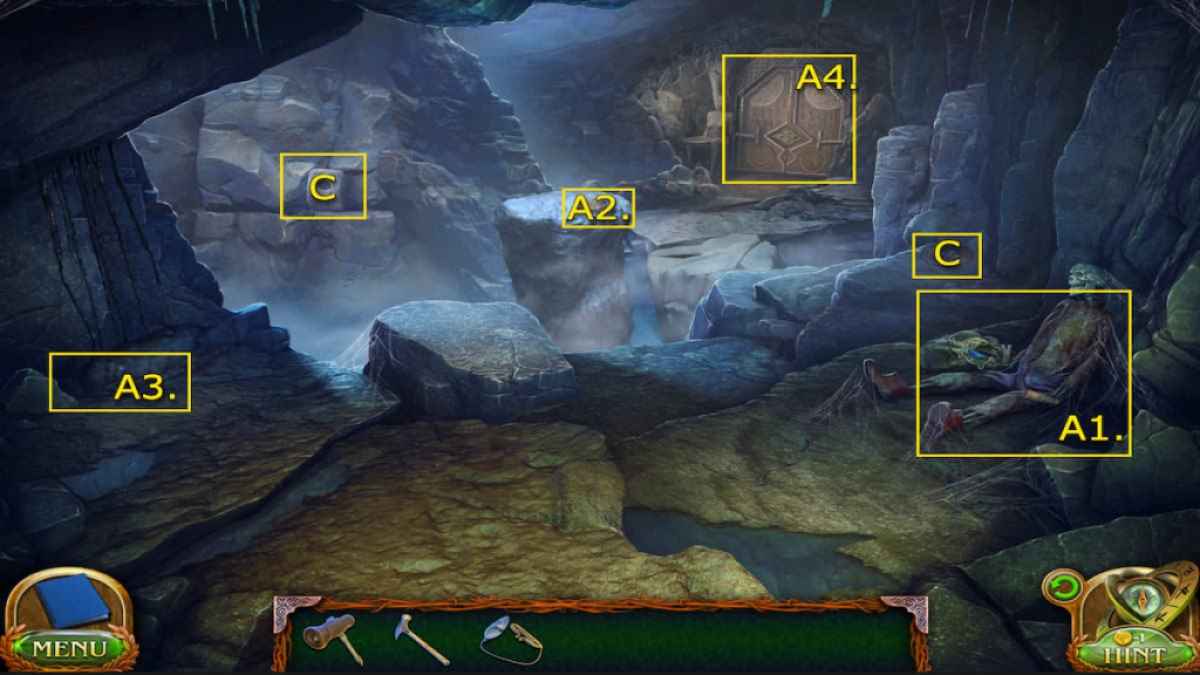
There is a lot more to see inside this dungeon, take note of all items, even if you can’t quite interact with them right now. They will all be important in the following parts.
- A1. Skeleton – Crystal candle and Pry bar
- A2. Ancient Seal
- A3. Black oil puddle
- A4. Glyph Door
- (Collectible) In the further right corner, past the skeleton – Gear 3/8
- (Morphing Object) Stone on the further stone wall on the left 6/45
Dungeon (Glyph Door)
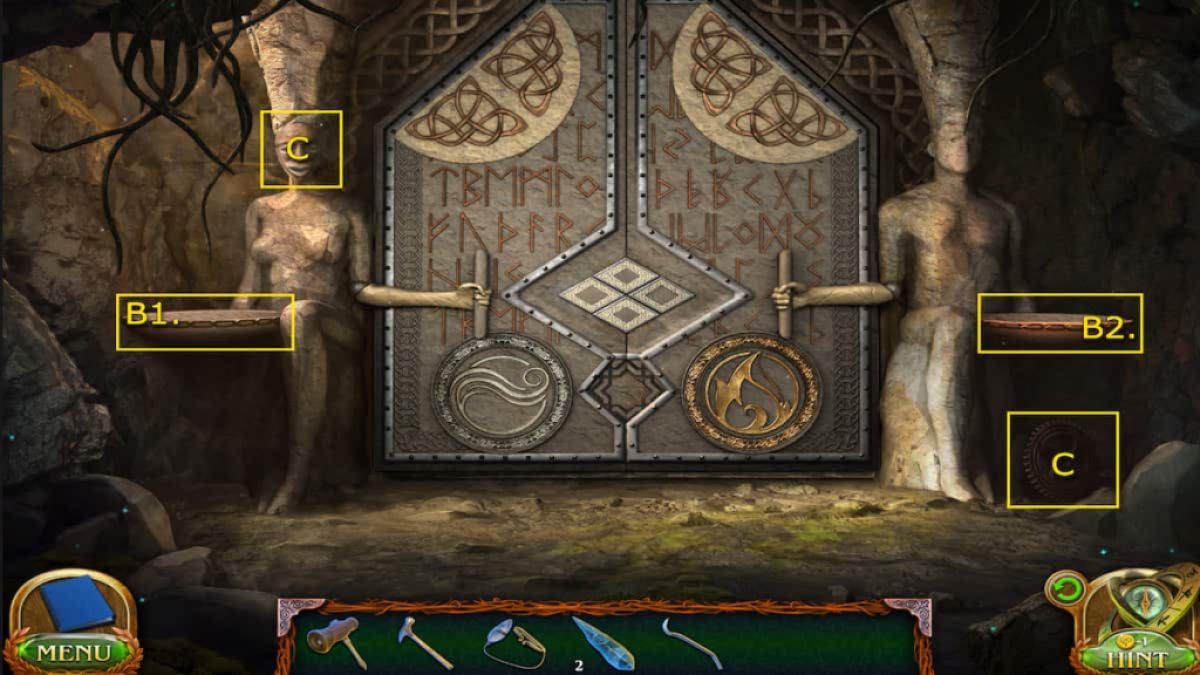
- B1. Left statue basin – Crystal candle
- B2. Right statue basin
- (Morphing Object) Left statue’s face 7/45
- (Collectible) Beside the right statue – Gear 4/8
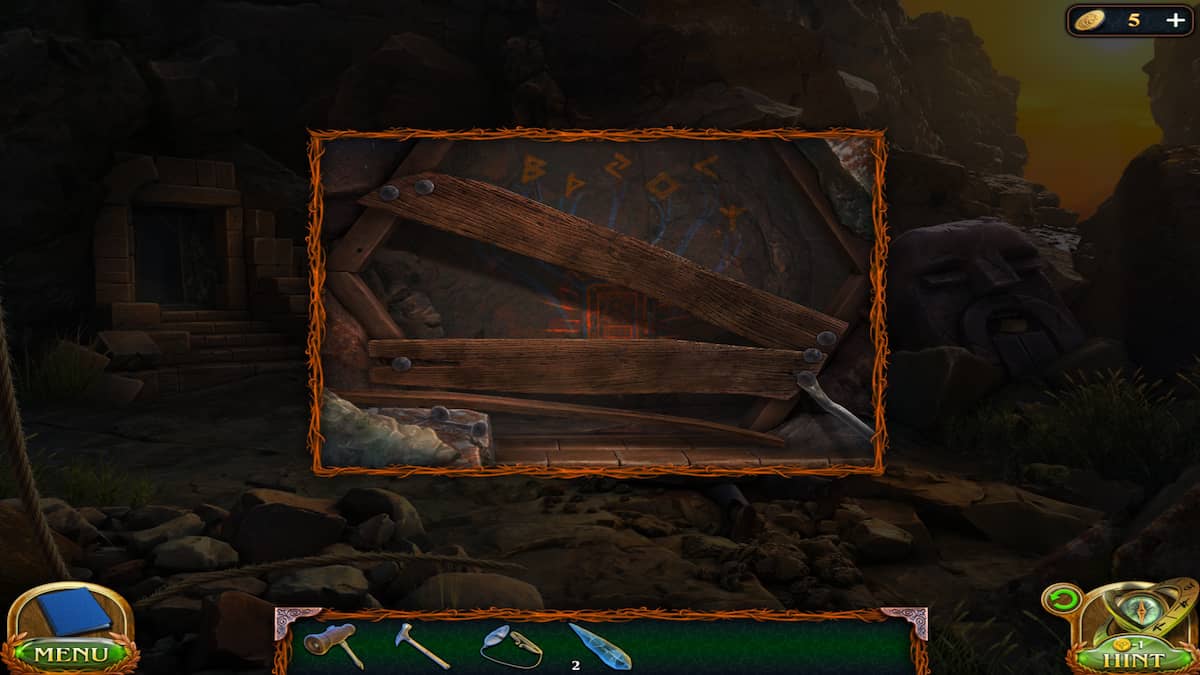
Now that you’ve looked around here and collected the Pry bar return to the Shelter Entrance. You can use the Pry bar to pull down the planks covering a drawing. Make sure to collect a Board once you do. Then, head back into the Dungeon to use the board to cross over to the Ancient Seal. This will, unfortunately, make the pillar fall and break the path to the door. Pick up the board again and try to use it to cross the door. It is too short of reach, so you’ll need more.
How to make a bridge to the Dungeon door
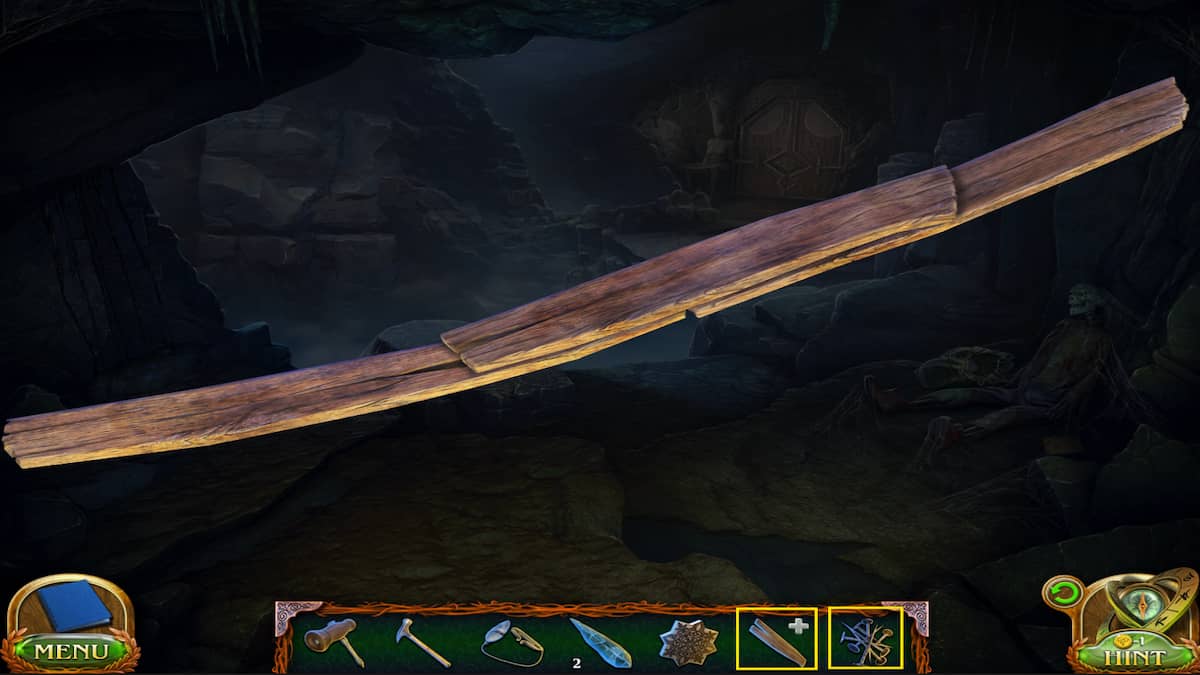
Head back to the Shelter Entrance, grab more boards, and the Nails in front of the drawing. Then, select your first board from your Inventory and add the other boards to it. Then, put the nails in. Use your Hammer to secure them all and finish your Self-made bridge.
Now, you can place the Self-made bridge across the gap to reach the Dungeon door again. You’ve made it to the door, but you’re still missing the two elements required to open it: fire and water.
Where to get fire and water
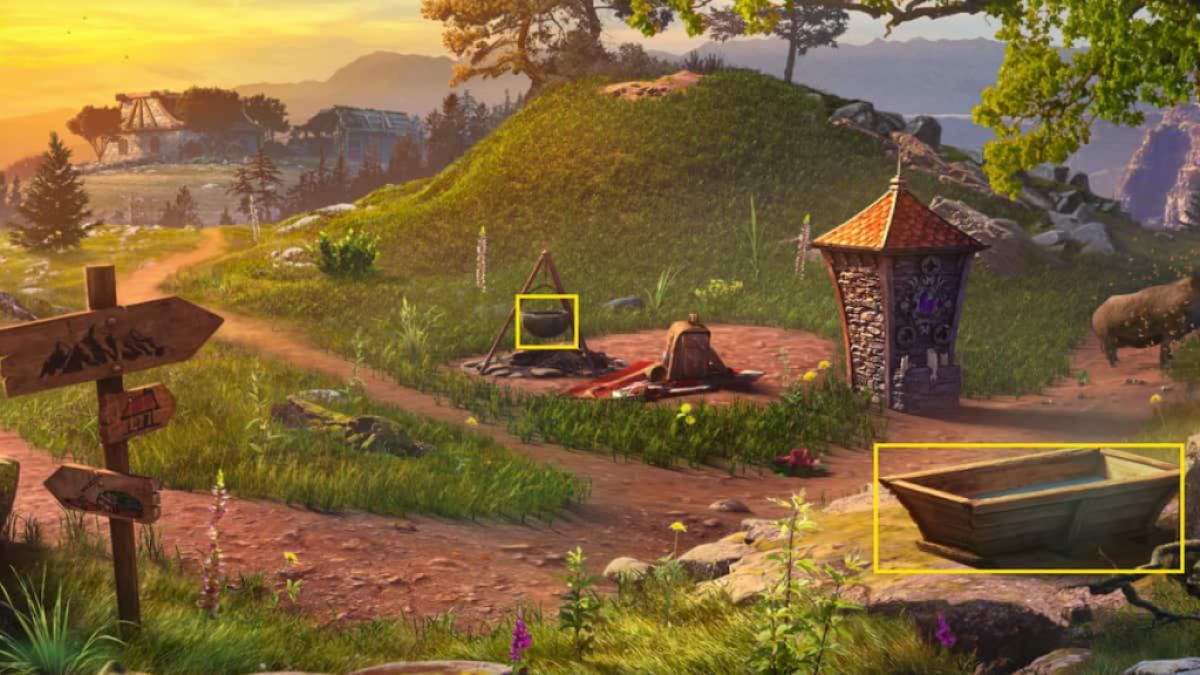
Return to the Village again and grab the Cauldron/pot from the campsite. Then, we interacted with the water trough where we found the Iron Flower earlier. Place the pot down beside the trough, then select the trough and pour some water into the pot. Now you can grab your Cauldron of water.
Return to the Dungeon door and pour the water from the cauldron into the left statue basin. This will give you your empty pot back.
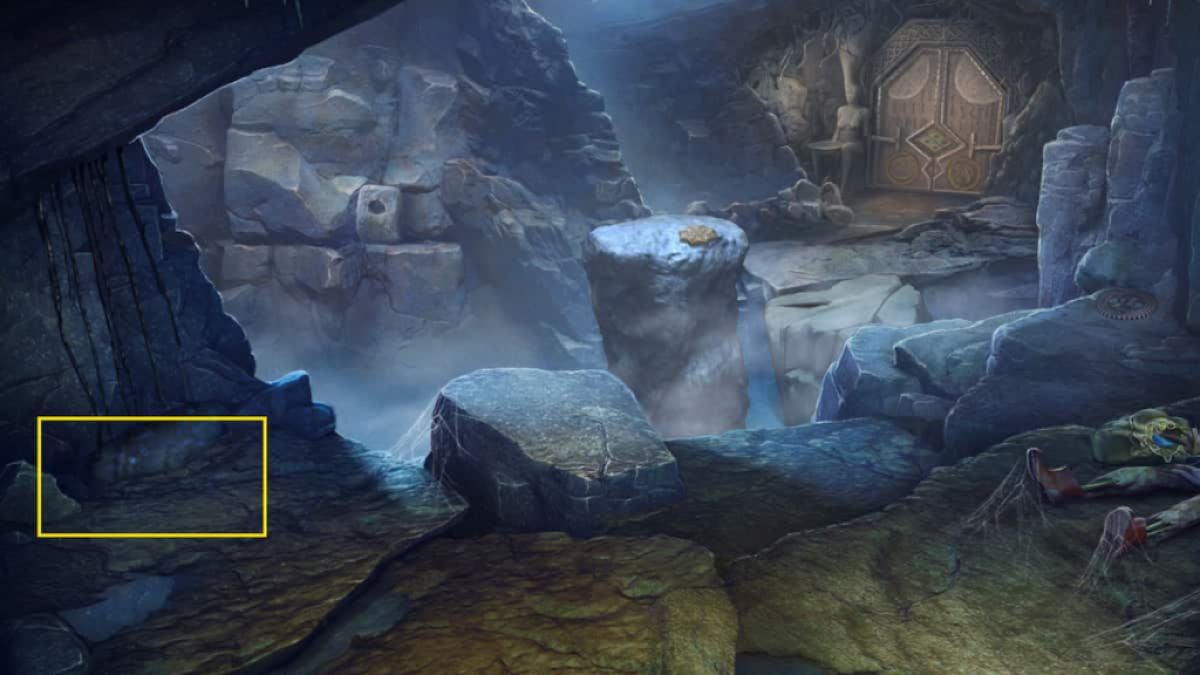
With the empty pot, head to the bubbling oil on the left side of the Dungeon cave. Scoop up some black oil into the cauldron. You can pour your hot liquid into the right statue basin at the Dungeon door. Then, you can grab your Flint from your Inventory and start a fire.
How to unlock the Dungeon glyph door
Now that you have the two elements in the basin on either side of the Dungeon door, you can place the Ancient Seal within the grooves at the bottom. This will allow you to interact with the Glyph puzzle in the center of the door. You can backtrack and look at the Treasure Hunter’s note near the skeleton for some clues. Here’s how to solve it:
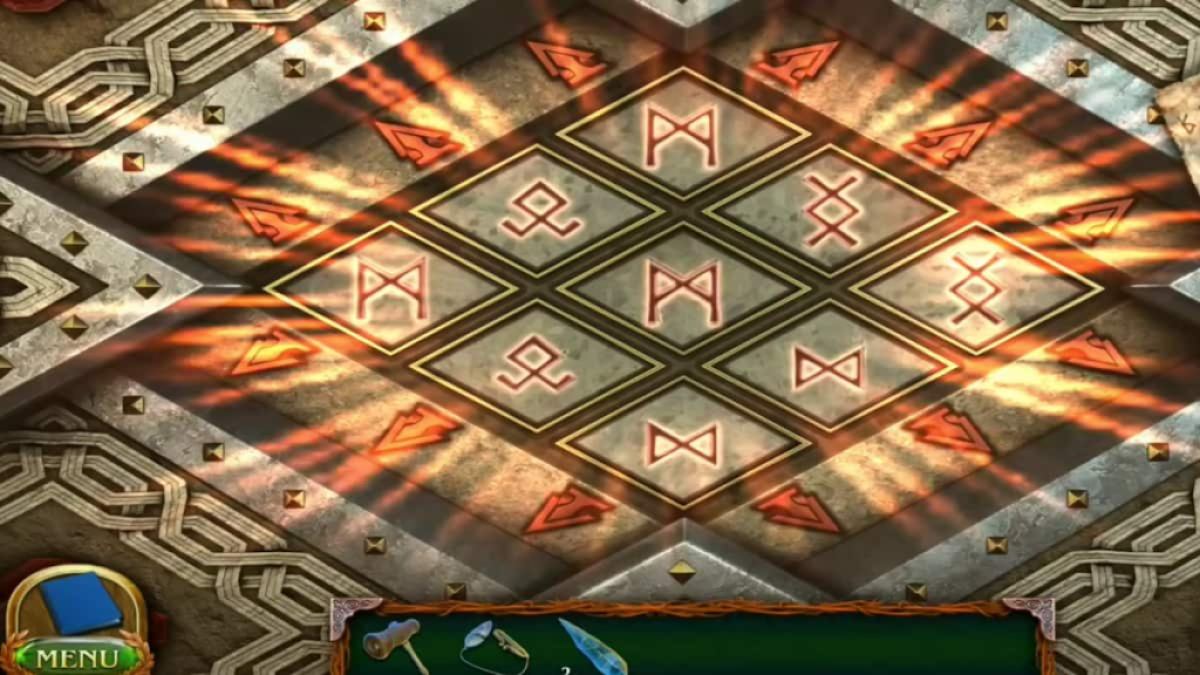
This puzzle will place the glyphs in a random starting position for everyone, but you can click your Treasure Hunter’s note from your Inventory and place it in the corner of the screen so you can keep checking it. The note will tell you exactly where to place each glyph on the board, so all you need to do is match the glyphs with the note.
Press the arrows around the glyphs to spin the row of glyphs up and down and left and right until you get the correct glyphs in the spots shown on the note. There’s a few different ways to get this proper layout, but here’s how the order I did it:
- Middle row – right x1
- Right row – up x1
- Middle row – right x2
- Bottom row – right x3
- Left row – down x1
- Bottom row – right x2
- Middle row – down x1
- Left row – left x1
- Middle row – up x1
- Left row – up x1
- Bottom row – left x2
- Left row – up x1
- Bottom row – left x1
When the glyphs are in the right spots, the Dungeon door will open and allow you to open the next area.
Dungeon City
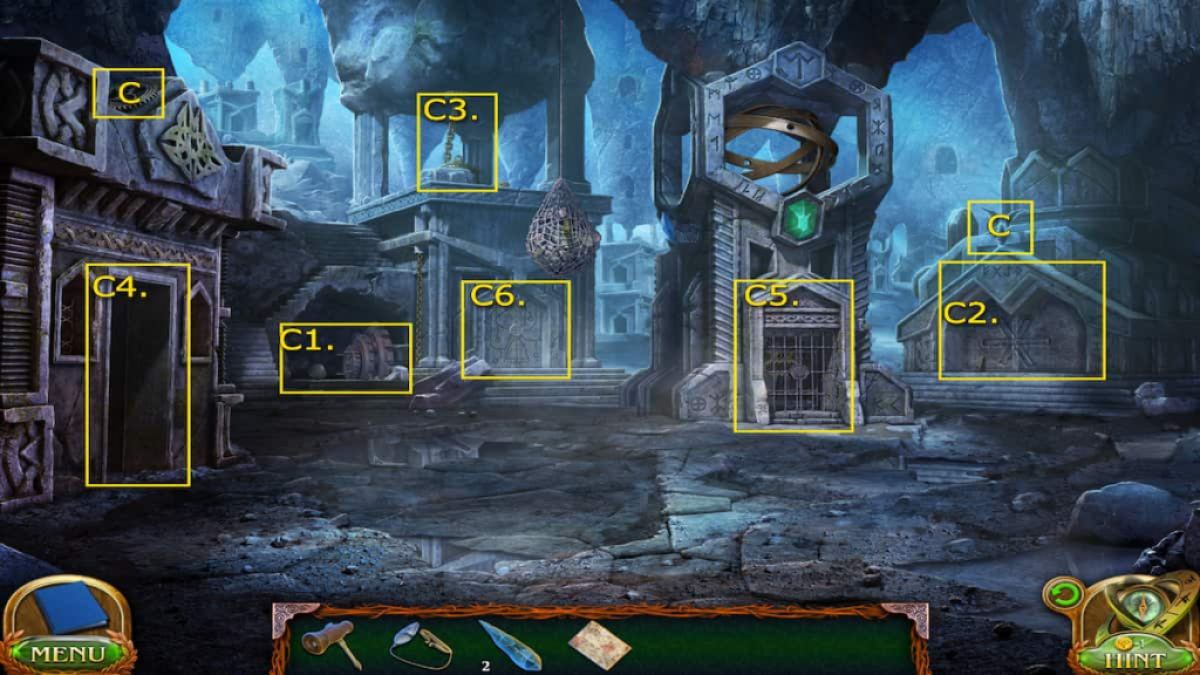
Once you open the Dungeon door, you will be able to enter the hidden city within. You’ll have a minute to look around before a cutscene cues showing Folly’s sister has followed him there and joins him on his adventure.
- C1. Gear Mechanic – Crystal Candle
- C2. Doorway with glyphs – Shaft Lock
- C3. Bell – Broken connector, Crystal Candle, and Hourglass Figurine
- C4. Forge door
- C5. Hourglass gate
- C6. Bell door
- (Collectible) On the top of the building on the left side – Gear 5/8
- (Morphing Objects) On top of the doorway on the right side – Angel statue 8/45
Find the Shaft Lock on the doorway with the glyphs on the right side of the city. Then, investigate the large gear mechanic in the opposite corner and use the Shaft Lock to fix the broken piece. Just to the left of it you can move a rock and collect another Crystal Candle. Grab the Broken connector from the bell hanging in the tower in the back left side of the city, and then enter the doorway of the stone house directly to the left to enter the Forge.
Dungeon Forge
There isn’t too many objects you can interact with in the Forge right away but you can use it to repair the Broken connector you grabbed from the bell. Select the Connector from your Inventory and place it on the desk in the back right.
Where to find all Forge items
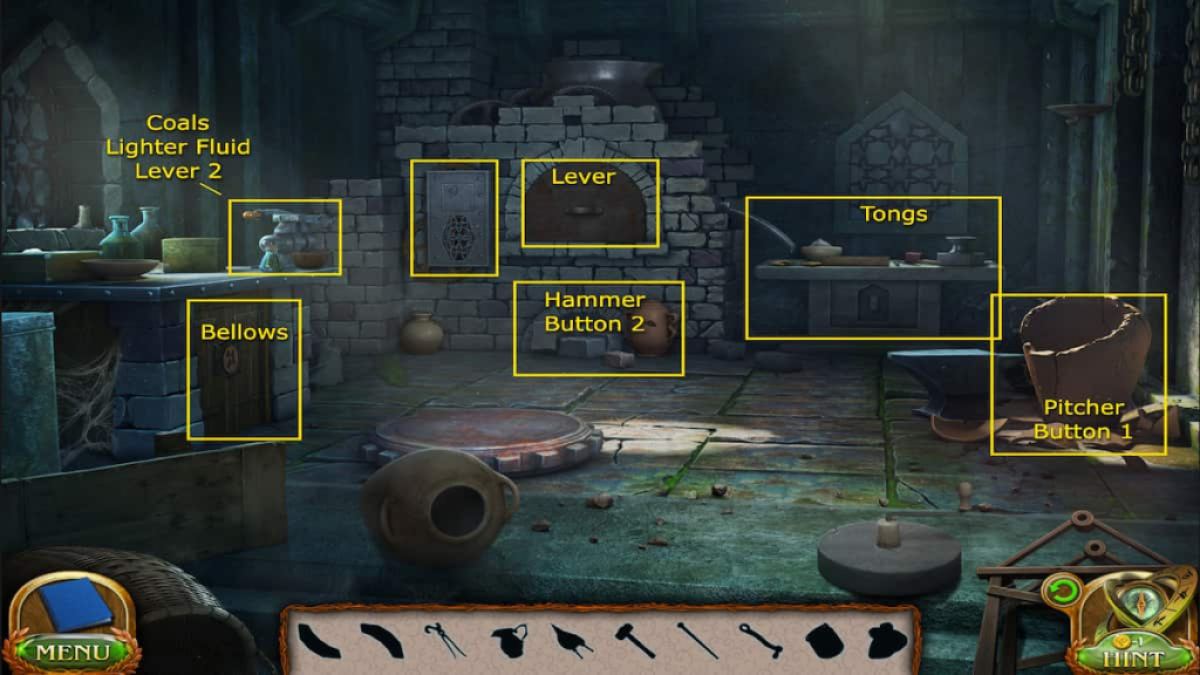
To repair the Broken connector you will need to use all the items on the repair station in the correct order. The icons at the bottom show you everything you need to find and use, but not all of them are right on the table. Here’s where to get them all:
- Pitcher of water: Next to the anvil on the right side of the Forge in large vase. Pitcher is in basket above.
- Button: On the floor beside the basket where the Pitcher is found
- Lever: In forge oven
- Hammer: Underneath the Forge oven after removing bricks
- Button 2: Underneath the Forge oven using brick to smash the pot
- Coals: Near the vise on table to the left side of the Forge
- Lighter Fluid: On the vise table (Open the box and see instructions. Use the bowl of mixture on test tubes, grab bottle of liquid from the box and use on the test tubes, and then place corks back in them to collect it)
- Bellows: By placing the two buttons in locked cabinet and completing the ball puzzle
- Lever 2: Use the first lever we found in oven on the vise to loosen it and grab the second lever
- Tongs with Molded Connector: The last icon is only filled with the tongs and connector after you’ve poured your liquid fire into the mold. (Tongs are right on the table and can be used to lift the connector and move it to the next spot)
How to solve the Forge ball puzzle
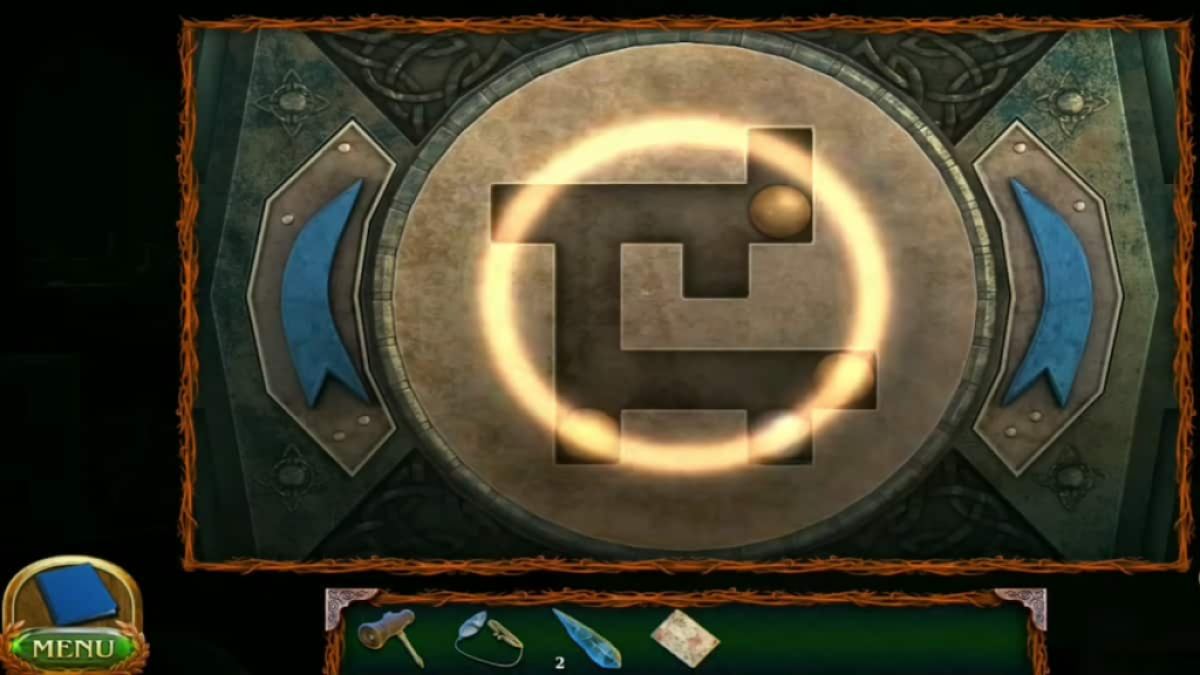
To open the cabinet on the left side of the Forge and collect the Bellows, you’ll need to solve a quick little ball puzzle. To begin, place the two buttons you find hidden around the Forge on either side. Then, you can begin to solve the puzzle by using the buttons to rotate it to the left and right, moving the balls as you do, attempting to reach the pressure point on the top. Here’s how I did it:
- Left Button x2
- Right Button
- Left Button x2
- Right Button x3
- Left Button x1
- Right Button x1
- Left Button x1
How to repair the Broken connector
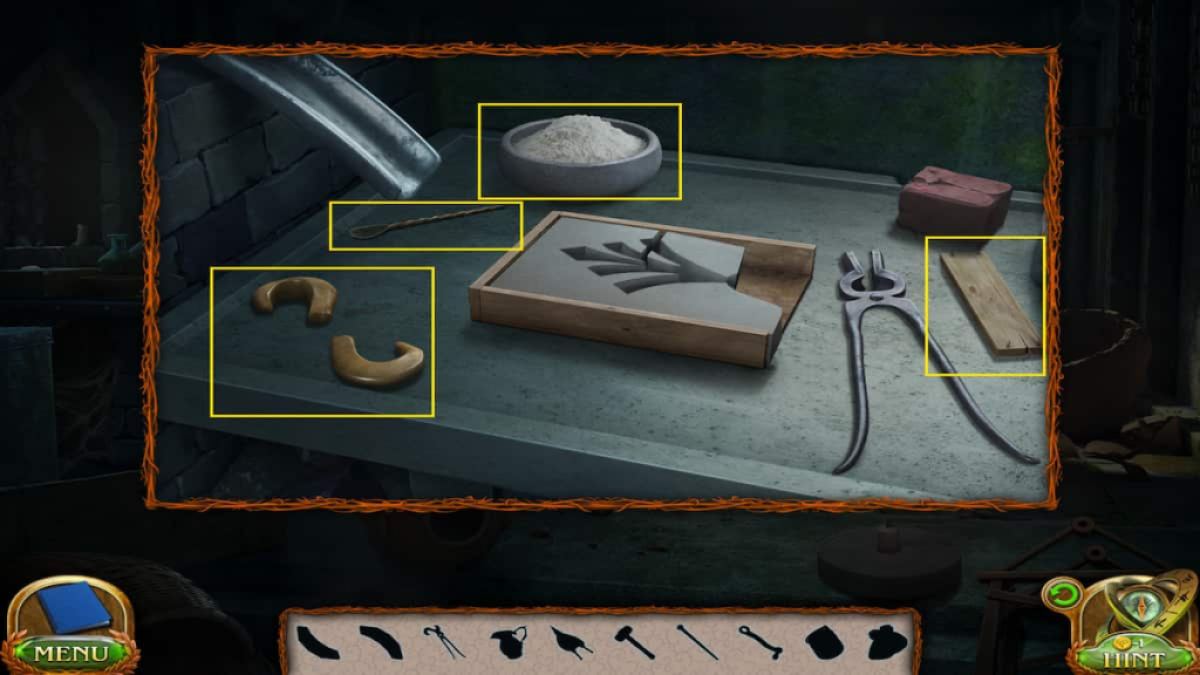
Once you have everything you need to make the new Connector, you can get started with the forging process. There is a lot that goes into making this new piece. It’s not too difficult but you will need to perform the steps in the right order, so here’s how:
- Use needle to pry out the old mold
- Repair your wooden frame using wooden board
- Pour in powder mixture into the frame
- Pour water from your Pitcher of water into the frame
- Mix the mixture using the needle
- Place Broken connector into the frame
- Place Coals in the Forge oven
- Place Bellows underneath the Forge oven where we found the hammer
- Place Lever 2 on the gear box beside the Forge oven
- Douse Coals with the Lighter Fluid
- Use the Bellows to provide air for your fire
- Crank the box beside the oven to pour liquid fire into the mold
- Use pliers on the repair station to lift the new connector out of the mold
- Place the Molded connector in the vase of water beside the anvil
- Hammer it on the anvil finish your Connector
When the Connector has been repaired, you will automatically move back to the Dungeon City. From there, you can interact with the Bell and place your new Connector. Now your goal is to ring the bell. First, use the Gear Mechanic to lift the bell, and grab the Crystal candle and Hourglass Figurine underneath it.
How to solve the hourglass gate puzzle
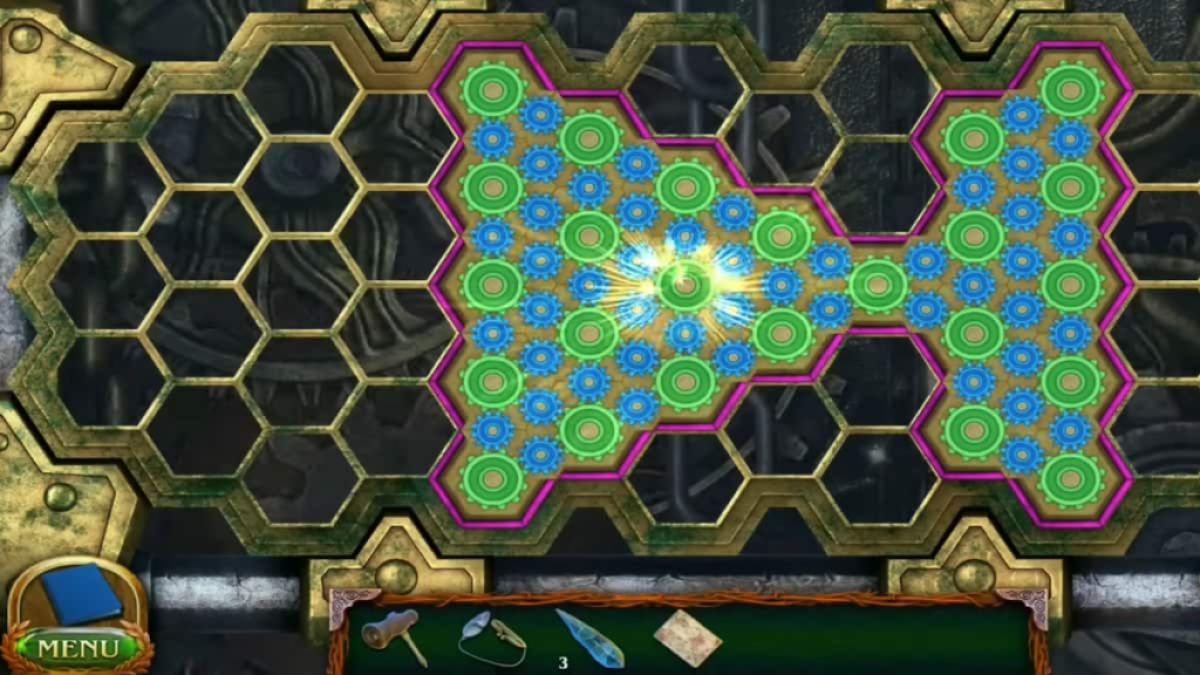
Now that you have the Hourglass Figurine, head to the locked gate with the missing Hourglass piece in the City. Place your Hourglass Figurine in the open slot and the gate will open, and you can begin completing this puzzle.
This puzzle requires you to form all the octagon pieces together by lining up the purple lines on the edges of them. It doesn’t matter where you place them on the board, as long as they are all joined together with the frame properly aligned all the way around. There are a few different puzzles you can get here, so it isn’t a guarantee it will be the same as mine. I found it easiest to place the corner pieces in first and then work my way toward the center. Take a look at a the picture above from reference.
Once you complete this puzzle, the bell will begin ringing and you can interact with the bell door beneath the bell tower.
How to open the bell tower door
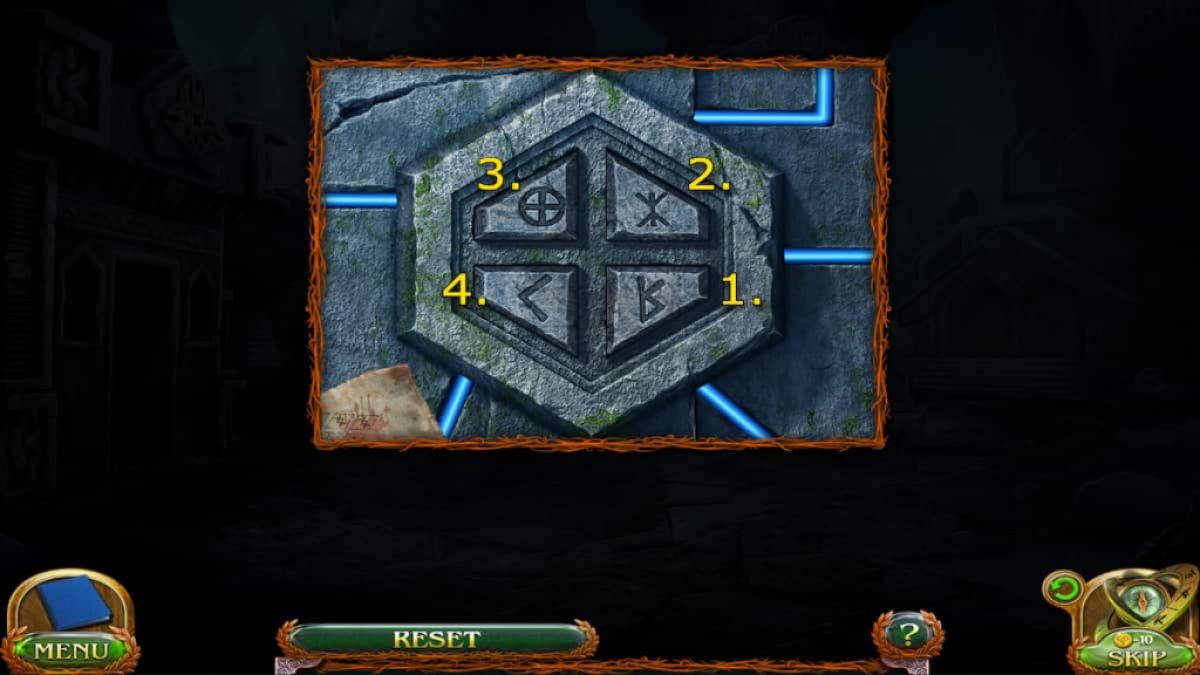
There are more glyph buttons on the bell tower door. Luckily, we still have the Treasure hunter’s note from earlier we can place on the side of the buttons to help us out. The note will tell us exactly what sequence to type in from the four glyphs located on the top left side of the note. Here’s what you’ll need to press: upside down R, double-sided fork, crosshair, and left arrow. The gate will open and you can enter the Sarcophagus Room.
Sarcophagus Room
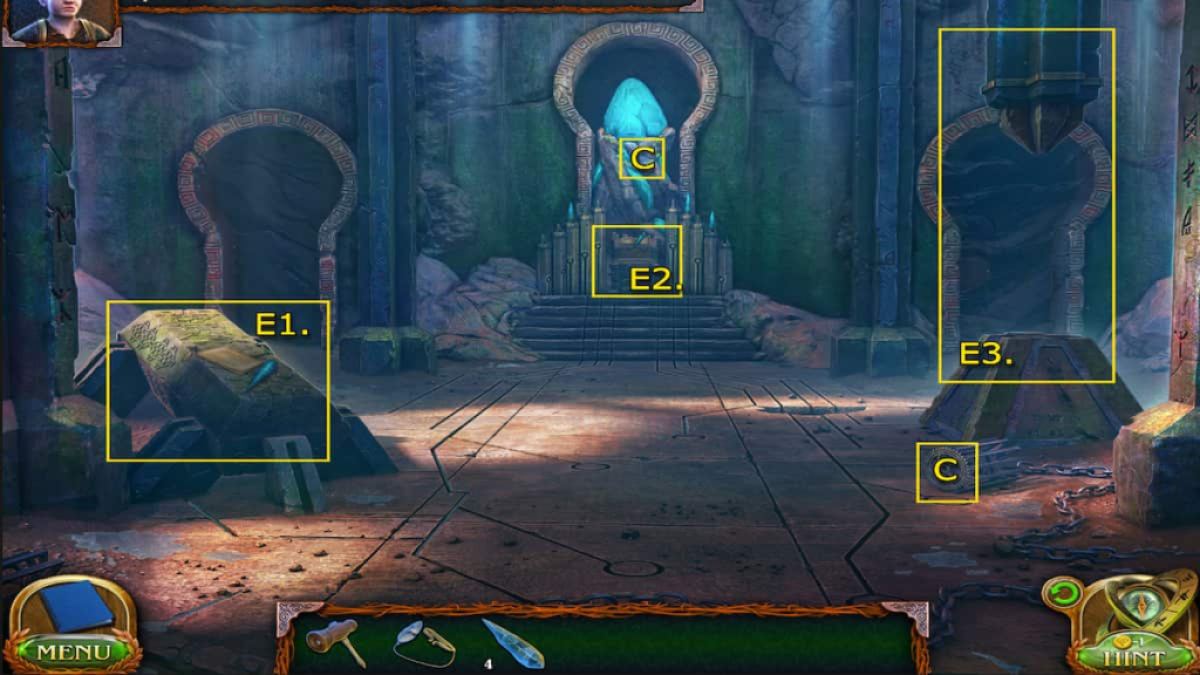
We’ve found the room with the Sarcophagus, potentially holding the rumored long lost treasure. We’ll have to find a way to open it.
- E1. Sarcophagus – Crystal candle, Manuscript 3/8
- E2. Altar – Crystal candle
- E3. Right Pillar – Crystal candle
- (Collectible) Fallen cage and chain on the right side – Gear 6/8
- (Morphing Objects) Chain and vine on the center crystal 9/45
In this room, we can work toward opening the Sarcophagus and seeing what’s hidden inside. To do that, we must interact with the altar at the front of the room. Locate the last few missing Crystal candles from around the room, and then begin following the rituals shown in the book on the altar.
How to open the Sarcophagus
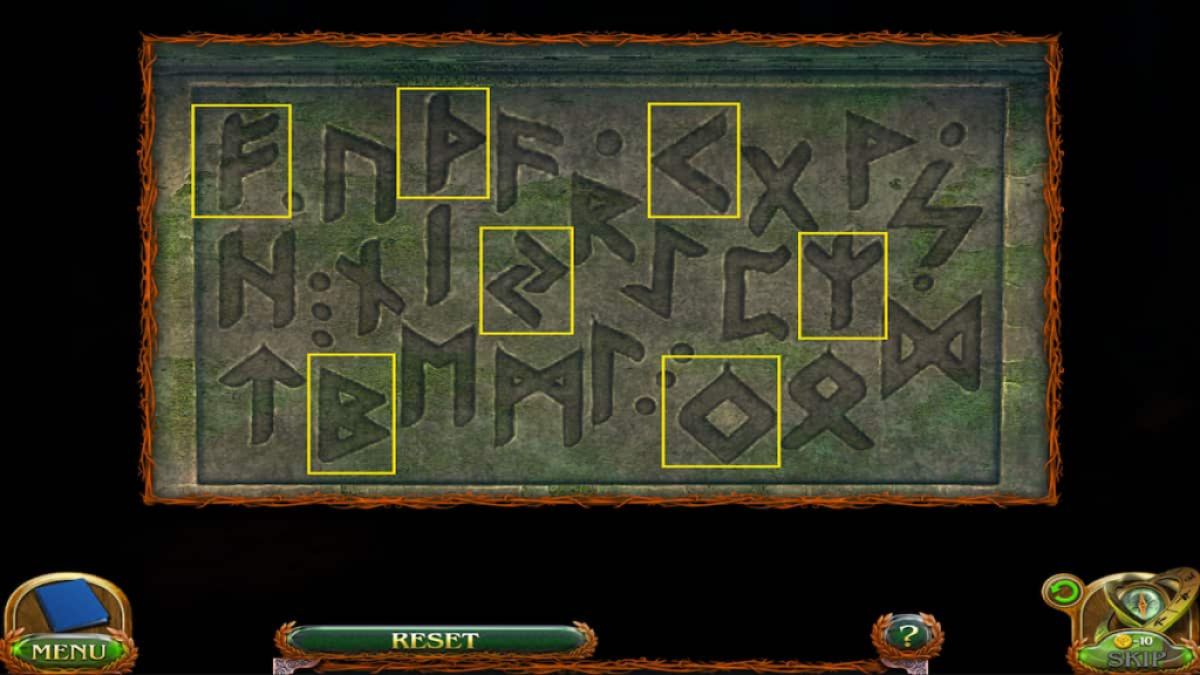
To begin this puzzle to open the Sarcophagus, interact with the altar and place all the candles into the candlesticks around it. This will open the altar and give you the Quill. Now you interact with the glyphs on the altar. Using the Quill, you’ll need to select the correct glyphs in the right order. This order is shown to us back on the painted wall at the Shelter Entrance, which we tore the planks from earlier. If you aren’t sure what the painting showed earlier, these are the glyphs you’ll need to sketch:
- F
- B
- P
- Two arrows
- Diamond
- Left Arrow
- Fork
This powered up the Sarcophagus, so now we can complete the puzzle on it and hopefully open it.
How to solve the Sarcophagus puzzle
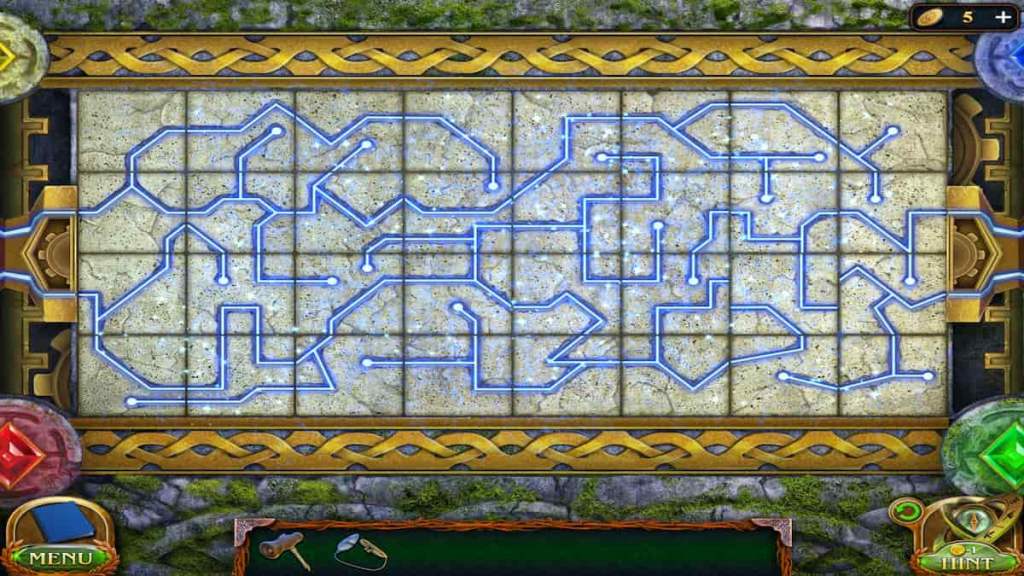
The puzzle is not too difficult but can take a bit of time. The goal is to rotate each tile until all the lines are powered. The tiles might look a bit different for you, but I would suggest working from the left to the right, turning all the tiles until you get them all lit up to the middle and continue over to the other side. You may have to backtrack and rotate tiles again as you get further. Remember, all lines must be lit up, so even if they are dead end tracks, they still need power. Use the picture above to help figure it out.
Once all the tiles are lit up, you will open the Sarcophagus, triggering a cutscene where Folly retrieves the Dagger from inside and him and his sister flee the cave together. You’ll arrive back in the Village and continue to the left toward your home.
Home – Yard
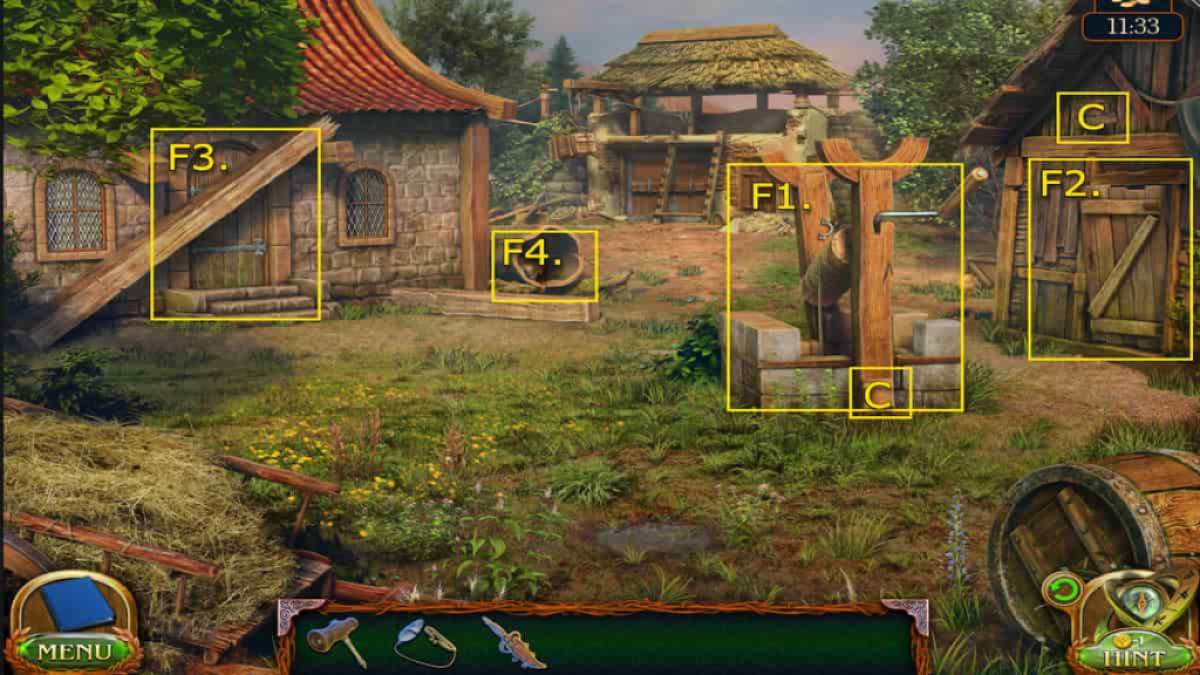
It appears there was some kind of storm that blew through your home yard. Things are left scattered and damaged, and Folly and his sister must make sure their mother is okay.
- F1. Well – End of the rope
- F2. Shed
- F3. House door
- F4. Dog in log
- (Collectible) Against the well post – Book 4/7
- (Morphing Objects) Shed window/board 10/45
Use your Screwdriver on the Well to fix the broken piece and place the bar on properly again. Then, look further into the well and use your Dagger to cut the rope from the snag. You will receive the End of the rope. With the end of the rope, tie the beam blocking the house door. You can try the wench on the well but we will be unable to move it right now. Open the shed door and uncover all the tools; you might need these later. Then, continue to the Backyard by clicking on the barn.
Home – Backyard
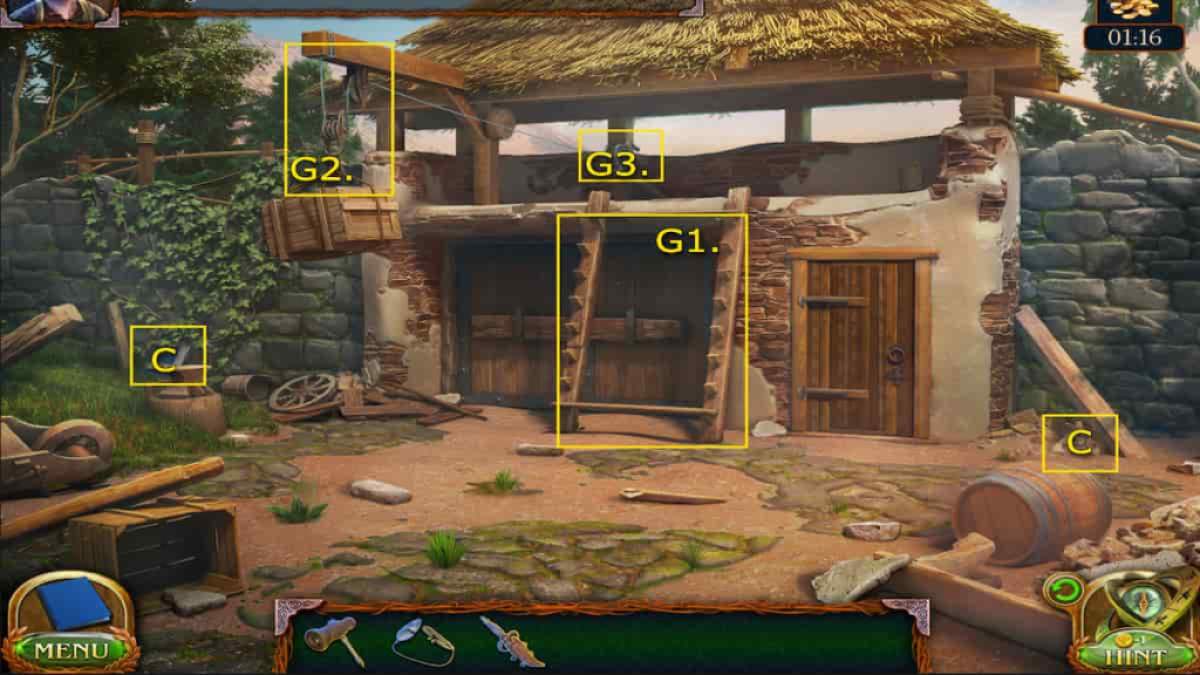
- G1. Ladder
- G2. Multipull
- G3. Reel
- (Collectible) Behind the vines on the stone wall to the left – Book 5/7
- (Morphing Objects) Stones on the right side of the house 11/45
We’ll need the hook and cable to help remove the beam from the house door. Interact with the broken ladder at the front of the barn and click on the planks beside it to collect them in a pile. Now, we can work on repairing the ladder.
How to repair the barn ladder
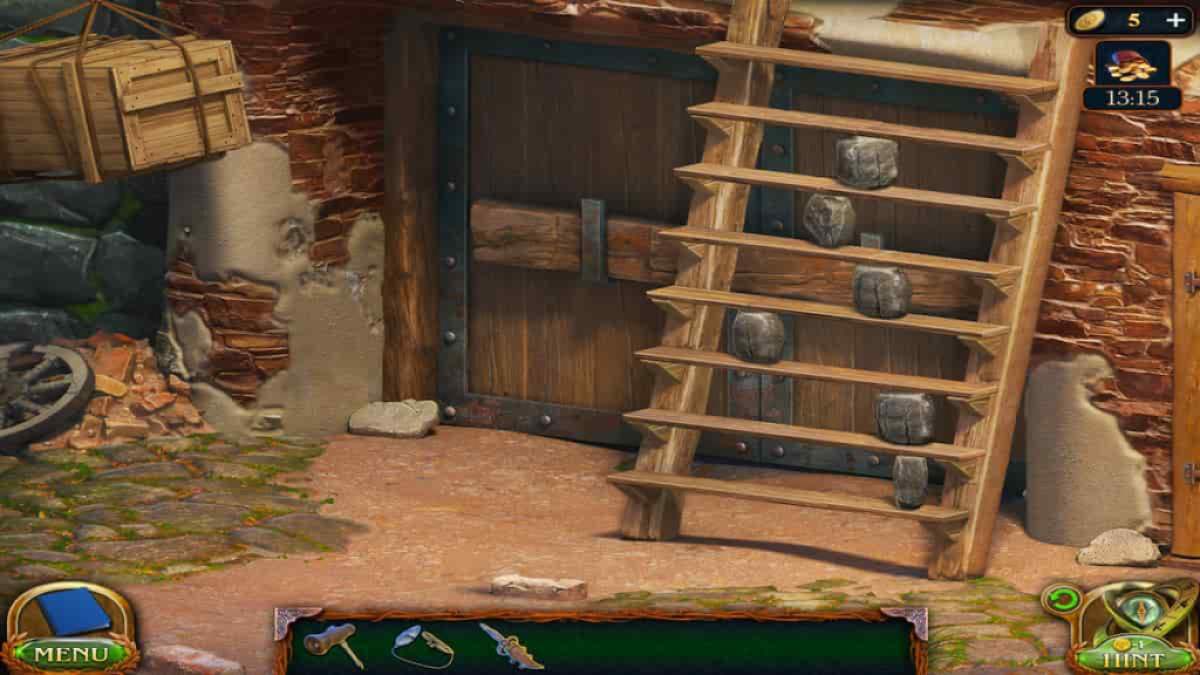
The goal to repair the barn ladder is to place the planks together to form steps. The planks are all different sizes, so you’ll need to place the sizes together until they align and form a step. You can do this several different ways depending on where you choose to place the planks. What I did was place all the long planks first, starting the longest at the bottom and working my way up. Once the long pieces were in, you can go back through and find the small sizes that fit in the gaps.
Once the ladder is repaired, you can reach the reel of the multipull. However, the cable is caught so you’ll need to head back to the Yard and collect the Wire Cutters tool from the shed we uncovered earlier. Now, use the Wire Cutters on the reel to cut the cable. Interact with the fallen hook off the ground and pick up the Power multipull.
We can now rig the Power multipull up to the beam blocking the house door. Head back to the Yard, use the Dagger to cut the rope on the beam. Then place the Power multipull hook onto the beam and reconnect the rope. Now we can use the wench on the Well again to pull the beam down and unblock the house. Unfortunately, we still need a key to get inside.
Where to find the house door key
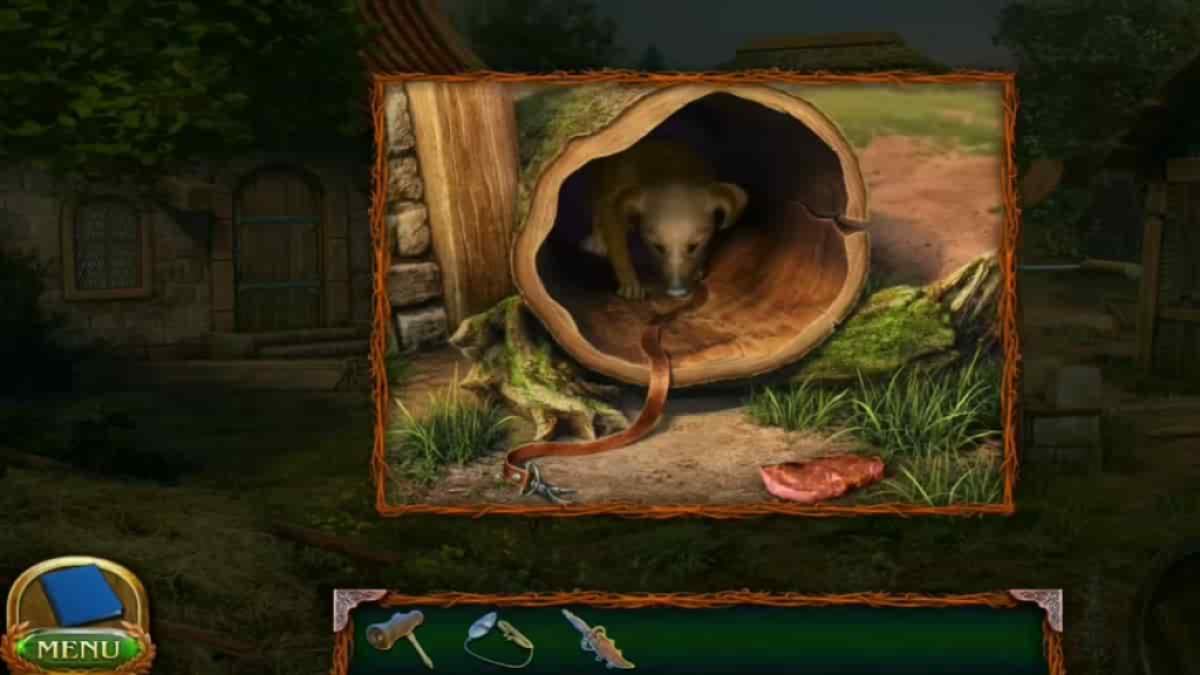
Funnily enough, to get the key we’re going to need to make the dog move out of the log beside the house. To do this, we’ll need some food for him. Head back to the Village and grab the Grilled meat we cooked up in part 1. Place the meat at the end of the log and the dog will crawl out. He’ll drop his Collar for you.
Select the Collar from Inventory, and then use the Screwdriver on it to unscrew the secret house key from it. Now, you can unlock the house and continue inside.
Home – Interior
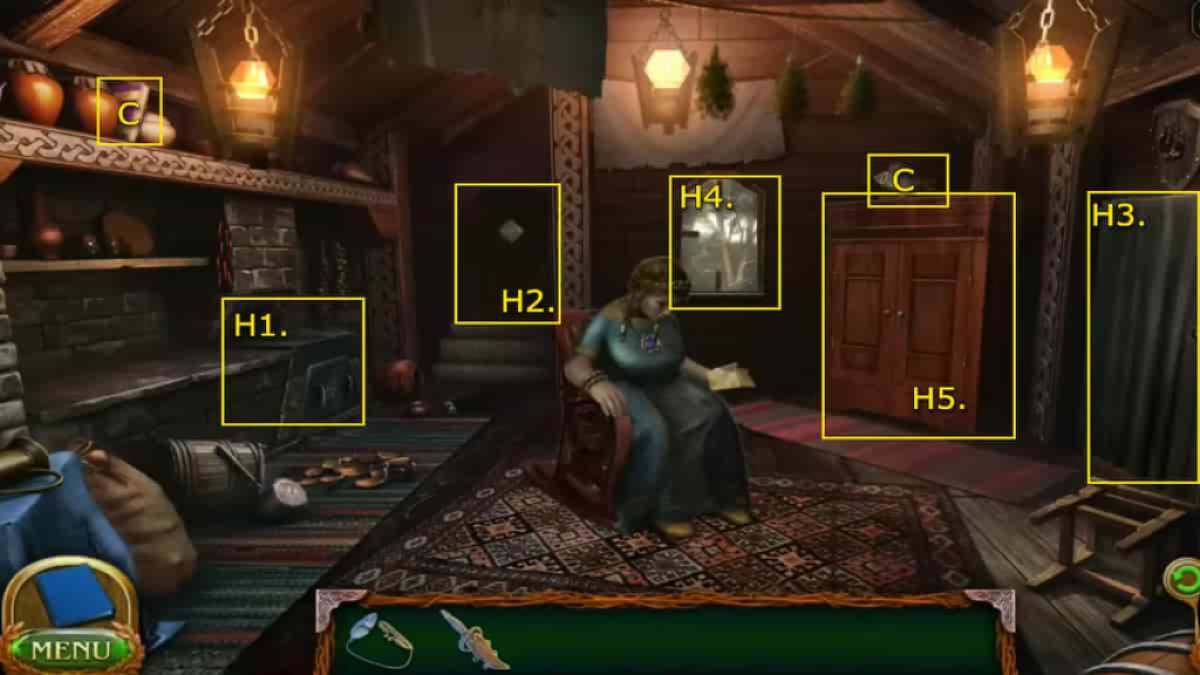
Folly and his sister will find their mother inside, but she is ill and the mystery still remains. We will need to figure out what happened here and cure her.
- H1. Back door
- H2. Oven
- H3. Door to Kitchen
- H4. Shattered window
- H5. Cabinet
- (Collectible) On the shelf on the top left of the house – Book 6/7
- (Morphing Objects) Fish/Bird statue on cabinet 12/45
Once you enter the house, interact with the unconscious mother in the chair to see a brief cutscene. You will retrieve a note from her with the instructions on how to make her medicine. Look at the oven to see where you will prepare the medicine, but you’ll need all the ingredients and the proper kindling. Continue to the right, behind the curtain, to enter the Kitchen.
Where to find all the medicine ingredients
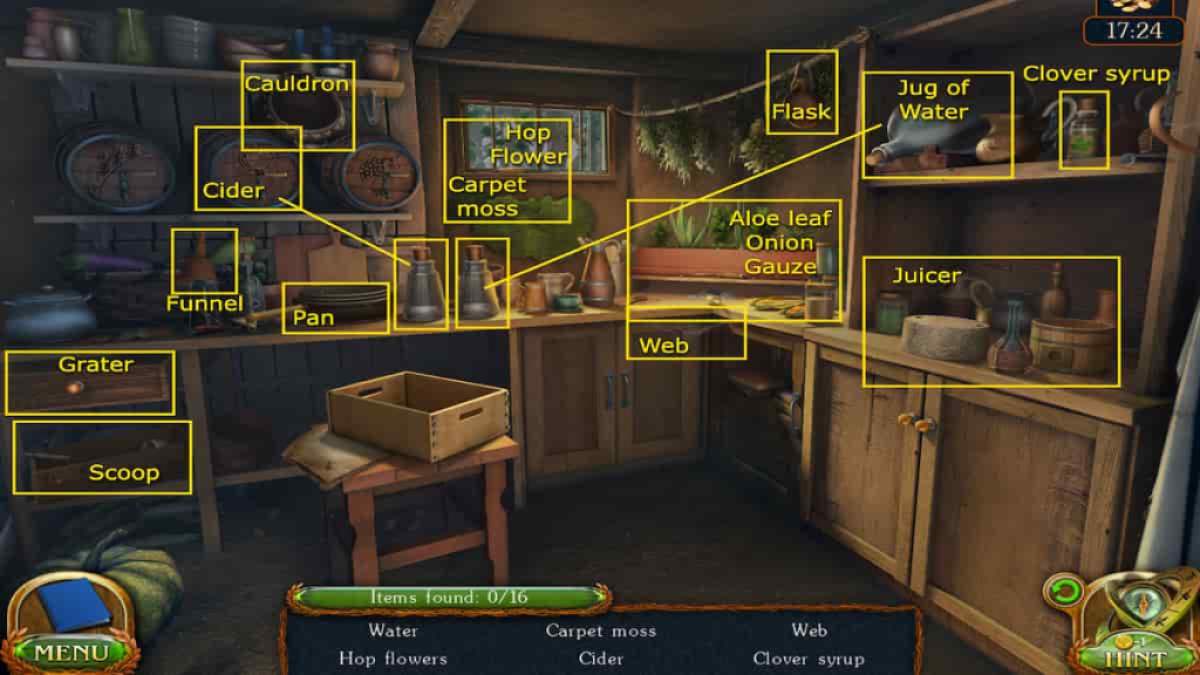
The kitchen has all the ingredients you need to make the medicine, but you’ll need to find them all in this cluttered space. Check the note in your Inventory to help you figure out what you need (once you do it will be displayed at the bottom of the screen). There are 16 ingredients in total. Here’s where to get them all:
- Water – Select vial on the counter and then the jug on the top right shelf
- Clover syrup – On the right shelf near the water jug
- Cider – Select other vial from the counter and then the barrel with apple symbol
- Carpet Moss – Take the tool from the window sill and cut off piece of the moss
- Hop Flowers – Open the window and grab a flower from the vines
- Web – From the corner counter
- Cauldron – On top of the barrels
- Pan – On the left counter behind the crate
- Aloe leaf– From the herb garden in the corner counter, use the knife to cut a piece off
- Onion – From the herb garden in the corner counter, middle plant
- Grater – In the drawer on the far left side
- Scoop – Underneath the drawer where the Grater was
- Funnel – On a bottle on the left counter
- Flask – Hanging on the rope above the herbs
- Gauze – Underneath the herb garden, remove beans on it
- Juicer – On the bottom shelf below water jug (Needs to be reassembled)
How to reassemble the Juicer
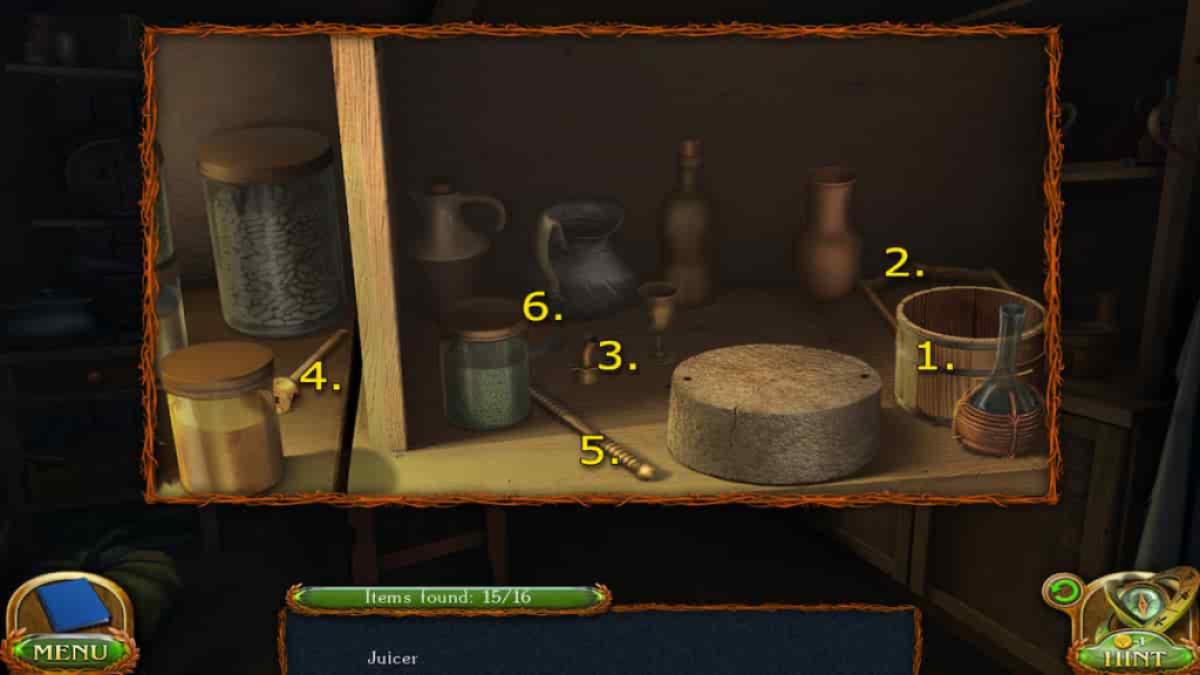
The Juicer is the only object that you will need to reassemble in order to collect it. It is on the lower shelf below the water jug on the right side of the kitchen. You can find most the pieces scattered around it. Here’s how to put it back together:
- 1. Place the wooden bucket on the circular stone
- 2. Attach the handle (in the back right) to the stone piece around the bucket
- 3. Put in the spout ( back left) on the front of the bucket
- 4. Place rod 1 (left cubby) into the top of the handle
- 5. Place rod 2 (directly to the left) through the other rod
- 6. Put the top of the bucket (behind jar directly to the left) on the bottom of the vertical rod
Now you can collect your reassembled Juicer. You’ll have all the ingredients you need now to start the medicine, but you’ll still need to start a fire in the oven. Unfortunately, to chop up some wood for the kindling, you’ll need to get into the Garden. To do this, you’ll need to create another way through.
Head back out into the Yard and collect the Axe from the Shed. Then, head back into the house and interact with the shattered window. Use the Axe to break out all the glass and allow you to climb through.
Home – Garden
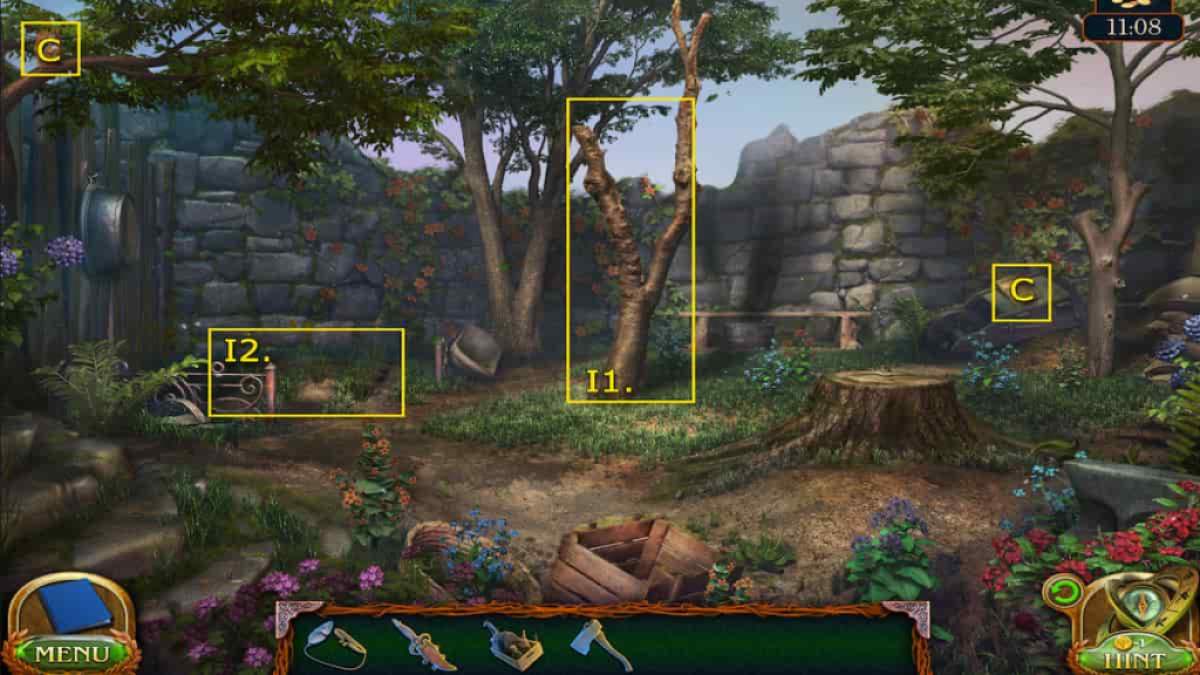
- I1. Dead tree
- I2. Flower spot
- (Collectible) On the wheel barrow on the top right side – Book 7/7
- (Morphing Objects) Squirrel/owl on the top left branch 13/45
Use the Axe on the Dead tree to chop it down onto the stump. Once it’s cut down, use the Axe again on the fallen pieces atop the stump to get Firewood.
Now that you have your Firewood, you can head back into the house and use it to start a fire in the oven. Place the Firewood inside the oven, then use your Flint to create fire. Then, place the Set of ingredients on the counter beside the oven to start making the medicine
How to make the medicine
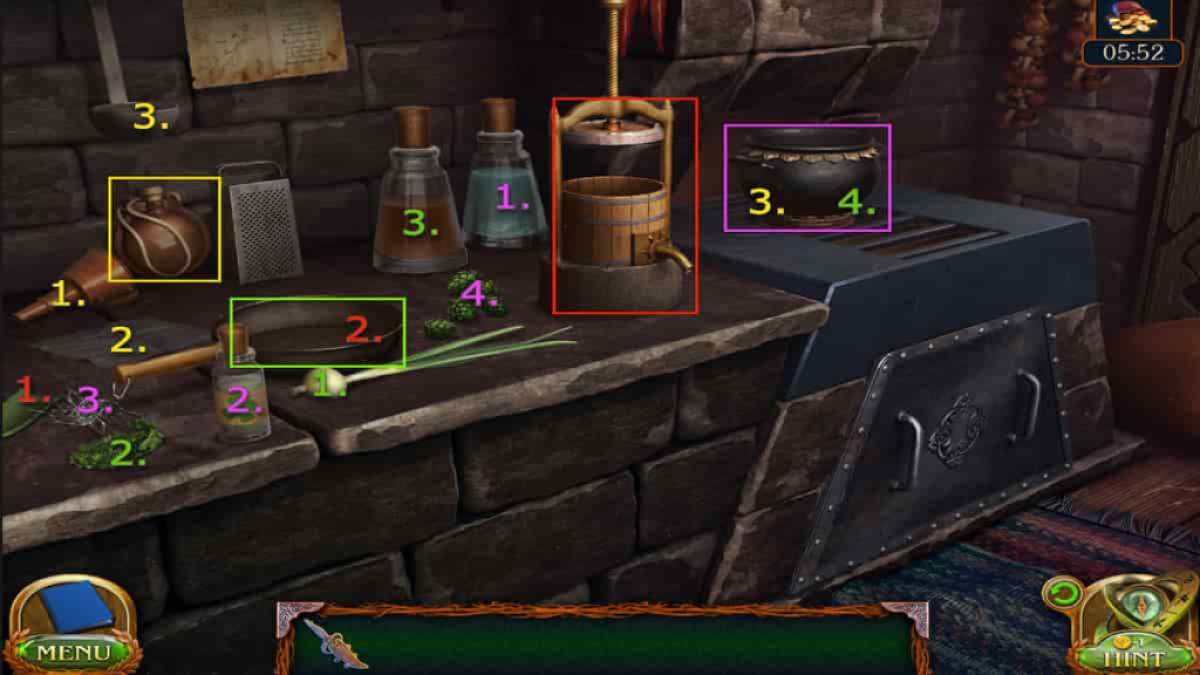
You have everything you need to get started on that medicine. The instructions from your mother are hanging on the back left side; you can look at it as much as you like to help you out. You’ll need to add items in the right order. Here’s how:
- Cauldron
- Pour the Water vial into the Cauldron on the stove top
- Add the Clover Syrup into the Cauldron
- Add the Web into the Cauldron
- Add the Hop Flower into the Cauldron
- Juicer
- Juice the Aloe Leaf (beside the web) using the Juicer
- Squeeze the juice into the Pan
- Pan
- Grate the Onion on the Grater in the back of the counter and add to the Pan
- Place the Moss into the Pan with the grated onion
- Pour the Cider vial into the Pan
- Add all pan ingredients into the Cauldron
- Flask
- Click on the Flask to retrieve it and then add the Funnel into the Flask
- Place the Gauze over the Funnel
- Grab the Scoop (hanging beside the instructions) and pour the contents of the Cauldron into the Flask through the Funnel
You have finished the medicine and can now give it to the mother in the chair. Select it from your Inventory and click on the mother to initiate another quick cutscene. The mother will give you the Cabinet key. Use it on the cabinet in the back right corner where you will find a shape puzzle.
How to solve the cabinet shape puzzle
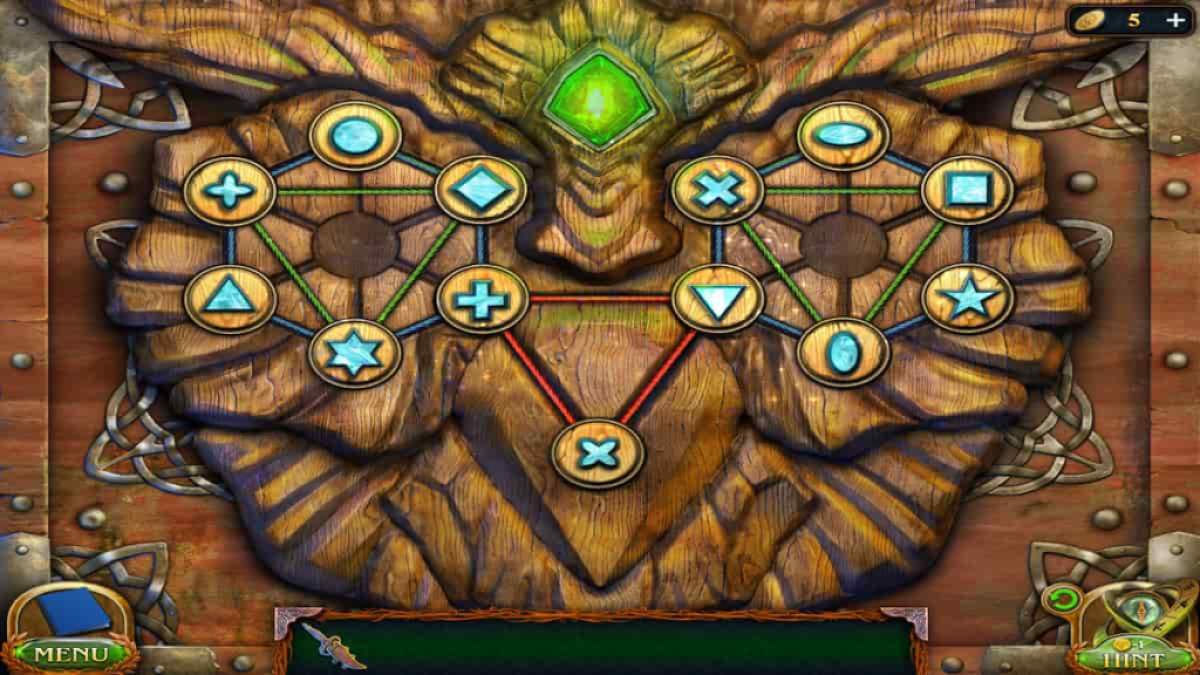
The goal of this puzzle is to make sure none of the ropes are overlapping by moving the shapes around to their correct slots. Clicking on a shape will move it to the only open slot or highlight the slot options if there are more than one. The shape of the slots will show you where each piece needs to go. Keep moving them around to get them in each of their corresponding slots and untangle the ropes. Use the image above to help you figure out where to put them all.
Once the shapes are in all the correct slots and the ropes form three different colored triangles, the cabinet box will open and you can grab the Family seal and the Gate key. Head back to the Backyard where the Barn is and use the Gate key to unlock it. You can continue through the Cliffside.
Cliffside
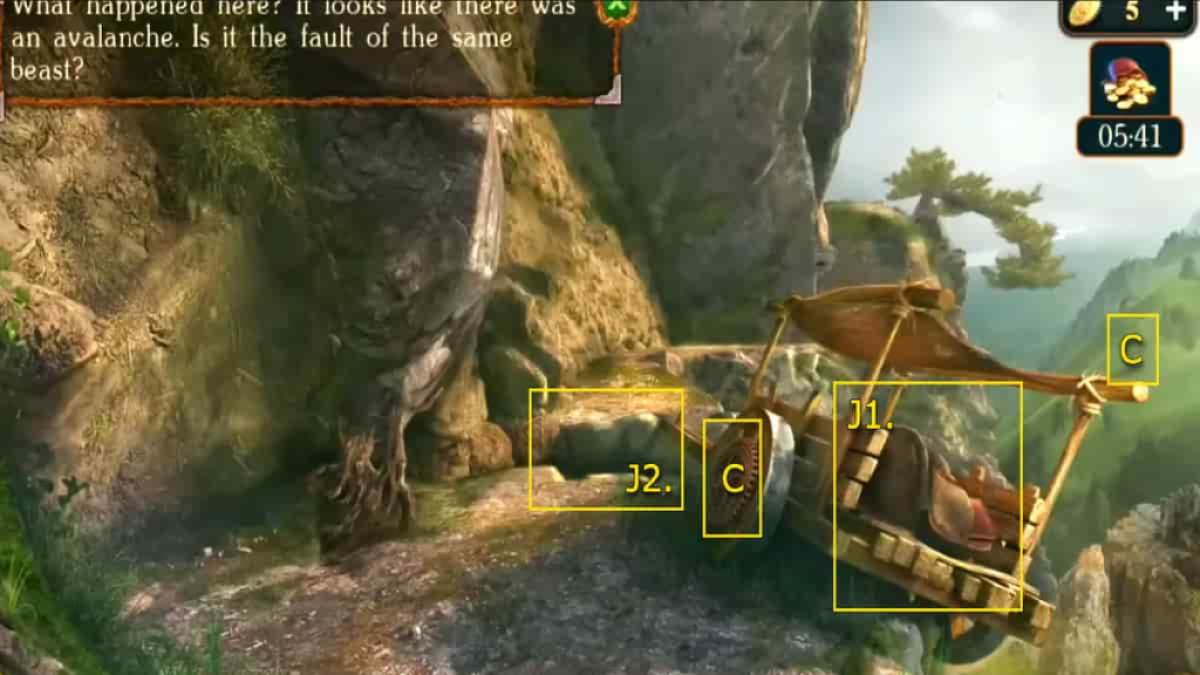
- J1. Wagon – Patterned Chip
- J2. Chest stuck in the ground
- (Collectible) On the wagon wheel – Gear 7/8
- (Morphing Objects) Tree in the background on the far left 14/45
You’ll find an abandoned wagon hanging on the side of the cliff. Investigate the objects in the wagon to retrieve the Patterned Chip. Then, look at the gap in the path to see a chest stuck in the ground. You’lll need something to grab onto it.
Return to the Yard and grab the Shovel from the Shed and the Leash from the log where the dog was lying before. Head back to the chest and use the Leash to hook onto the handle so it’s secure. Then, use the Shovel to dig out the chest.
How to unlock the symbol chest
Now that you have the chest, place the Patterned Chip in the top of it to begin completing the puzzle and opening it fully. The goal is to recreate the symbol shown in the center by rotating the symbols on the outer ring around it. Not all of them will be used every time. Just rotate the ones that match and then select the symbols that go together to progress. There will be several different main symbols to recreate (until all the symbols around the outer rims are gone) and here are the symbols you’ll need to use to complete each one:
- Symbol 1: The cross and the crosshair with dots
- Symbol 2: A with dots and squiggly line with cross
- Symbol 3: Gate with a curve and cross with a seven
- Symbol 4: Cross with a loop and mountain
- Symbol 5: M with a tail, two parallel lines, and cane
- Symbol 6: W, slanted cross, and z with a tail
- Symbol 7: Slanted S and upside down 7
- Symbol 8: M with a loop and slanted V with a loop
- Symbol 9: A on its side and 4 with a tail,
- Symbol 10: Crossing p and y and J
- Symbol 11: Slanted P and squiggly line
- Symbol 12: Target and lines
- Symbol 13: Diamond target, diamond with lines, and crosshairs
- Symbol 14: Diamond in a box, diamond outer lines and x with up arrow
When the chest is unlocked, you can grab the Fast time potion from inside and then continue down the path along the cliffside.
Family Crypt
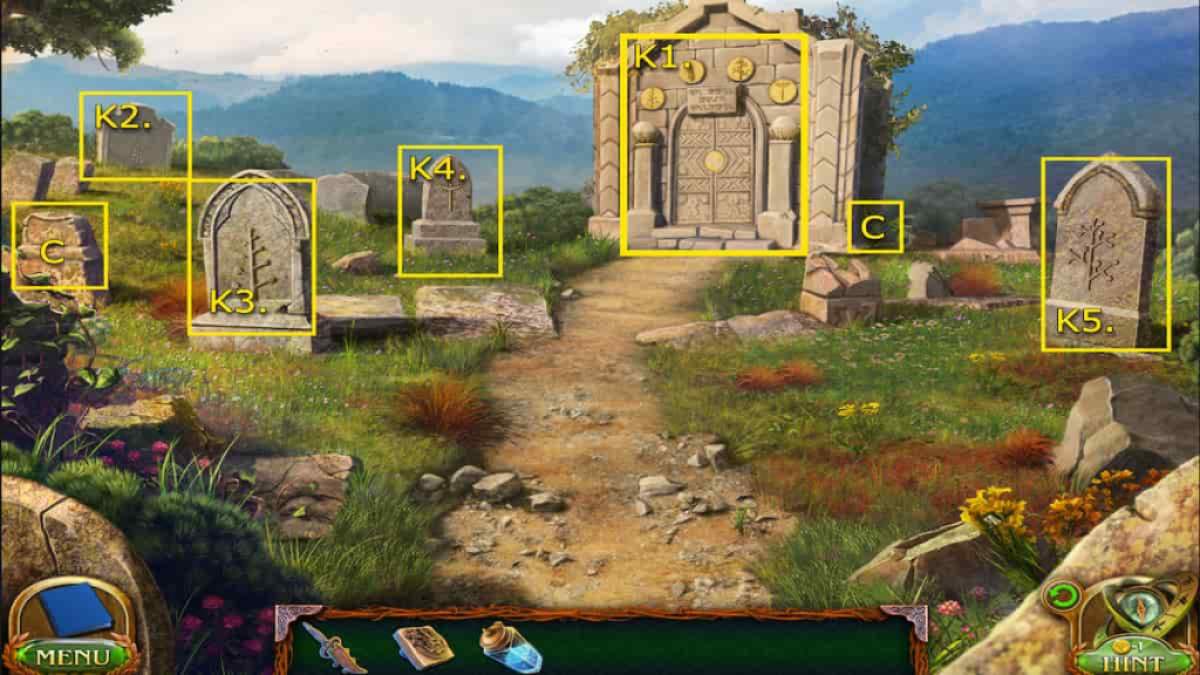
Folly’s come to his family’s crypt seeking answers locked inside. We’ll need to complete one last puzzle to unlock it.
- K1. Crypt
- K2. Grave 1
- K3. Grave 2
- K4. Grave 3
- K5. Grave 4
- (Collectible) On the right side of the crypt – Gear 8/8
- (Morphing Objects) Gravestone on the left side 15/45
Check out the Crypt to see the symbols shown on the top of it. It will prompt you to ‘honor’ the lost loved ones. To do this, we’ll need to have some flowers to place on the graves.
How to plant flowers for the gravestones
Return to the Yard and grab the Hoe from the Shed. Go to the Backyard and look at the bags of flower seeds that dropped from the multipull earlier.
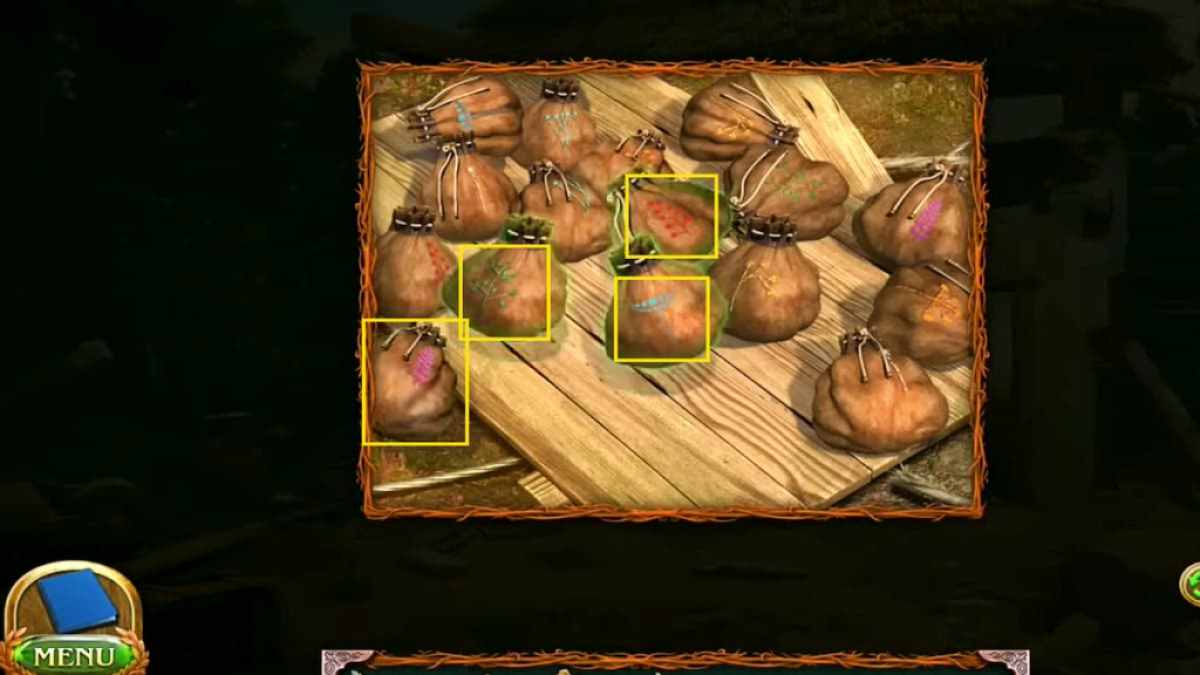
You’ll need to grab the correct seeds by matching the symbols on the bags to the symbols on the Crypt. These are the ones you’ll need:
- Purple frond
- Green tree
- Blue crescent vine
- Red bulb vine
With the seeds, head to the Garden and look at the flower spot on the ground in the back left corner. Clear the weeds and then use the Hoe to dig up the ground. Now grab your flower seeds and plant them in the ground.
You’ll need water for your flowers, so head to the Schoolyard and look at the fountain. Grab the pitcher on the fountain and scoop up some water. Select your Jug of water and add the Fast time Potion. Then, return to your Garden flower spot and pour the Enchanted water on the ground. Now, grab the flowers using your Dagger and return to gravestones.
Where to place the flowers on the gravestones
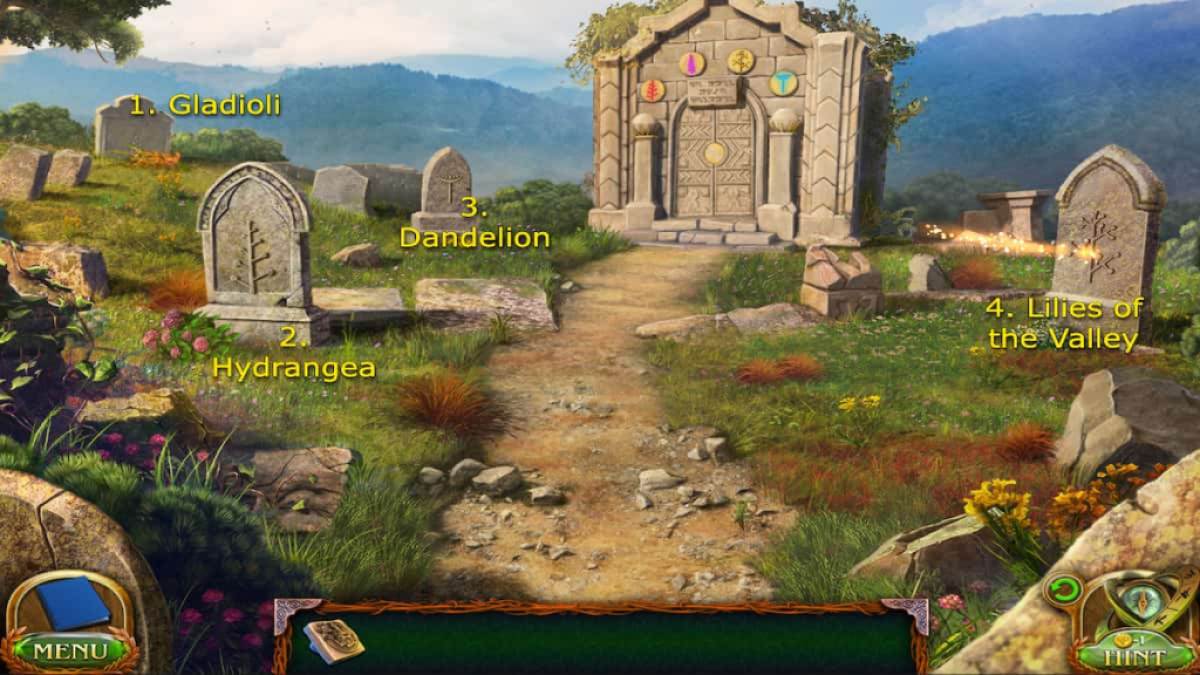
Now that you have the flowers, you’re going to need to place them on the proper gravestones. Use the pictures above and the list here to help you place them:
- Grave 1 – Gladioli
- Grave 2 – Hydrangea
- Grave 3 – Dandelions
- Grave 4 – Lilies of the Valley
When all the flowers are placed, you can look at the Crypt door and add the Family Seal into the open slot. Enter the Crypt to complete the last puzzle of Chapter 1.
How to solve the Crypt puzzle
The goal of this puzzle is to move the gemstones across the rods using the arrows on the sides until they all fit into their proper slots. This may take a few minutes since you will have to keep moving them until you get them lined up correctly. The best way to line them up is to form them into the square shape first and then move them altogether to the center. Try to look for every possible path you can move on the rods. If pieces are blocking one direction, move down another that leads to the same spot. Use the pictures above for reference.
Once you finish this puzzle you’ll be able to collect the weapon from the top of the Crypt and successfully finish Chapter 1. Continue with Chapter 2 Part 1 right now!
Looking for more Lost Lands content? Check out our guides on Lost Lands 7 Redemption Walkthrough or Lost Lands 6 Walkthrough – Mistakes of the Past!
